
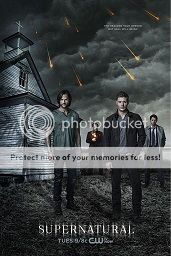
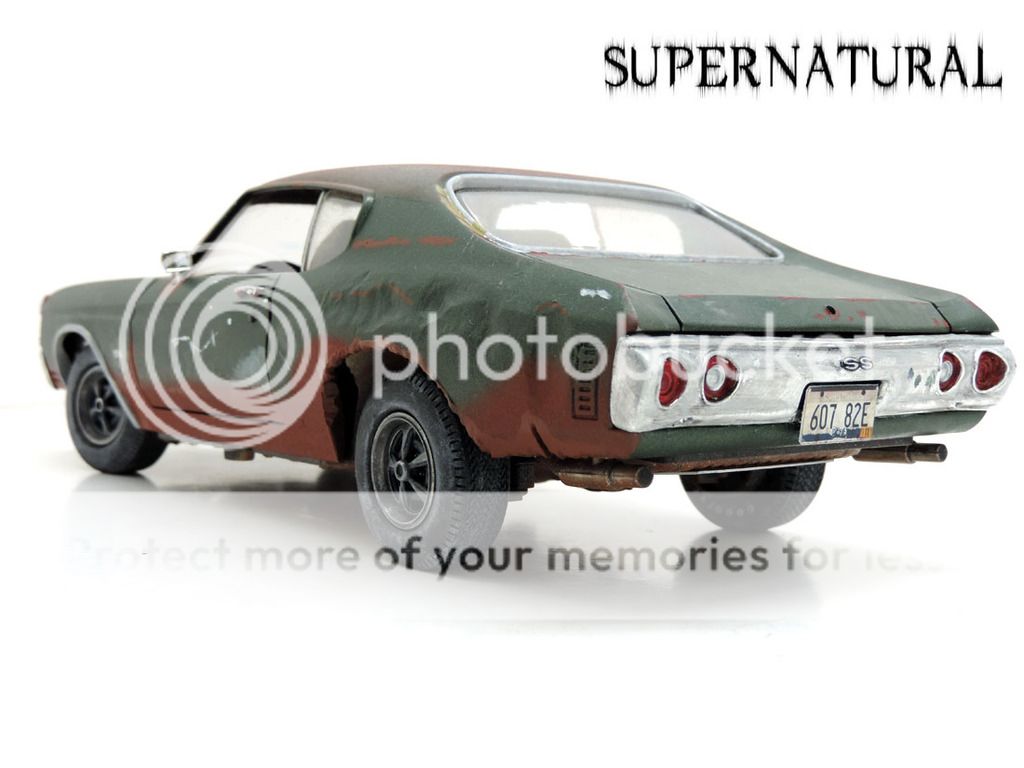
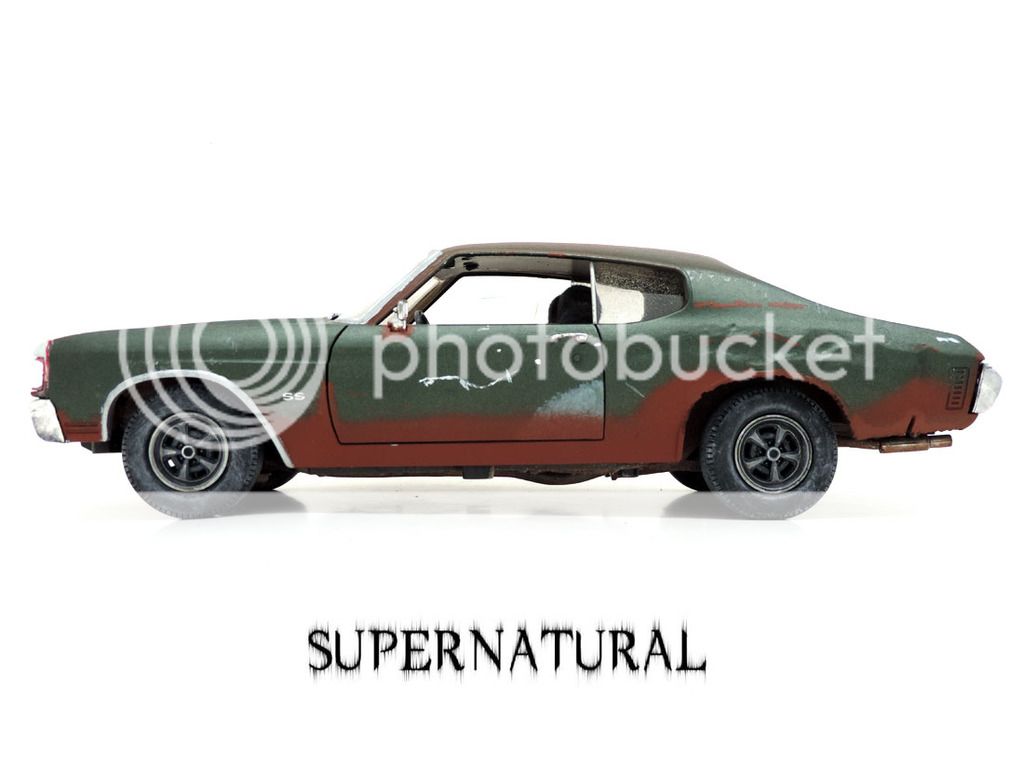
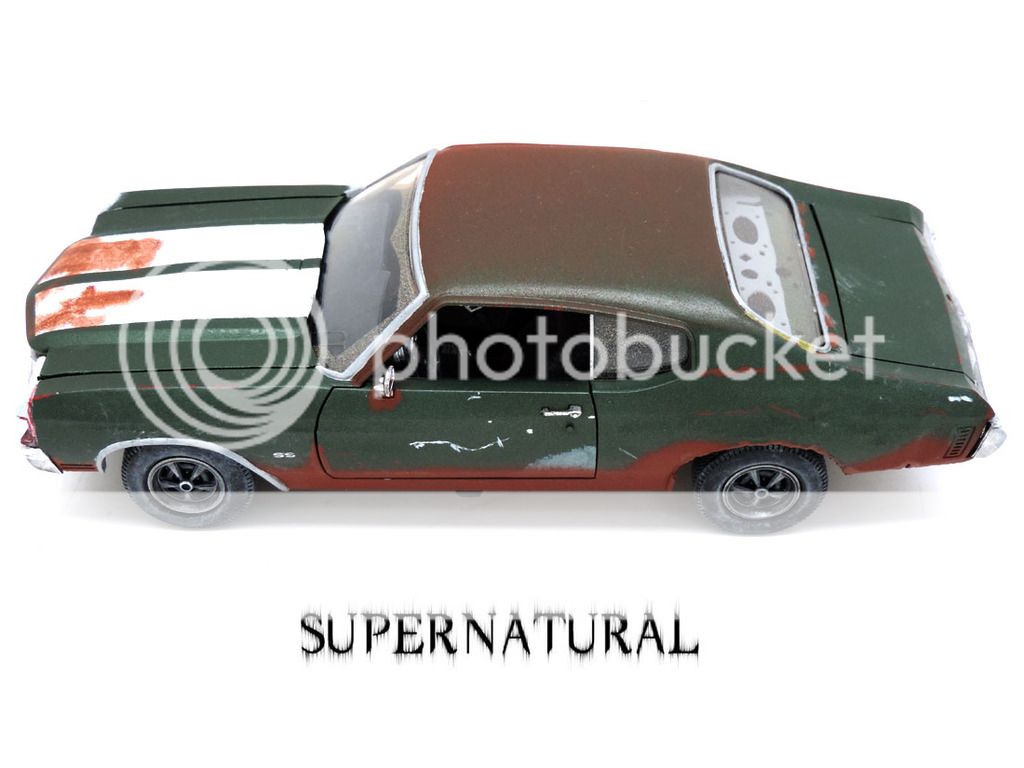
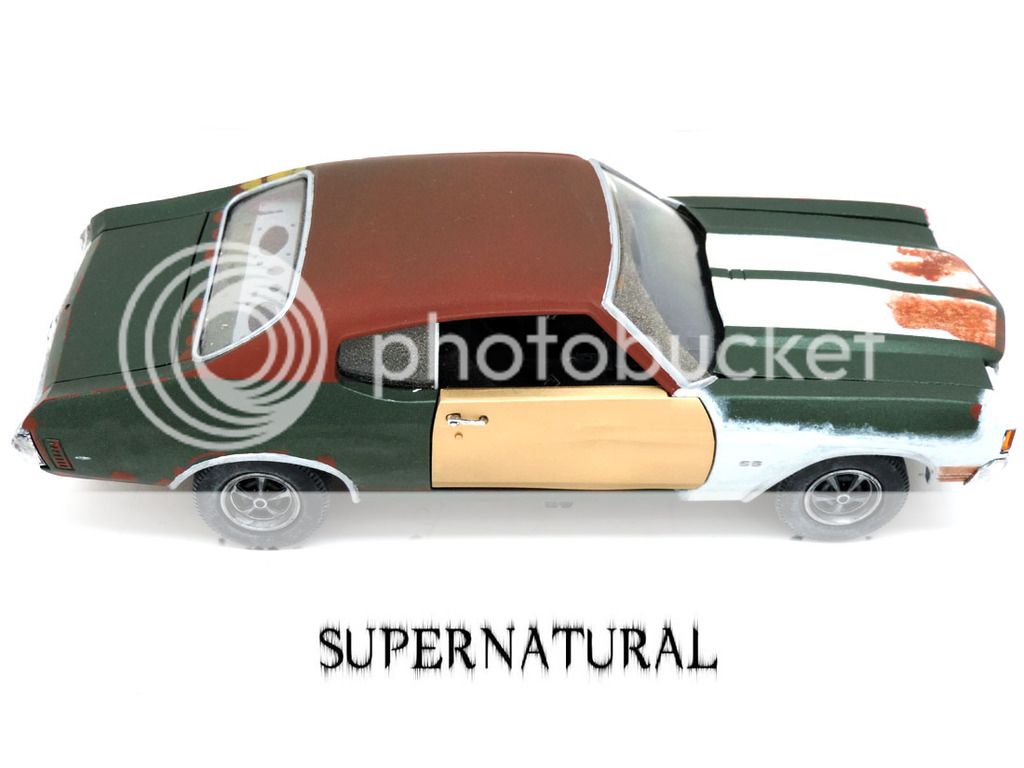
1972 Chevrolet Chevelle (Bobby' Singer's car) from "Supernatural"
... by Cuda Jeff's Customs
Year of model release : 2012
Year of customization : 2015
Based on item : 2015 Auto World #109
Hours to complete it : 160 (average of 32 hours per car ... yes I made 5 of those)
Distributor : Warner Brother / CW
Number of seasons : 10
Television premiere on : September 13, 2005
Last episode airing on : Show is still running ... renewed for season 11 & 12
Starring : Jensen Ackles, Jared Padalecki, Misha Collins, Mark A Sheppard, Jim Beaver
Synopsis : The show follows two brothers, Dean & Sam Winchester, as they hunt Demons, ghosts, monsters and all other supernatural beings in the world, behind the wheel of their 1967 Impala loaded with all kind of weapons.
Supernatural is one of my favorite TV Show since it's been on!
…. the story of how I got "trapped" into making these customs is quite interesting … here's all it all started …
Keep in mind that all of these littles stories are all connected to each other …
![Image]()
Greenlight already released the deceiving black 67 Impala last year … but has no intentions of releasing Bobby's 72 Chevelle … so I had this custom project sitting in one corner of my mind since the Impala has been out … but what was stopping me is the little fact that there is no 1972 Chevelle Hardtop made in 1/18 scale ... which is KIND OF a big problem!
Yes, some of you will say that Maisto did make the model … correct … well not so much … you see, Maisto did the convertible …. and they decide to make a crappy "hardtop" out of it, by simply removing the top booth cover and place a separate plastic piece consisting of the new windshield with top the body.
It was probably due to reducing production costs, instead of creating a new mold … but, it surely look odd with the huge gap that is all around at the junction of the top, trunk and rear fenders … it is so odd looking and since top is plastic, it would have given a very shitty look once completed , plus it doesn't really recreate the real roof line of the hardtop… and I'm too anal about details to just be okay with that!
Now …
Among my very good friends, there's a guy who lives in Kansas, his name is Rick Blevins ... he used to be on DX (Projectthx138) ... but hasn't logged in over a year ago.
To place him in this story, he's THE reference when it comes to cars, props, weapons, wardrobe, etc ... everything related to the Supernatural show. Why?
A - He's without a doubt, the biggest fan of the show
B - He's very close with the show production team and crew
In fact, my good friend also builds true replicas of the famous 67 black Impala and the last one he built for one of our "Supernatural Sister" (Stefany) , was used in season 9, episode 20, that was filmed in Chicago last year, the only episode that was filmed in USA ... that episode had to be filmed in the windy city because it was serving as a springboard to launch a new series , a spin-off, of which the story was setting in Chicago.
Rick's quality of work is so perfect, that the production team asked him if it was possible to use the car he built for our common friend, Stefany. Since the show is film in BC, Canada … having to transport the couple of Impalas they use on the show ... PLUS ... all the weaponry the Winchesters have in their weapon box, stashed in the trunk of their car … Customs would have been a real freaking nightmare!!!
And since my friend Rick has all the real replicas of all the weapons they did used on the show since the very first episode … the production just told him which weapons they would need for this one ... so they filled up the weapons in the Impala's trunk, got the car in a close trailer and him, Stefany and her boyfriend went to Chicago, all paid expenses for 4 days and got to be on the set and meet with the cast and crew AND NOW, she has a studio certification that proves that her car is now a screen-used Impala! THAT IS SO FREAKING COOL FOR HER!!!
So getting back to my little Chevelles project now ...... a few months later ...
Rick and I, we called each other once or twice each week. And during one of these calls, I put myself into trouble because, my huge cakehole and I, made the mistake of mentioning that I was THINKING about the POSSIBILITY of MAYBE EVENTUALLY , make Bobby's Chevelle ... now that wasn't a smart move from my part, especially telling that to someone who's an even bigger crazy fans then I am. LOL
Now guess what happened ...
The next phone call he gave me a few days later, he told me that he had told 3 of his friends about my, possible, next project … and those 3 friends of his were not any average Joe
![Image]()
:
- Jeff Budnick : (creator of the real 67 Impala that is on the show and he's the owner the real Chevelle that Bobby drives. Jeff is also the guy who's in charge of all the cars on the show from the beginning in 2005) …BTW, the reason why the replicas that Rick is building, are the most faithful replicas you can find, it is because they're' all built according to the original specs, measures and details of the real true car of the show, provided by Jeff Budnick himself ... which is also why the production did not hesitate to use the car he built for the episode in Chicago.
- Eric Kripke : (Supernatural's creator - also executive consultant , writer , executive producer & showrunner) ... (although I think it is going to him, but with my memory problems due to chemo treatments, I remember my friend telling me about him in this project but I'm not sure anymore if it's Kripke or someone else from the show)
- Jim Beaver : (actor who plays Bobby Singer in the series, the Chevelle is its character's car)
Those guys are all cars nuts like us, they have seen all the previous 21 movie/tv customs I've made ... because my buddy have share every one of my custom links with these guys …. And after seeing my Dumb & Dumber van, they convinced him, to convince me, to make one for them too!!
Gotta tell ya, at first I wasn't very happy about the situation, I felt trapped with the obligation to accept
![Image]()
... I mean how could I say no to these guys???
And my friend is doing so much for me since January 2014 (things I cannot talk about yet), so I just couldn't say no to him .... and by doing so, I had to say yes to the 3 other guys ... but to know that 3 of those cars, would go to those 3 guys , made me quite nervous!!
![Image]()
As for the other 2 cars, of course I was building one for me and the other one was for my Supernatural Brother, Rick.
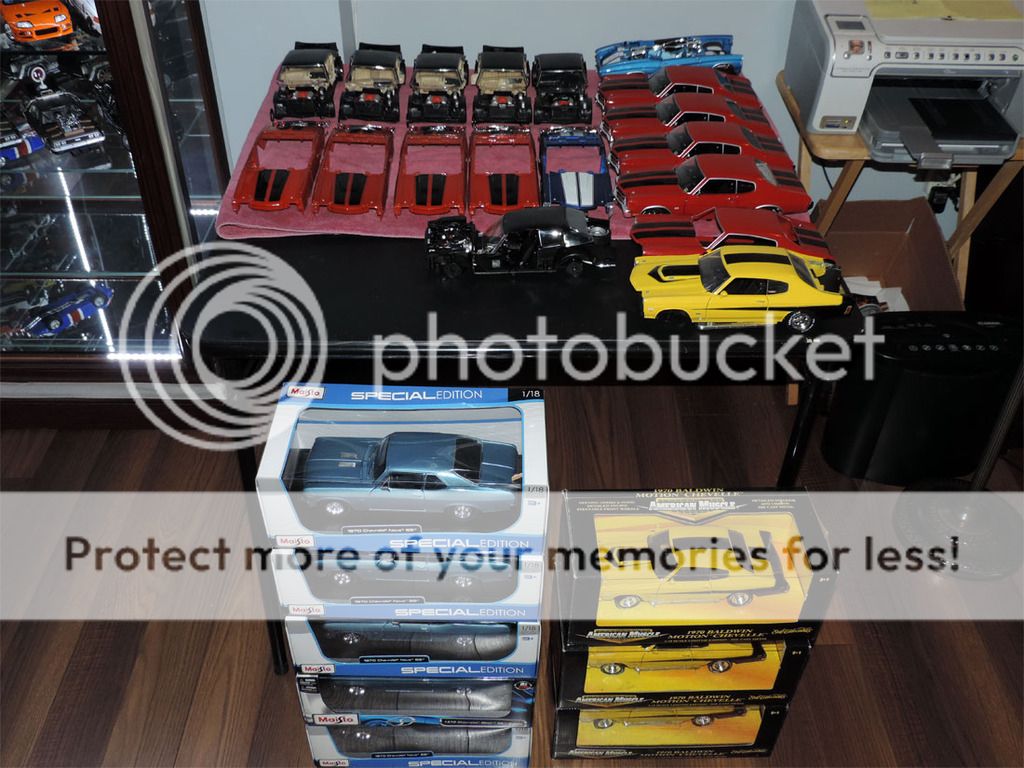
So, from then on, I've been officially commissioned to make 5 custom models of the same Star Car ... 5 models of a car that doesn't exist in 1/18 scale … I just had to get my mind wrapped about how to get out of this mess by finding solutions to make that possible! Can you imagine the difficulties I was facing regarding this project??
... and I knew I needed those models to be the best accuracy possible ... as, of course, all my customs are … but those needed to be the best work ever I could do ... because among those 5 cars, 3 are actually going to people that I surely didn't want to disappoint!
So you can understand the pressure I had on my shoulders to make those cars has perfect has they could be! ... my reputation as a customizer was on the line!!!
And as a MEGA FAN of the show, I SURELY don't want to disappoint them IN ANY WAY!
So that was it for the stories behind the built … hope you found the story interesting!
![Image]()
Now what I like about making a new custom is that I'm improving my skills on some work I've done on other models ... and trying something new on others. For instance, for these models :
- Create a year model that doesn't exist in 1/18 form yet, so I had to cut, replace and weld parts from one model onto another on … x5
- Creating new parts
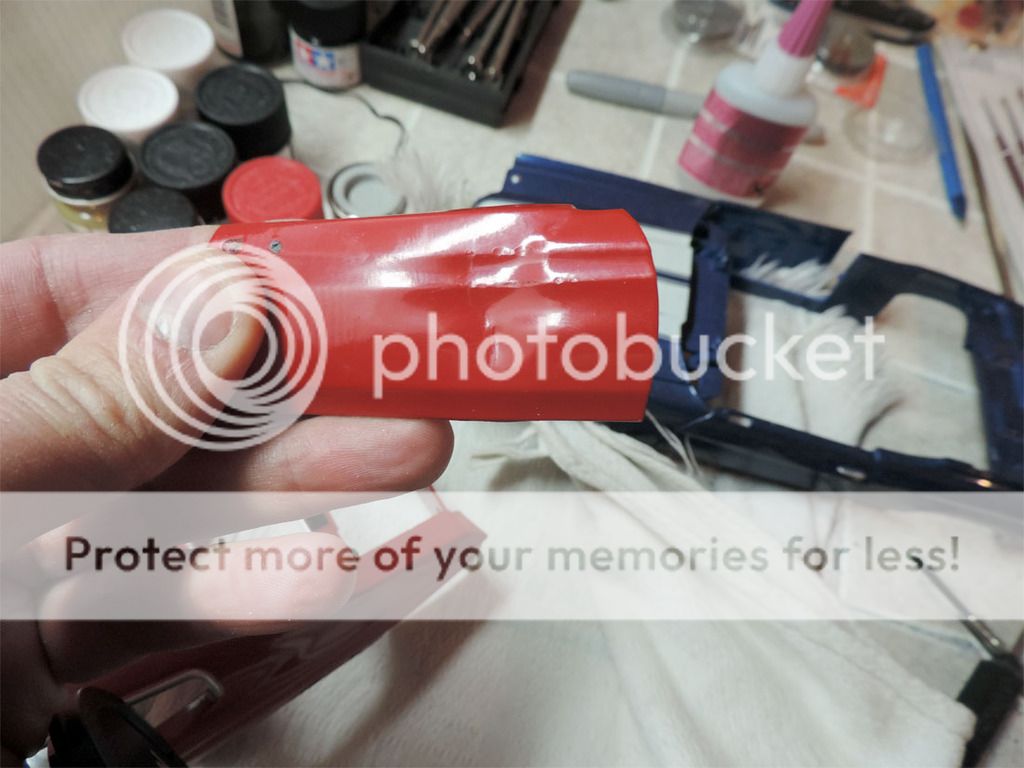
- damage body parts by recreating dents … man that was something!!!
- make a multi-color car
- make decals
- create an aged-look on the entire car, inside & out
- make all the same steps x5 .... it was the very first time I was making more than one of the same custom model, and by doing so, making them for customers and getting paid for.
So as I usually do with all my customs, here's the "making of", of those very complicated creations …
I hope you'll find it interesting
Here's the pictures now ...
Please keep in mind that pictures NEVER does justice to what it really looks like for real ... also, lighting in my work place is very shitty for taking pictures
As for every custom I make, I had to find movie references and do many movie screengrabs ... for the very first time, I couldn't be more better serve for this project has the real owner of the car, that is used on the show, Jeff Budnick, sent me about 50 pictures of every freaking details I asked about … and those are details that NOBODY else has seen beside the show crew & cast. So I feel privileged to be able to have those pictures from THE GUY himself!
![Image]()
I started my project by deciding which Chevelle was going to use, to be my main car to transform into a 72 Chevelle.
So I chose to use the Auto World Jack Reacher 1970 Chevelle. Basically, 70 & 72 year model are sharing the same body, only the front is different … and of course, the rear bumper/light panel.
I did some testing with many other 70 Chevelle that were made in 1/18 scale, but there was always something that didn't fit to match the front end of the Maisto 71 model … I took the Jack Reacher version because it was the best match.
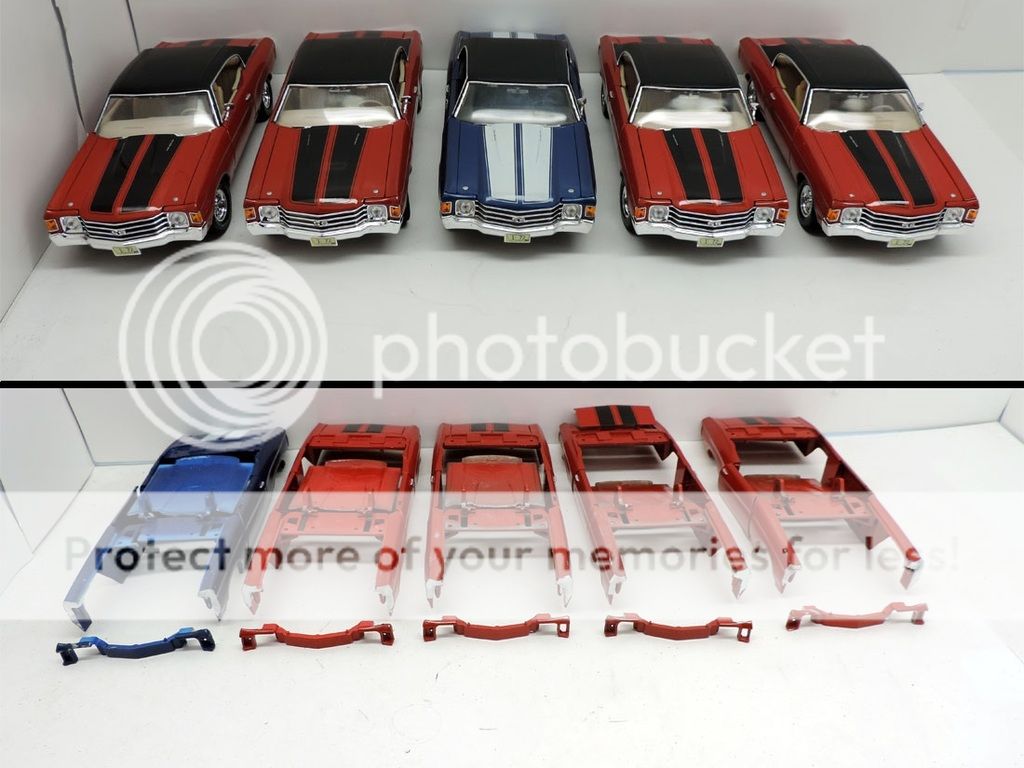
But as you can see, as in many TV show like Dukes of Hazzard, many Chevelles were destroyed during the process as I needed 5 different cars to make 1 Chevelle :
- Auto World 1970 Jack Reacher model that I was transforming into the 1972 Bobby Singer car
- Maisto 1971 Chevelle (vinyl top version) for front ends & corner lights which are different from the convertible
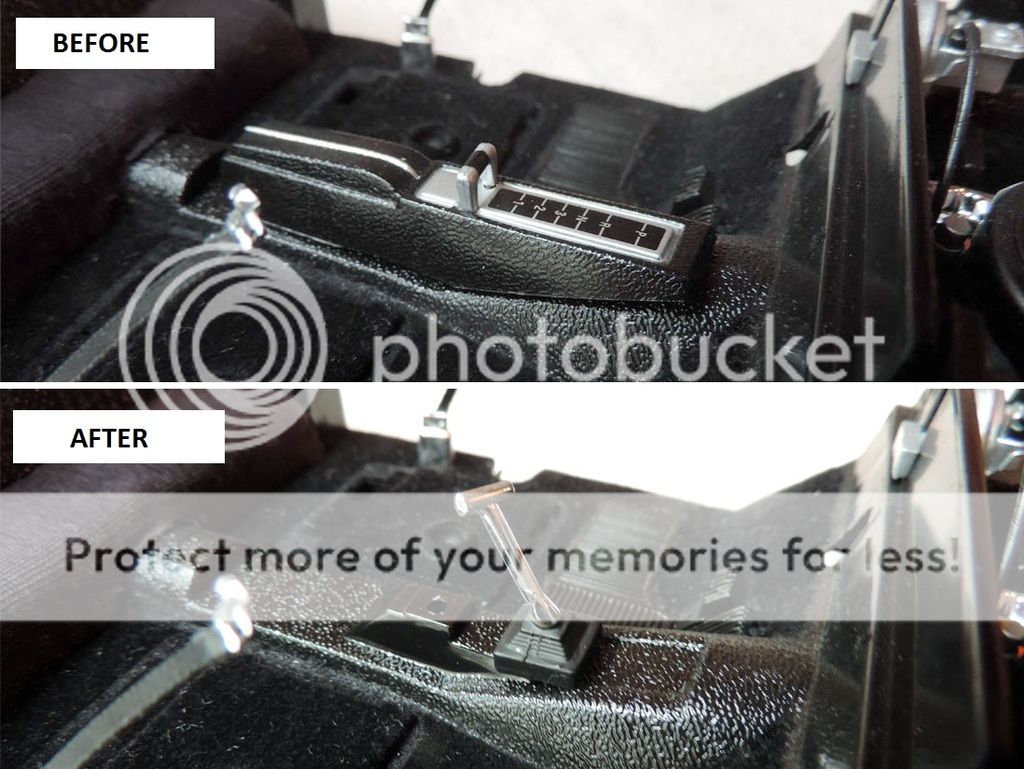
- ERTL 1970 Baldwin Motion for the T-Shifters
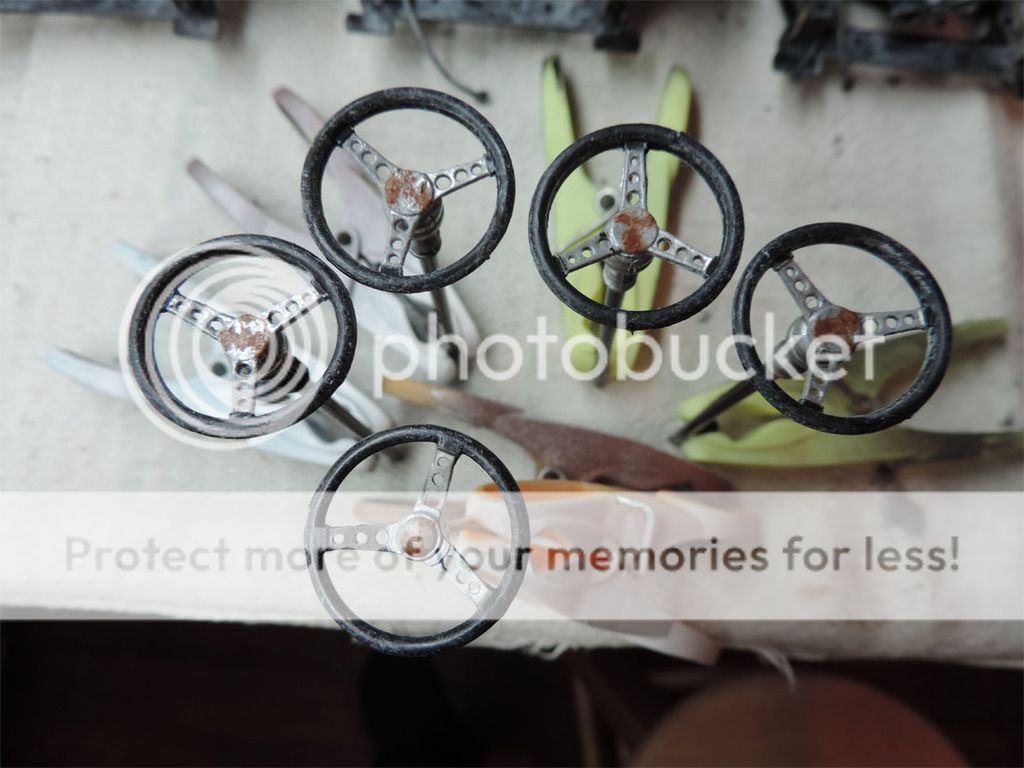
- Bburago 1957 Corvette for the steering wheels models (cars are not showing as I only got the steering shipped)
- Maisto 1970 Nova SS for the round chromed air cleaners
So the first step was to completely disassemble the 10 cars (5 Jack Reacher + 5 Maisto) ... plus gather the parts I needed from others donnors (Baldwin's shifters ... Nova's air cleaners ... Corvette's steering wheels ... GMP Pontiac wheels ... etc)
- then cutting 10 front ends off ... from the five 72 Maisto and the five 70 Jack Reacher …

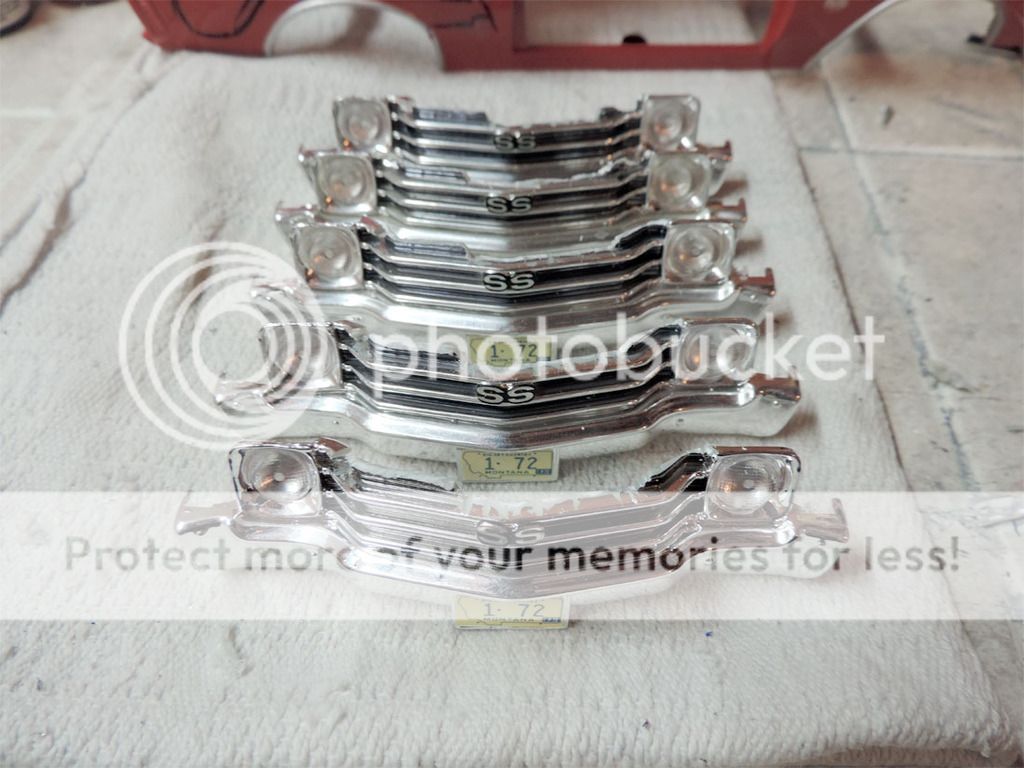
- recreating "bad shape" Bobby's front grill of five 72 grills …
- denting five 72 passengers doors …
- removing trim from driver side, rear wheel arch and recreating "ate by rust" arches trimming …
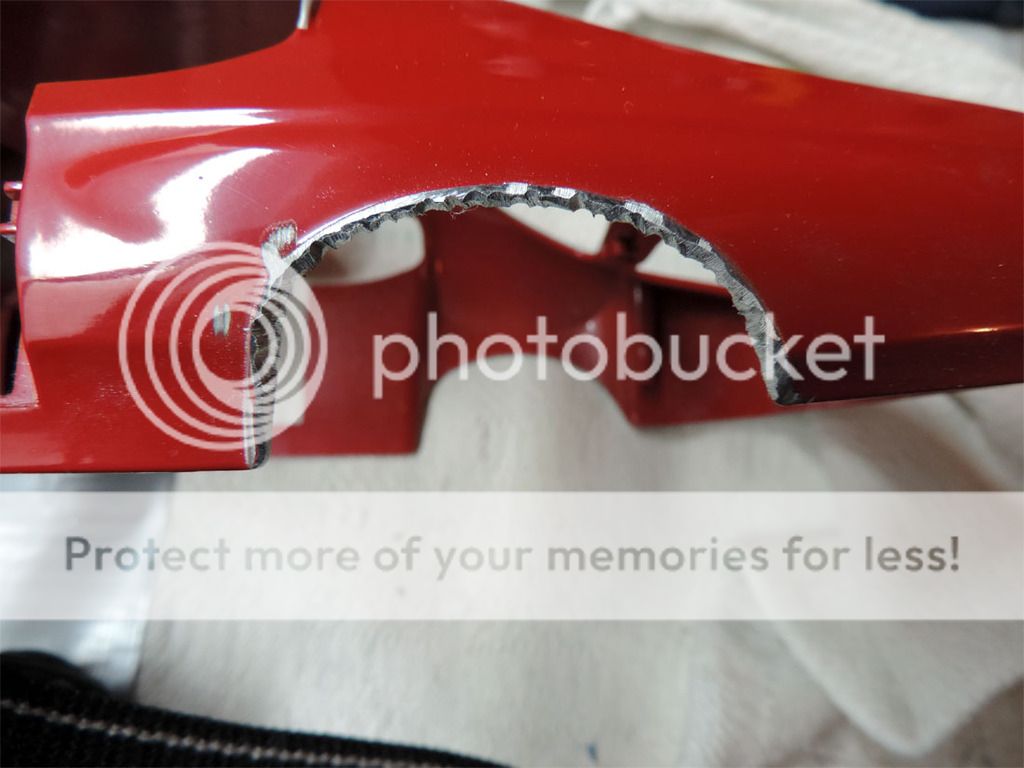
- now one of the parts that scared me the most to do was to figure out how to dent a diecast. Because Bobby's car is a turd, a junkyard car … and it's in a VERY bad shape. Only I didn't know how to dent fenders because metal is very thick.
So I thought about grinding into the metal … so I did some testing on a dummy model … now the results weren't satisfying me because we clearly could see the grinding marks …
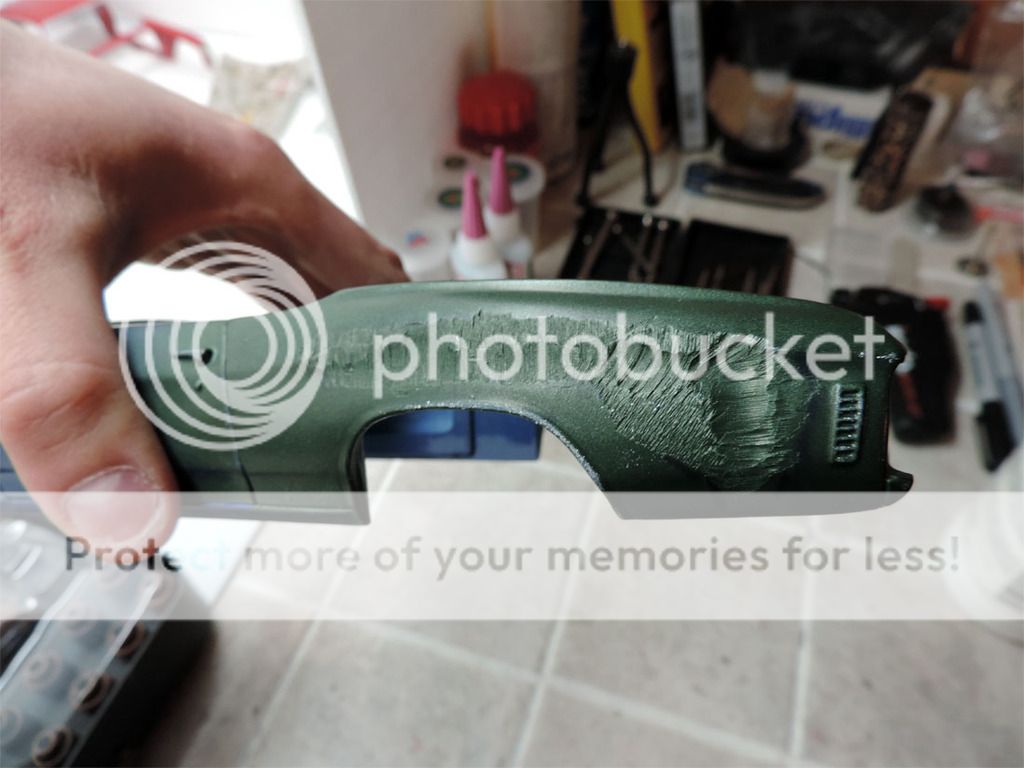
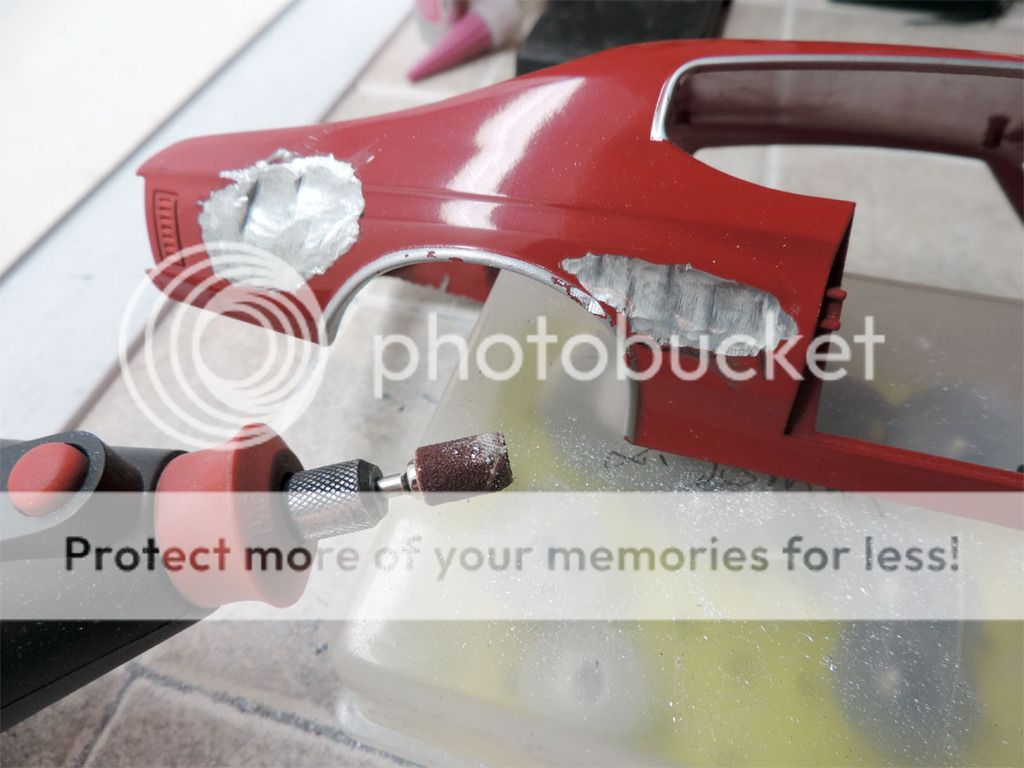
... so I thought of a solution and it worked! .... the first step remains the same : creating dents on five 70 Chevelle by grinding in the body panels …
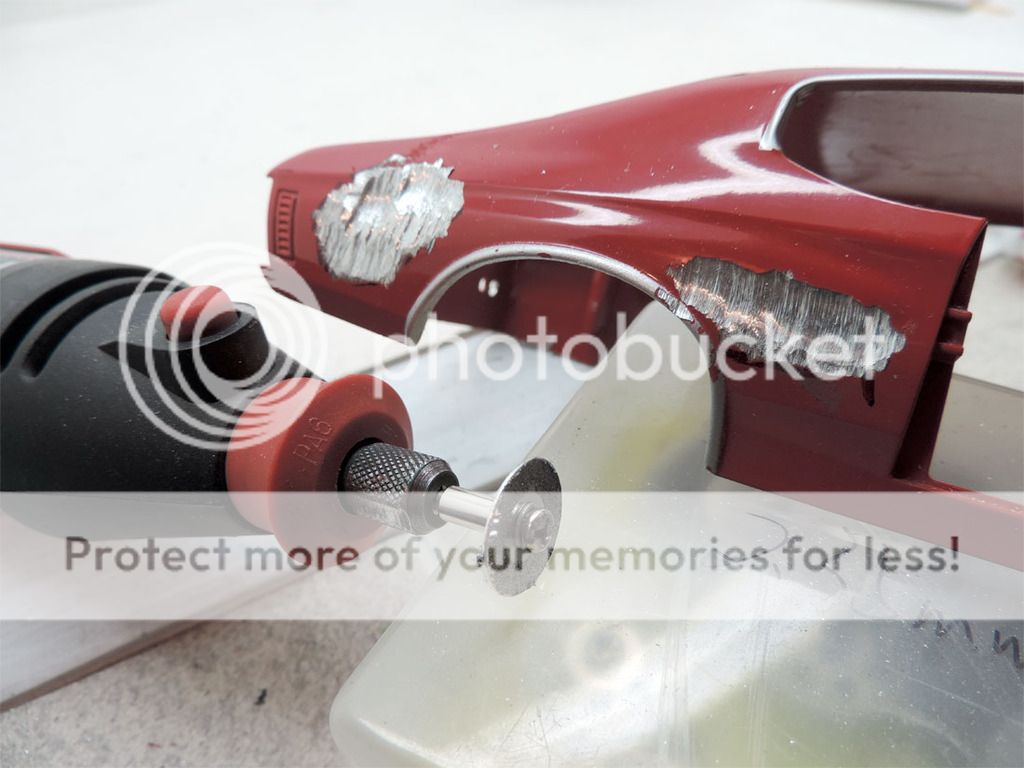
- then simply smooth the grinding marks by sanding them with my dremel, until a smooth finish … that's it …
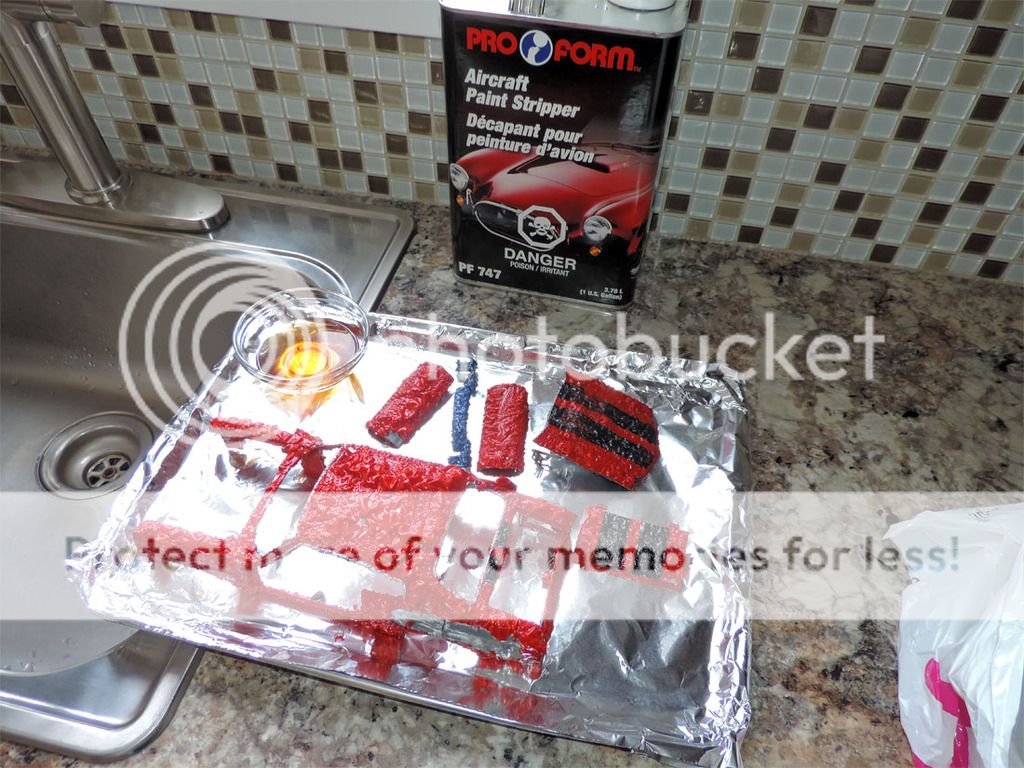
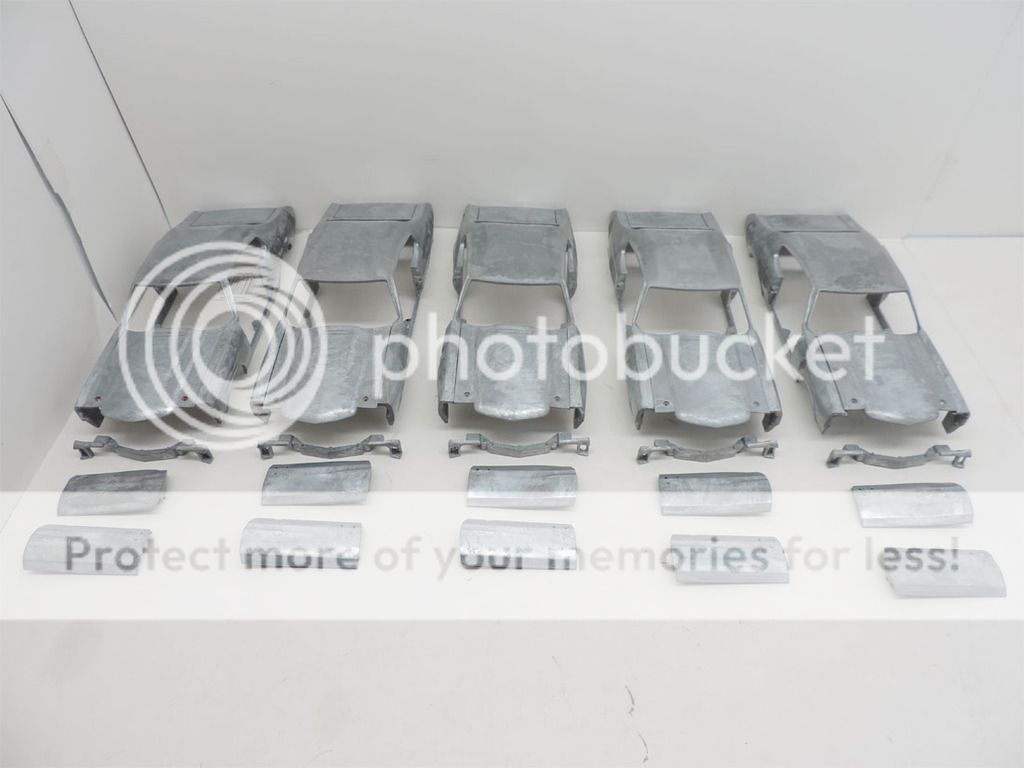
- now stripping the models from their paint , that meant 30 parts : bodies, hoods, trunks, both doors, front ends …
- then some putty body work and finish with use of liquid cement to correct badly damaged dents …
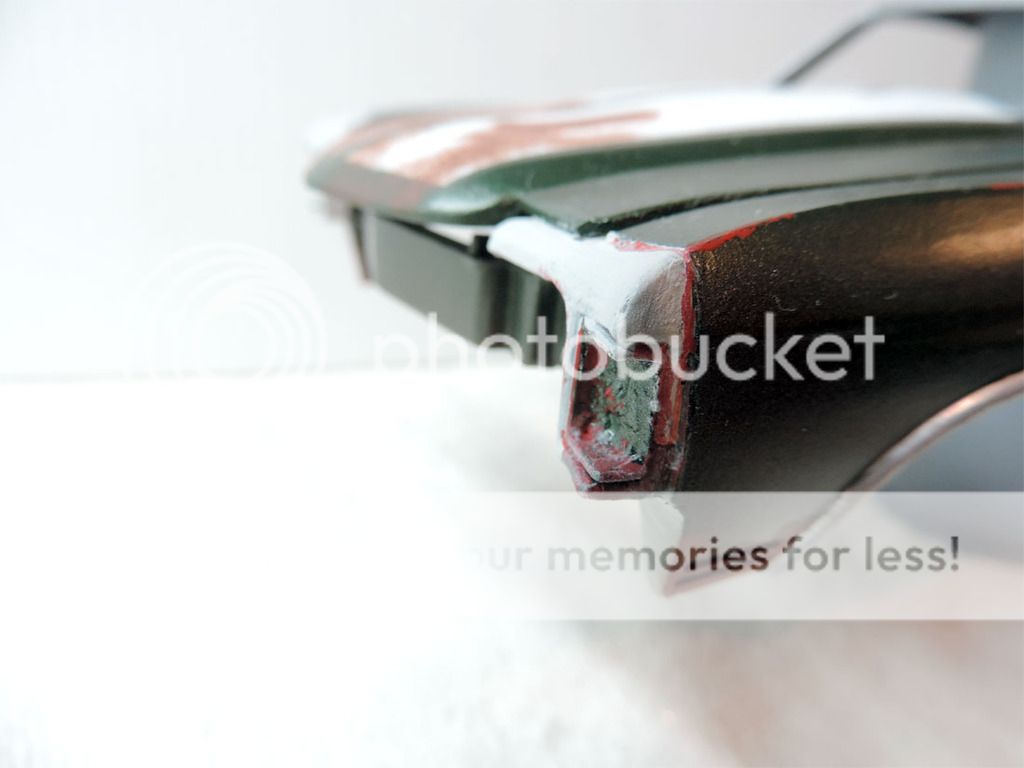
- fill up holes of hood pins … and trimming hood's edges on both side because in order to make the 1972 front end to fit on the 1970 body, I had to lightly bend the front fenders by pulling them in a little … it's invisible to the naked eye, but it resulted, of course, that the hood weren't closing properly anymore … so a little bit of trimming was needed
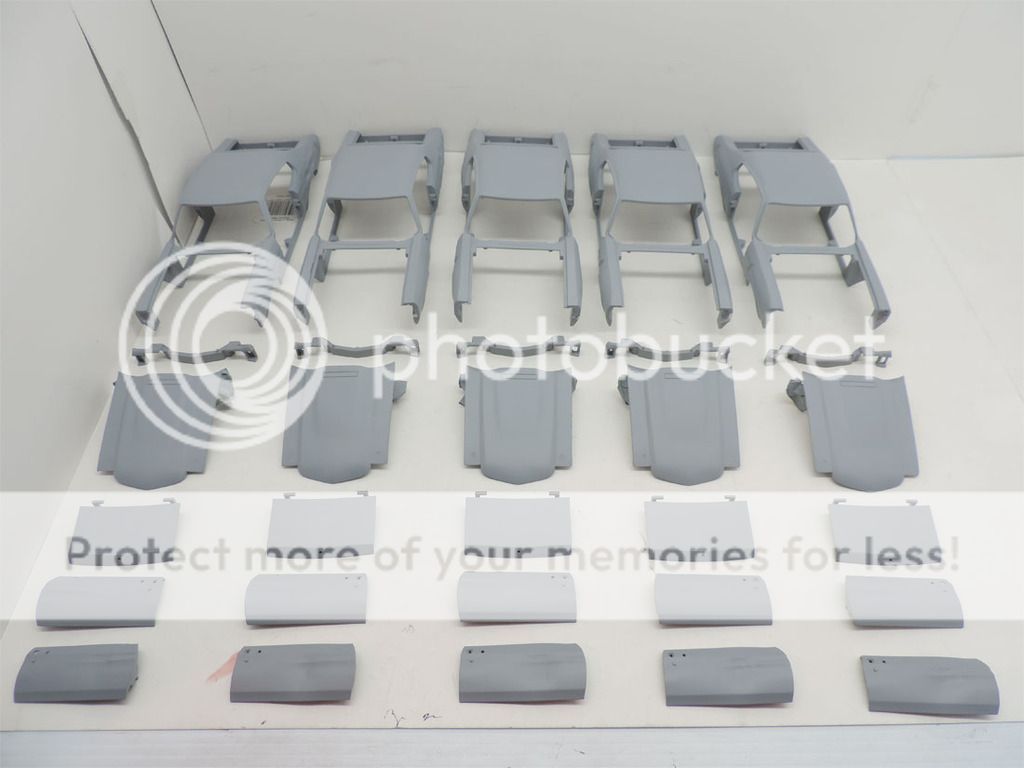
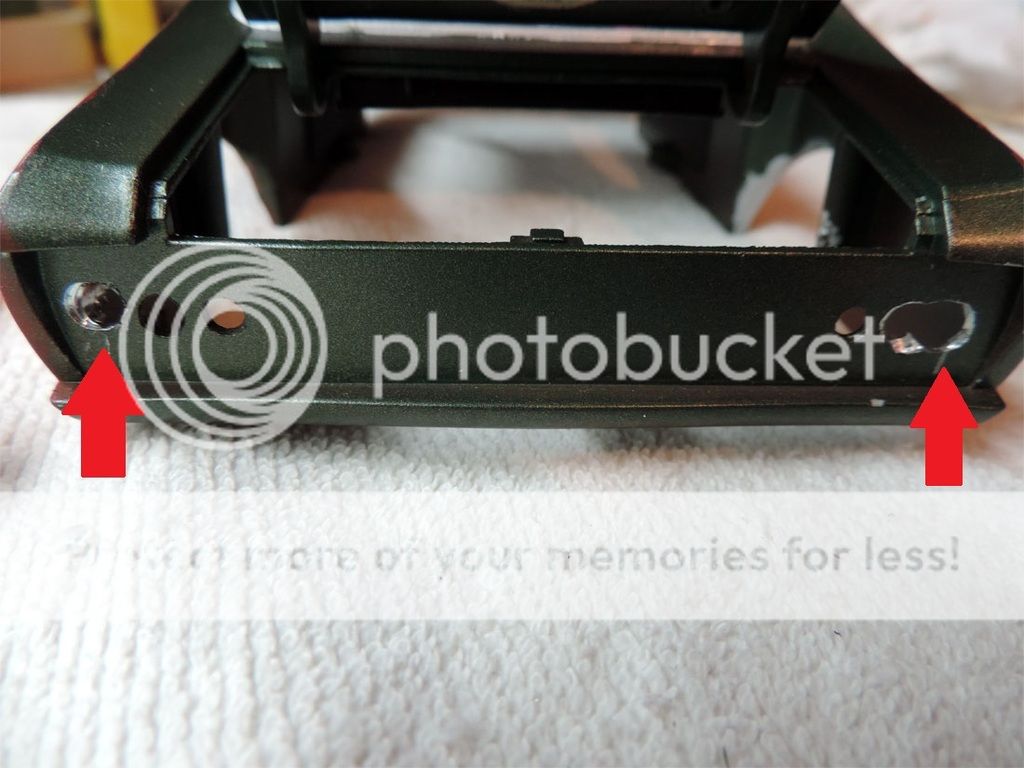
- drilling holes in trunks to replicate Bobby's missing trunk key lock … then primer stage …
- installed the front '72 front ends on '70 bodies …
- painted the hood's underside in black …
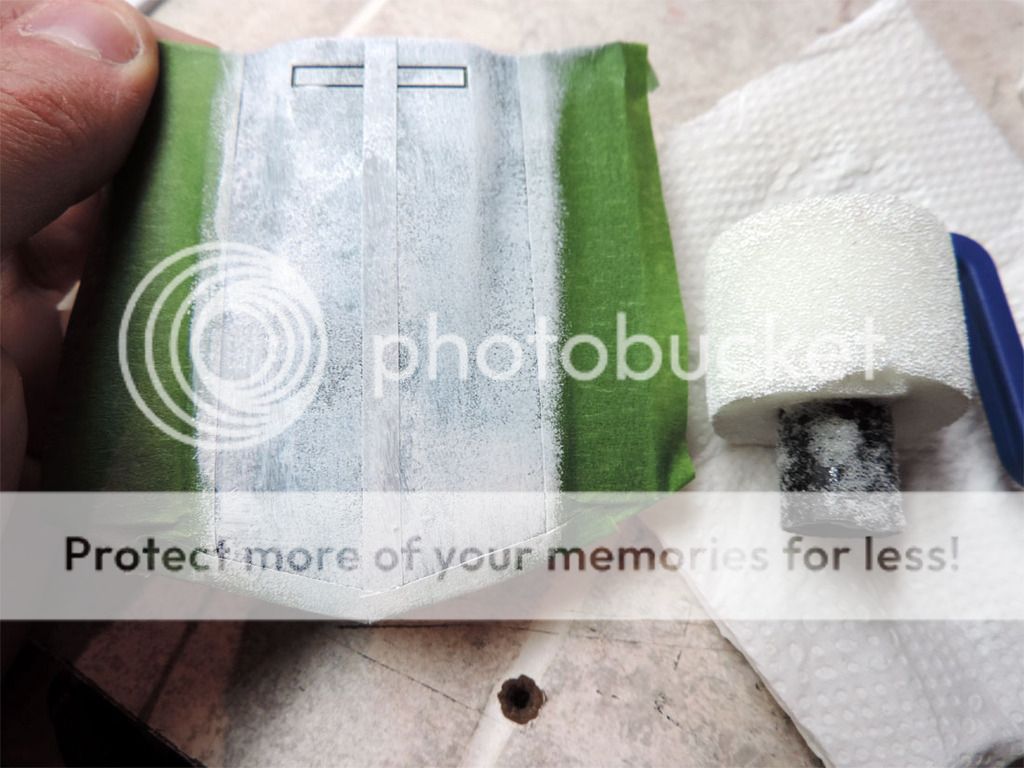
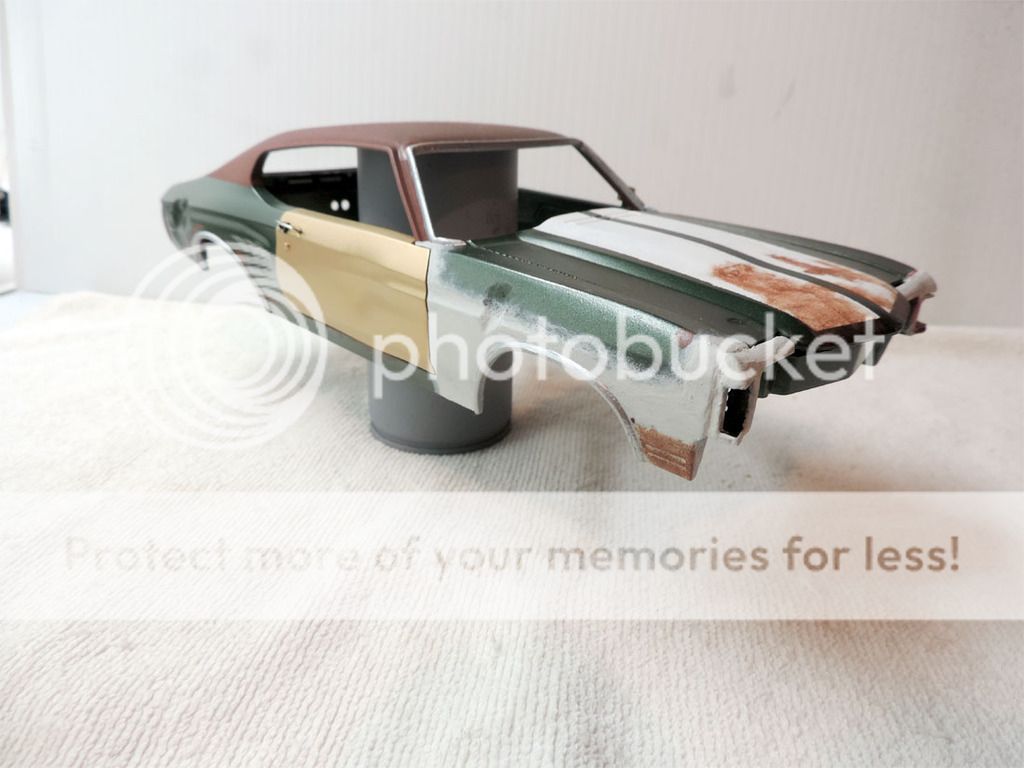
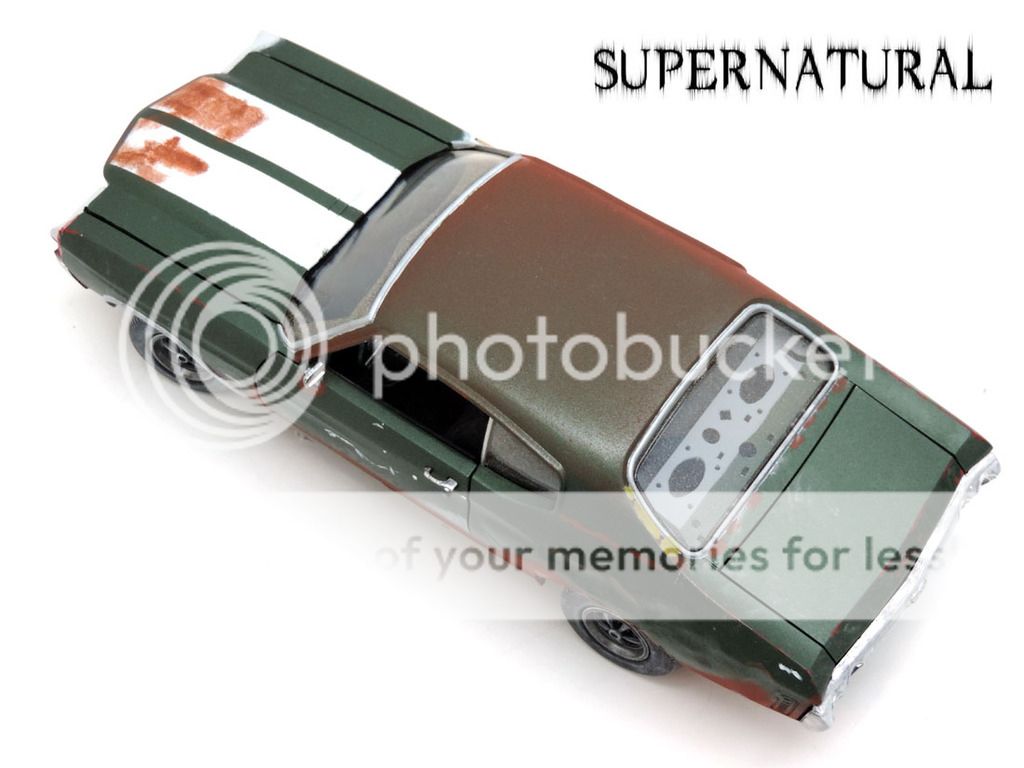
- made guidelines to paint the dual stripes … now on Bobby's car, the stripes are badly painted, they seems to have been done with a paint roller … and the green paint underneath is still showing through on some places.
So I really wanted to recreate that look, so I used a small sponge paint roller to paint the stripes …
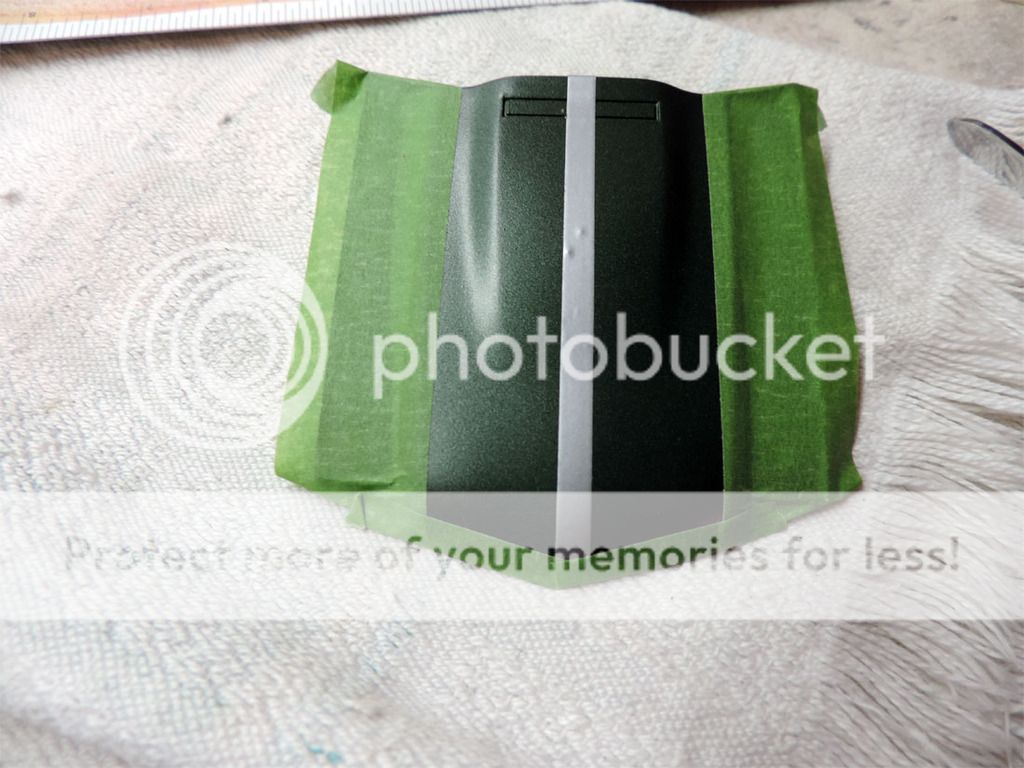
… so now it looks exactly like Bobby's hood …
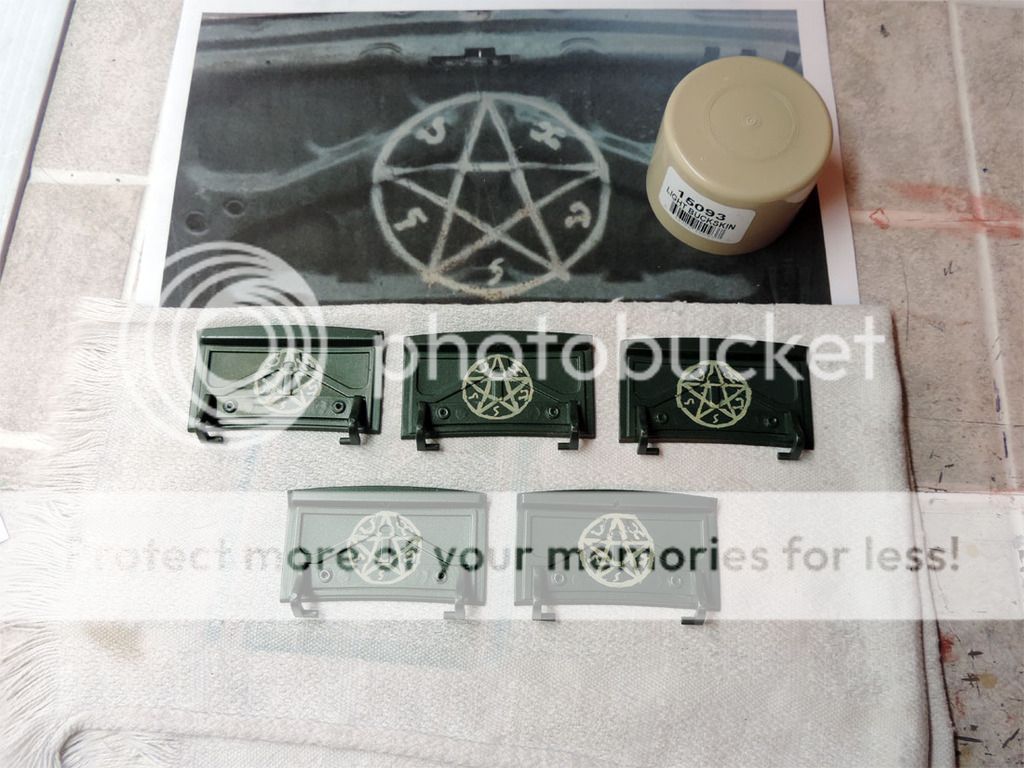
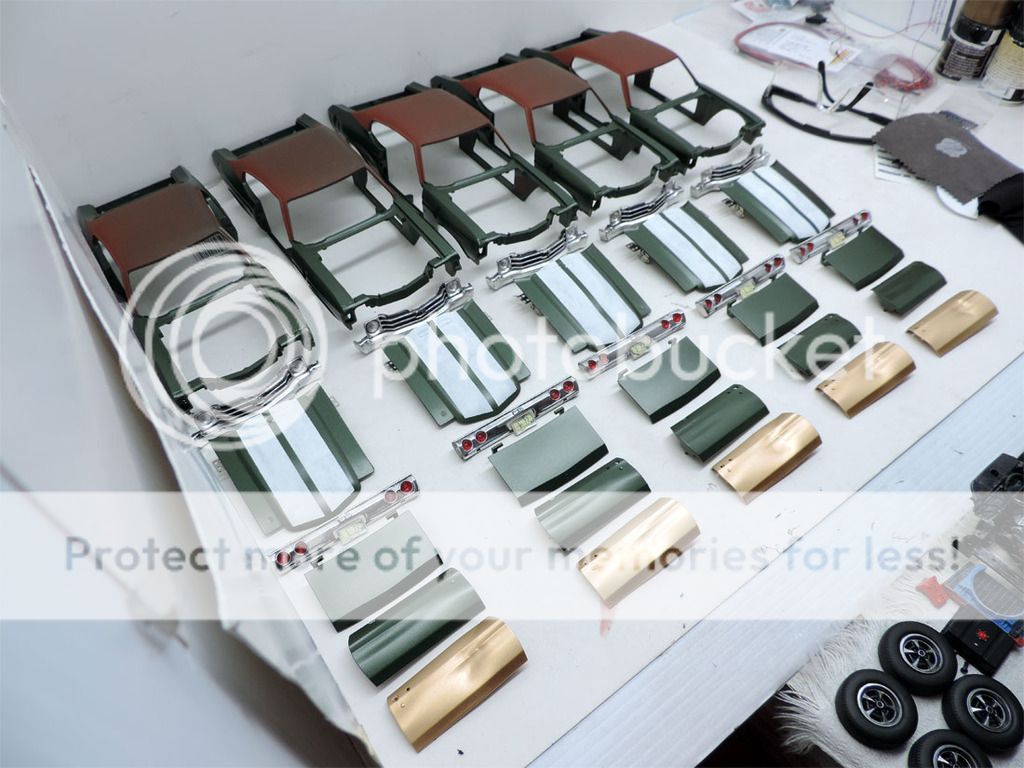
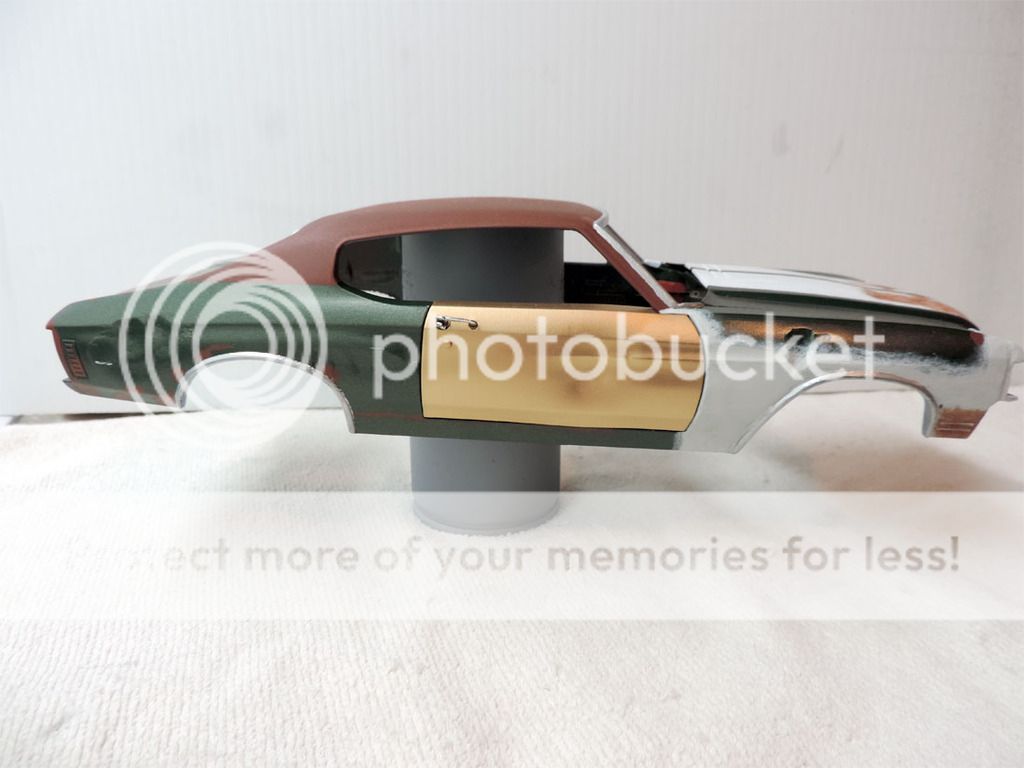
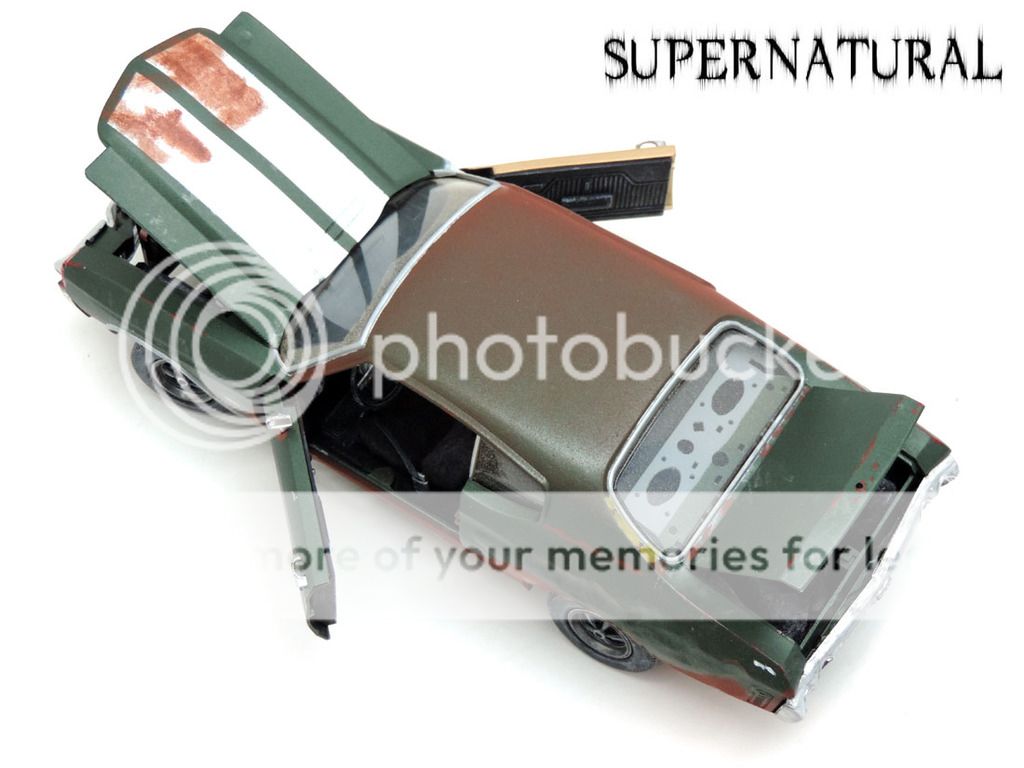
- then I've painted all 30 parts to true original '72 Chevelle green factory paint ... except for the passenger doors which are gold …then I've painted the Demon's Traps on all trunk lids, in original Buckskin paint color, just like it is on the show car …
- transmission has been changed from automatic to manual T-Shifter …
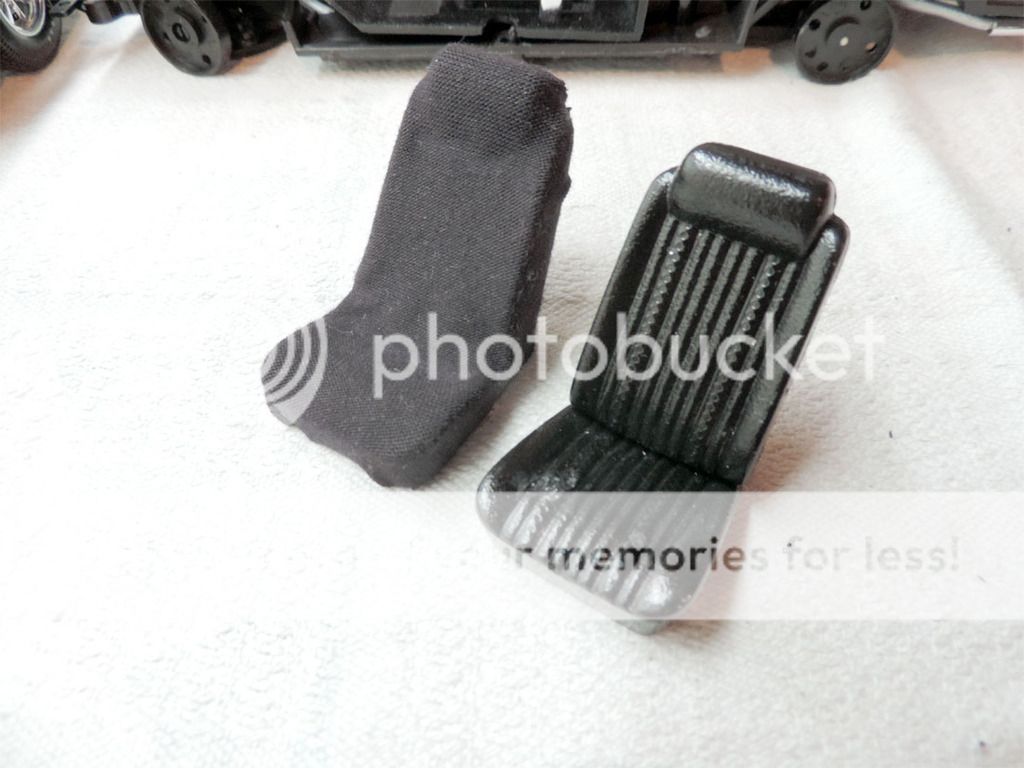
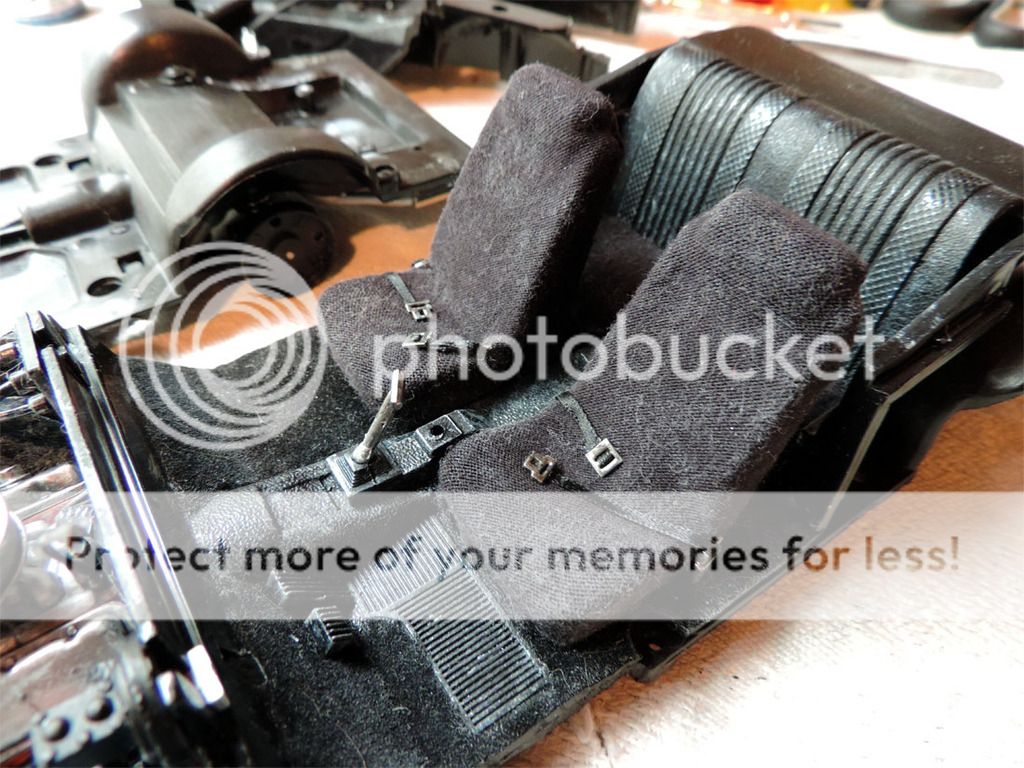
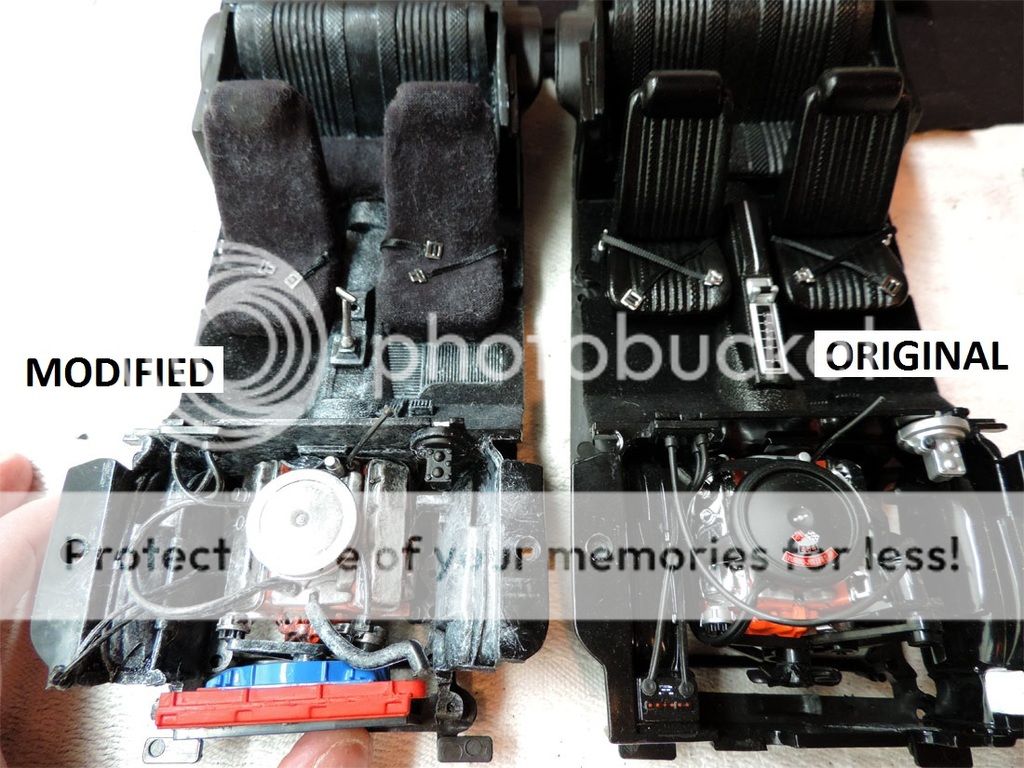
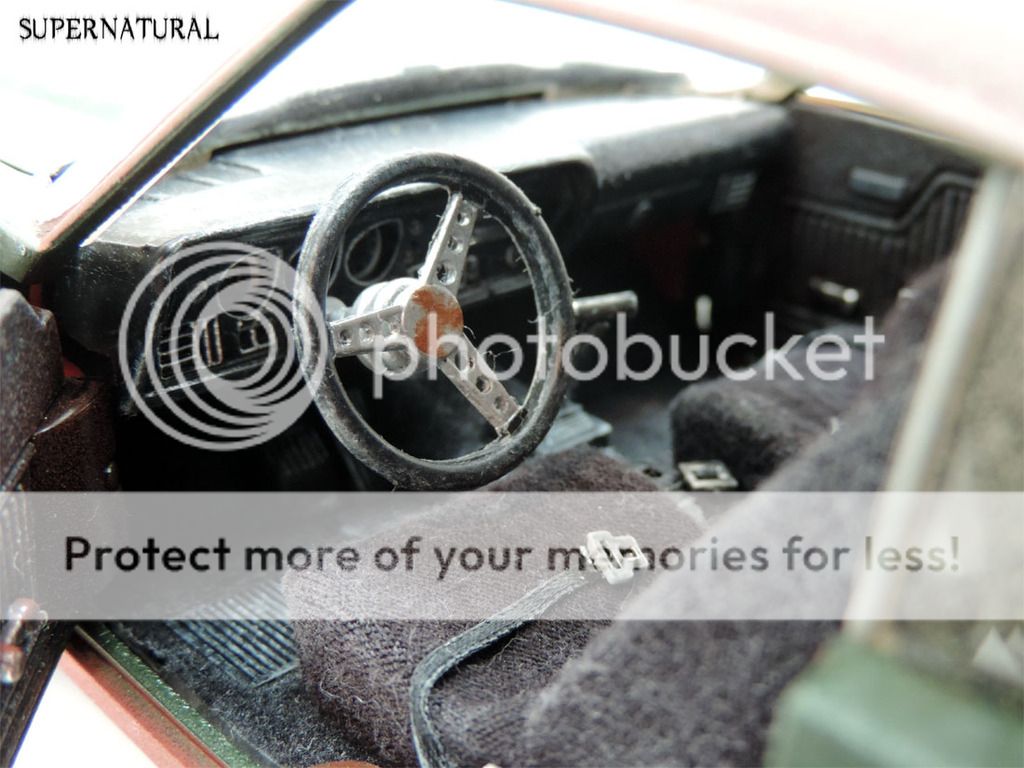
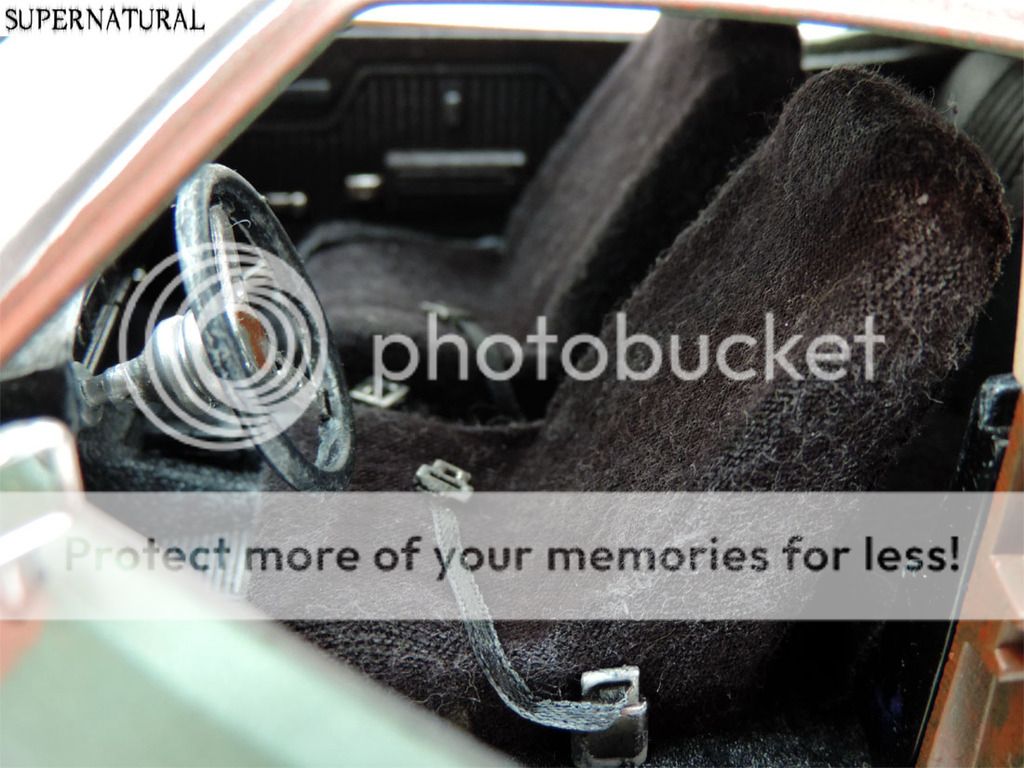
- Bobby's front seats has covers on them … so is the rear bench … so I did them, make the whole interior look dirty & dusty … and replaced the seatbelts … all 5 cars has the seatbelts placed in 5 different position to make them unique to each other …
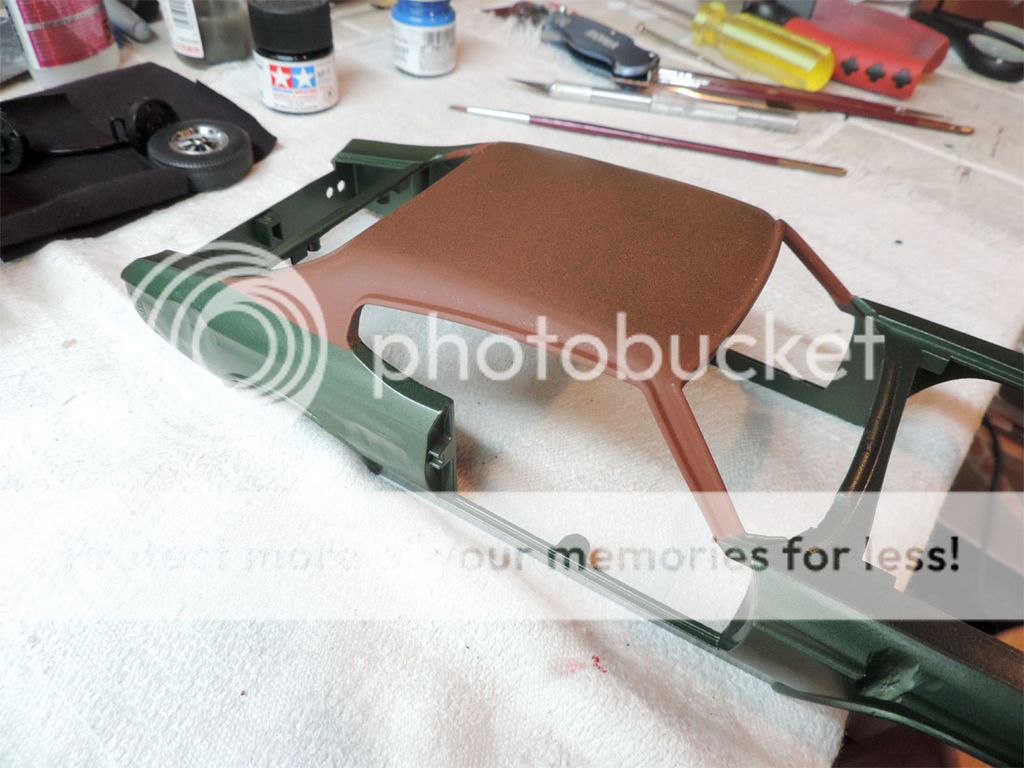
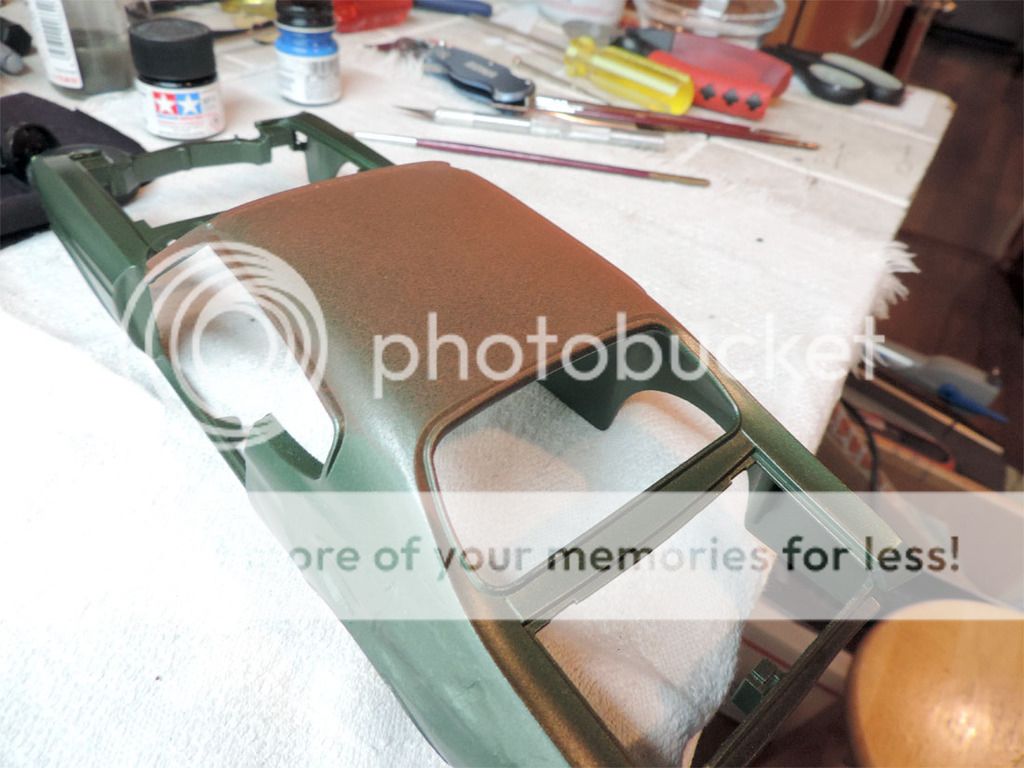
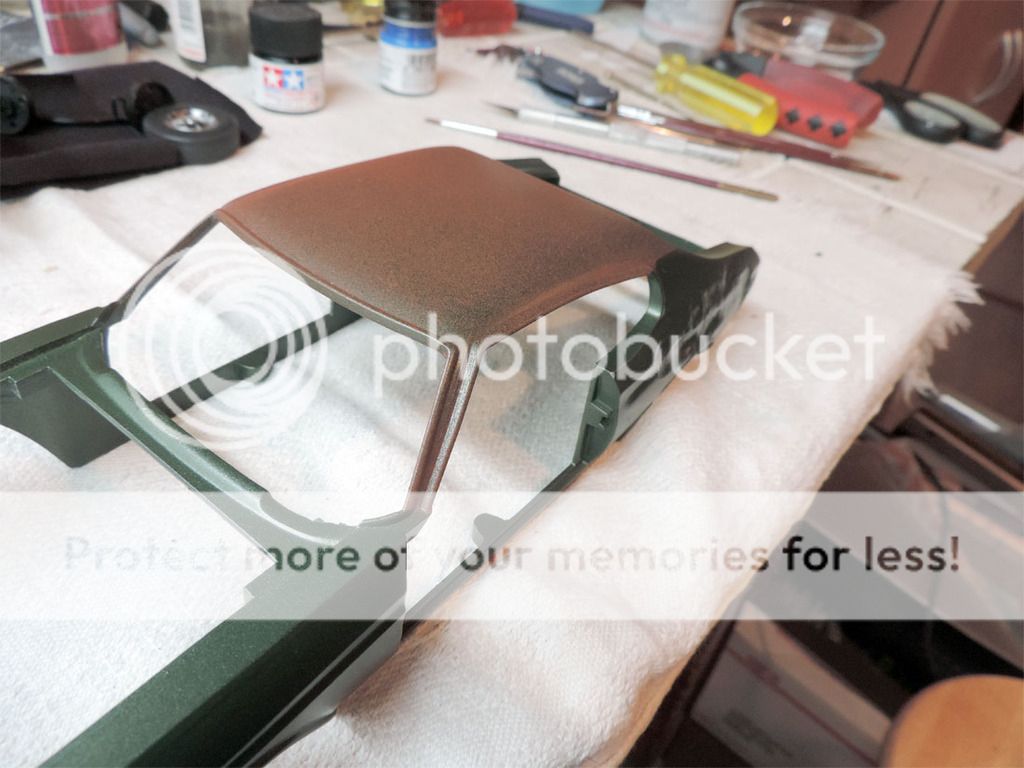
- tops has been primed to rust color primer, with a gradient of paint from passenger side fading on to driver side …
- now all parts are painted …
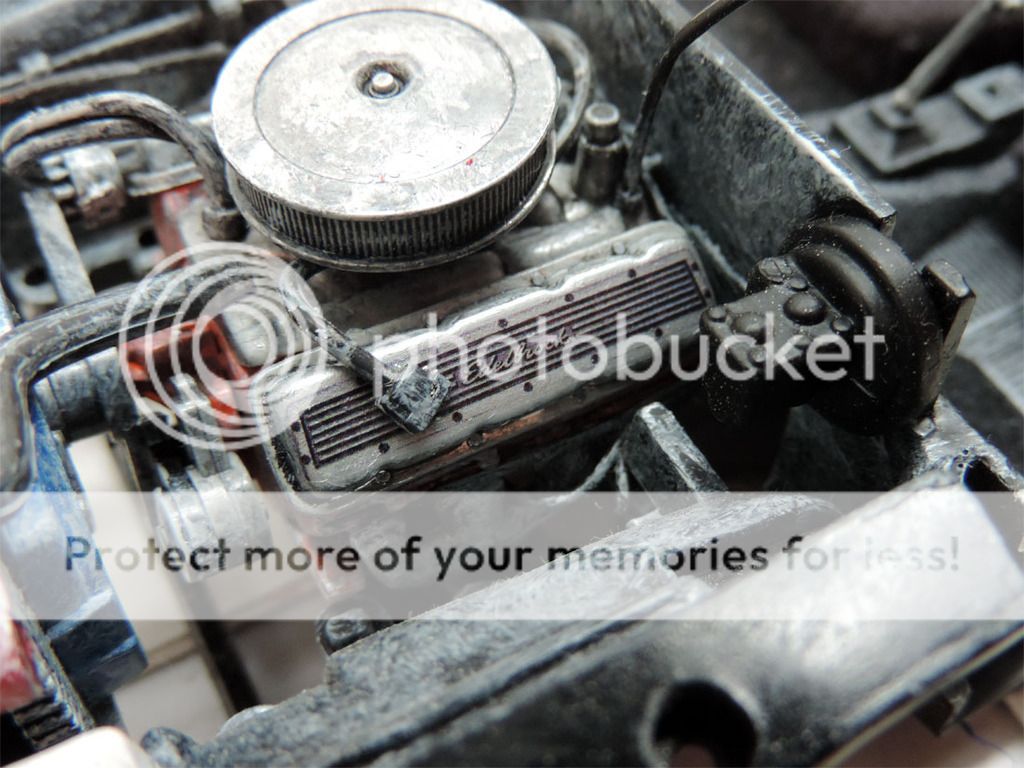
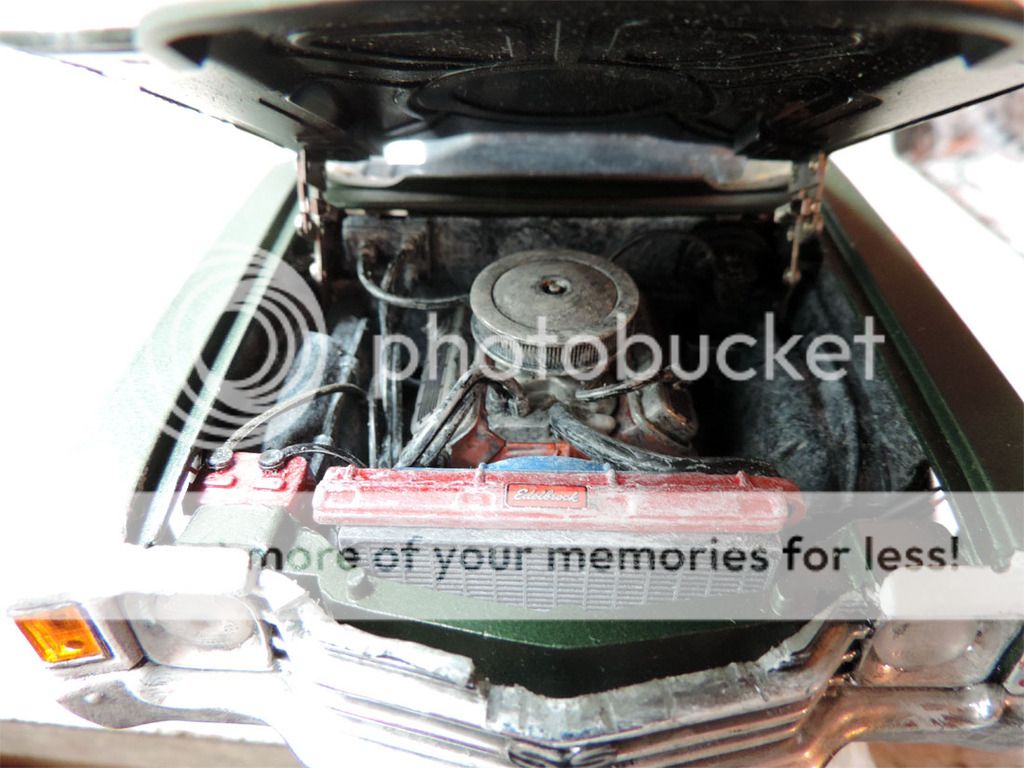
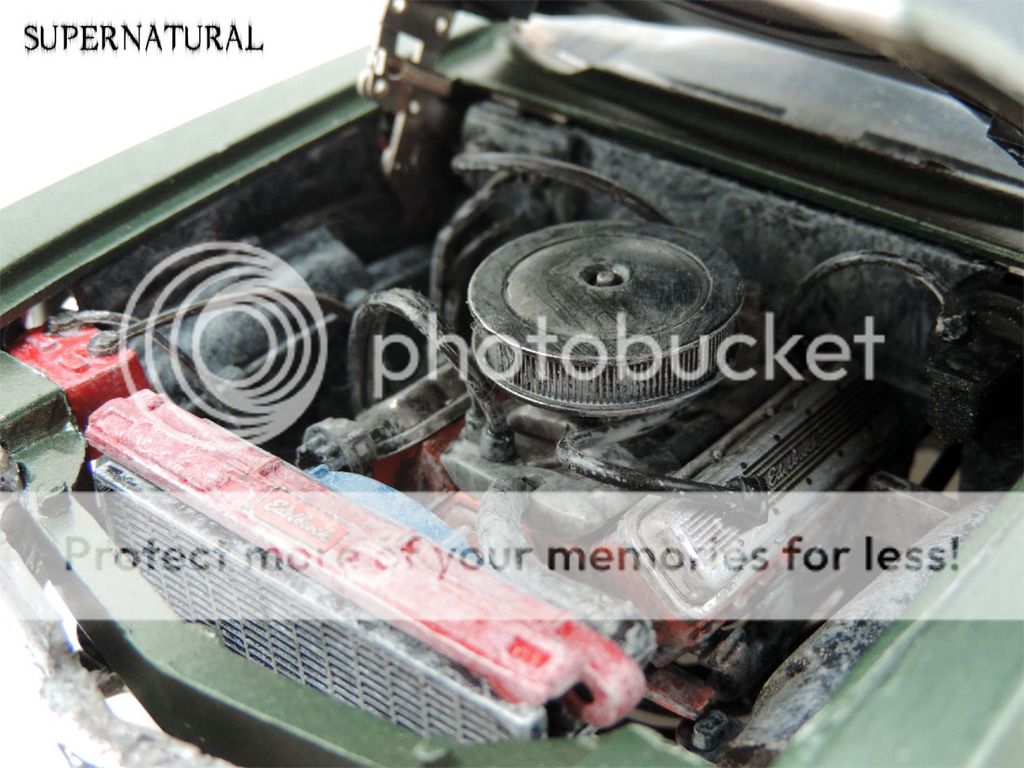
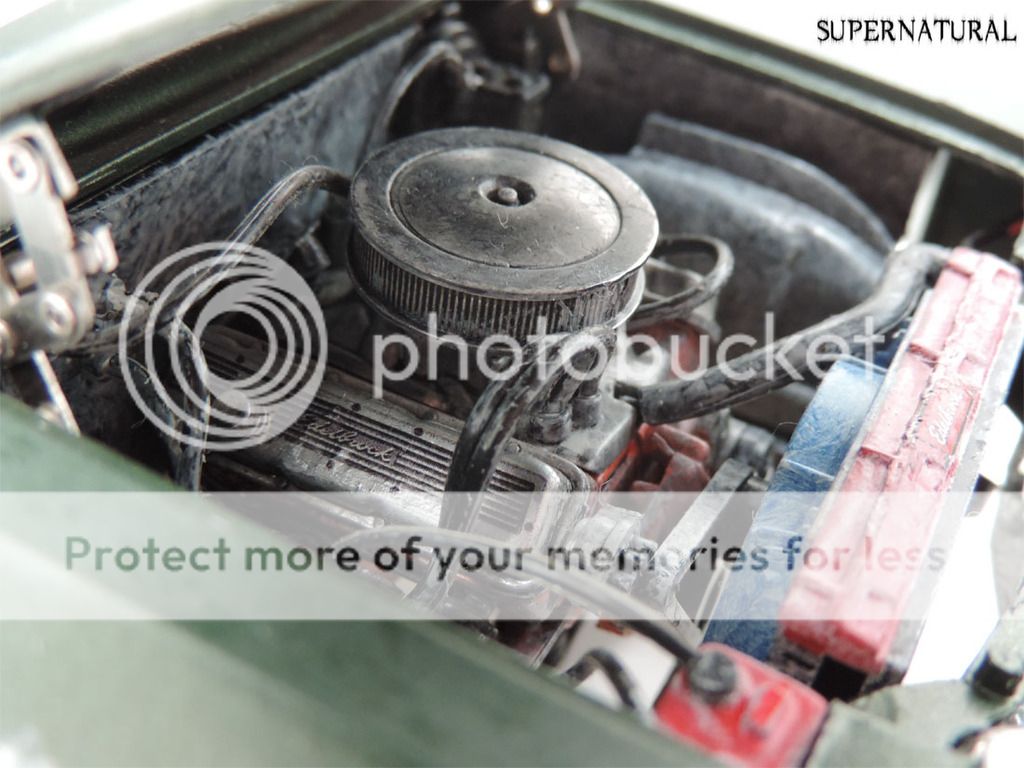
- all chrome parts has been black-washed to remove shine and make it look like old unrestored chrome … also black-washed the entire engine on the 5 cars to give them a "not taking care of" look ... which recreated oil leaks under the engine and transmission … also black-washed the entire exhaust line …
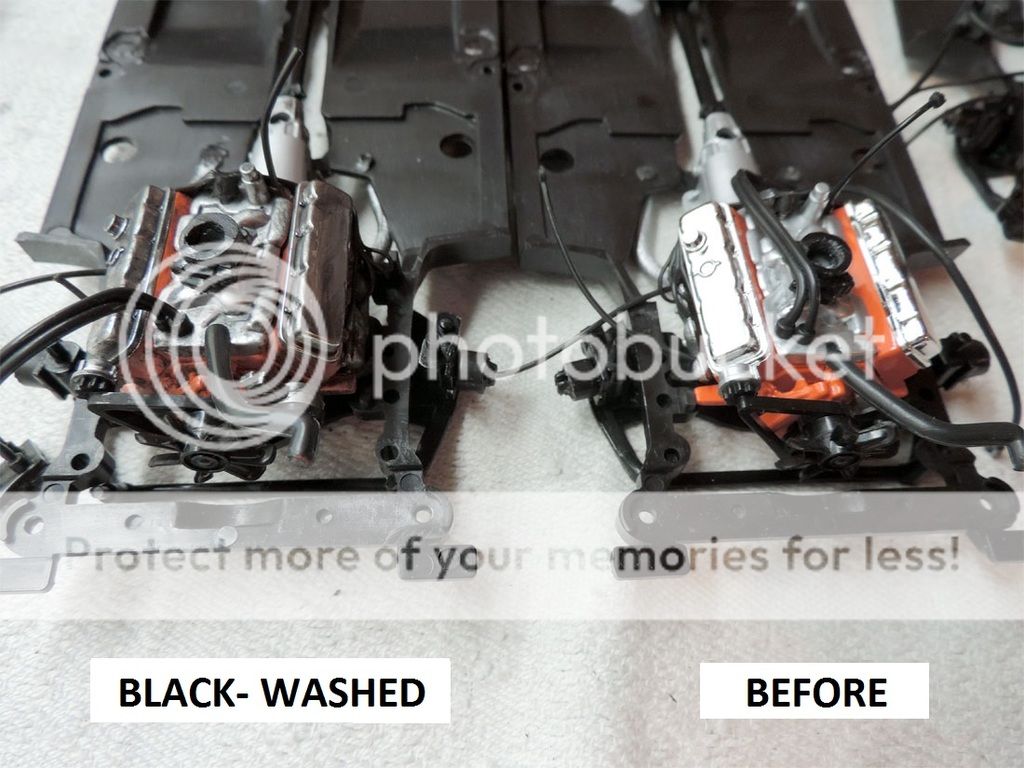
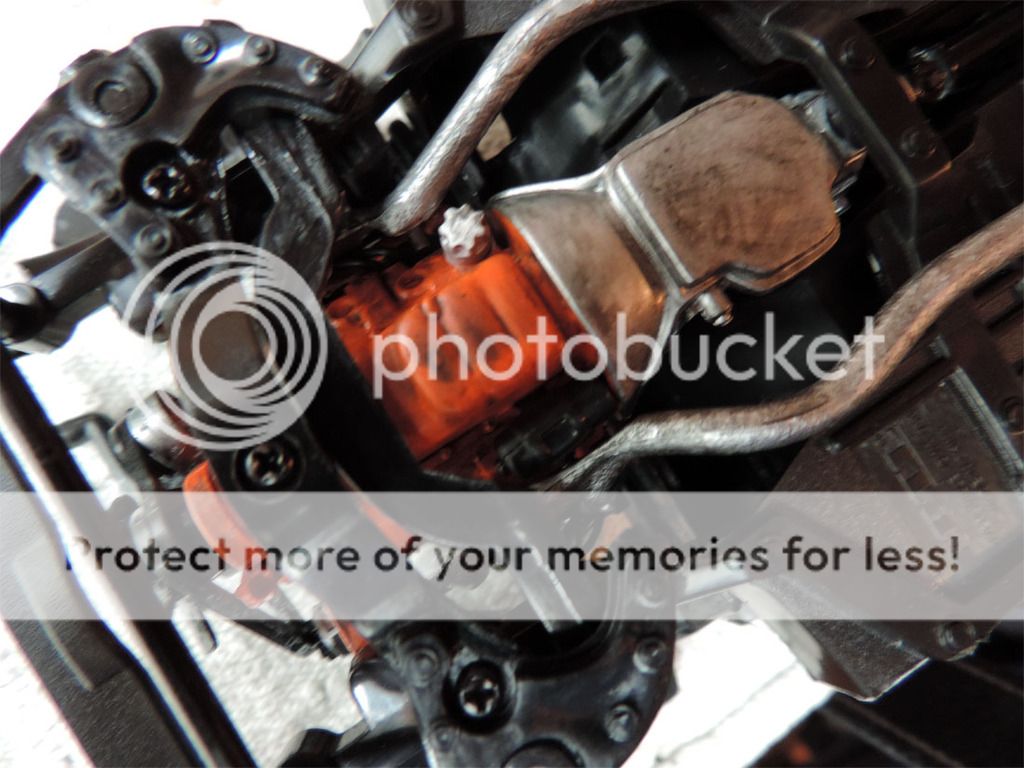
- figured a way to make the engine and engine bay looks like it's really dirty & dusty … just like the real car is …
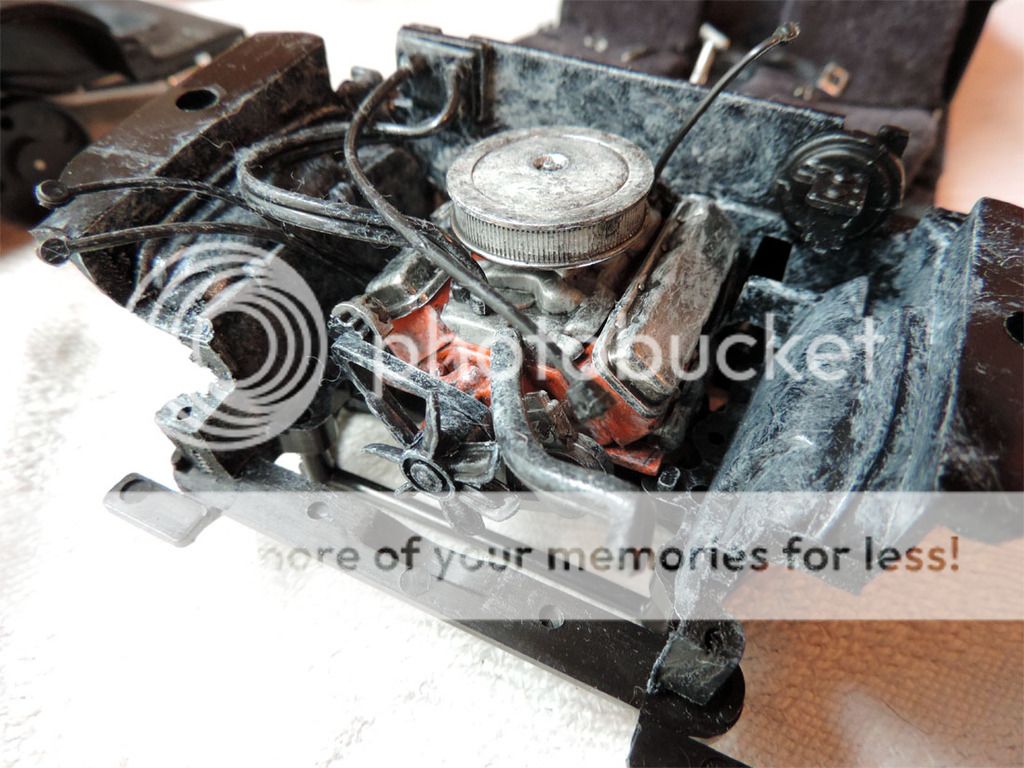
- here you can see the original engine (Jack Reacher) … and the Supernatural one, once done …
- figured out a way to attach the new Pontiac wheels to the model ... which was really problematic!!!
For the rear wheels, I just flip over the attachments …
… for the front wheels, I couldn't free the attachment disc from pins … so I had to gently cut through and remove the disc completely, only keeping the hub …
- then I found the images I needed to print to make my models … so I needed 3 decals which I had one of my contact to do since apparently, I'm too dumb to figure out how to do them myself
"SS" fender logos … "Edelbrock" red stickers for the radiators … "Edelbrock" Valve covers
- radiators has been painted … then put the red "Edelbrock" stickers on the top of it … then gave it that dirty & dusty look to match the one in Bobby's car …
- put the "Edelbrock" valve cover decals to replicate the ones on Bobby's …
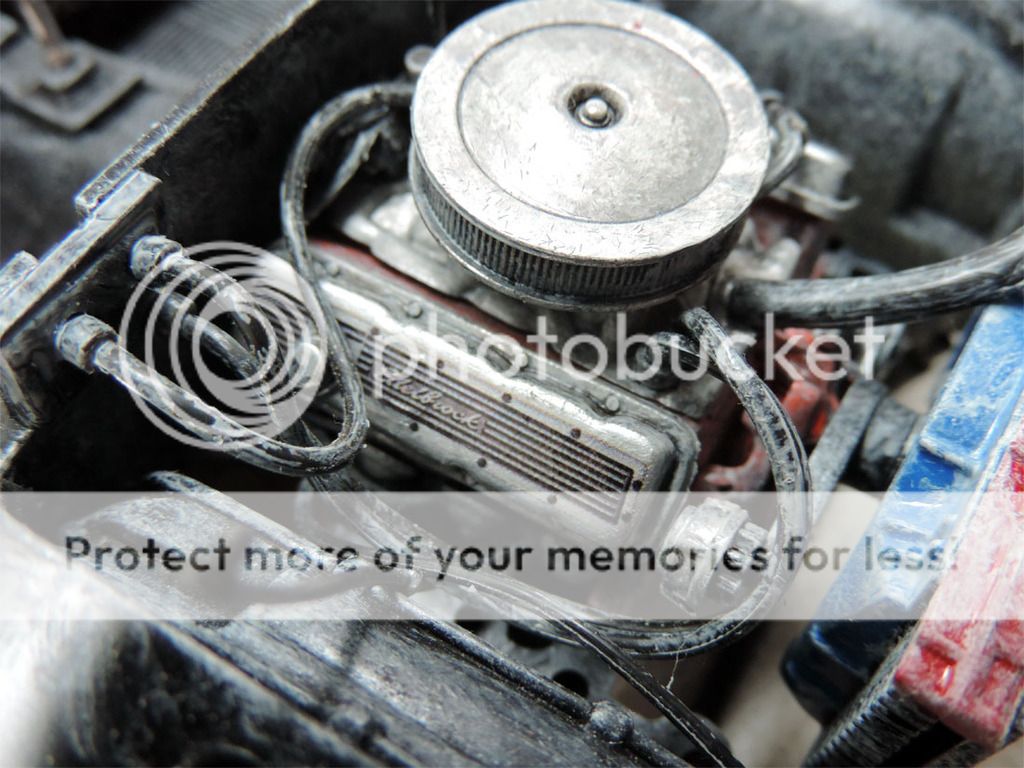
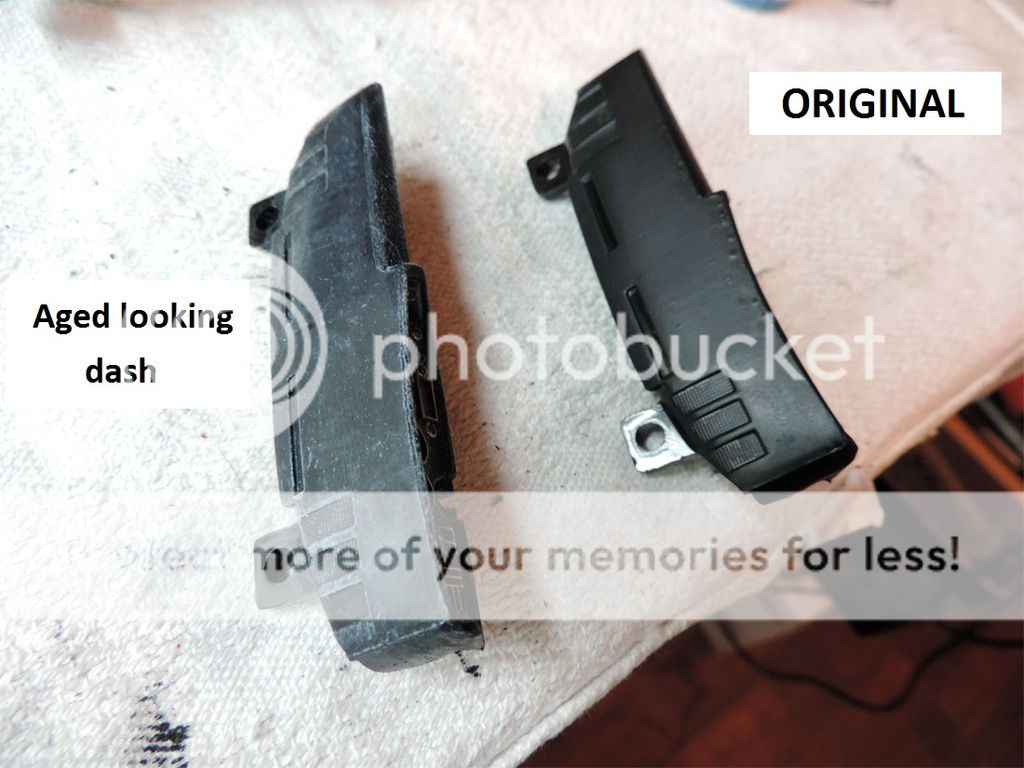
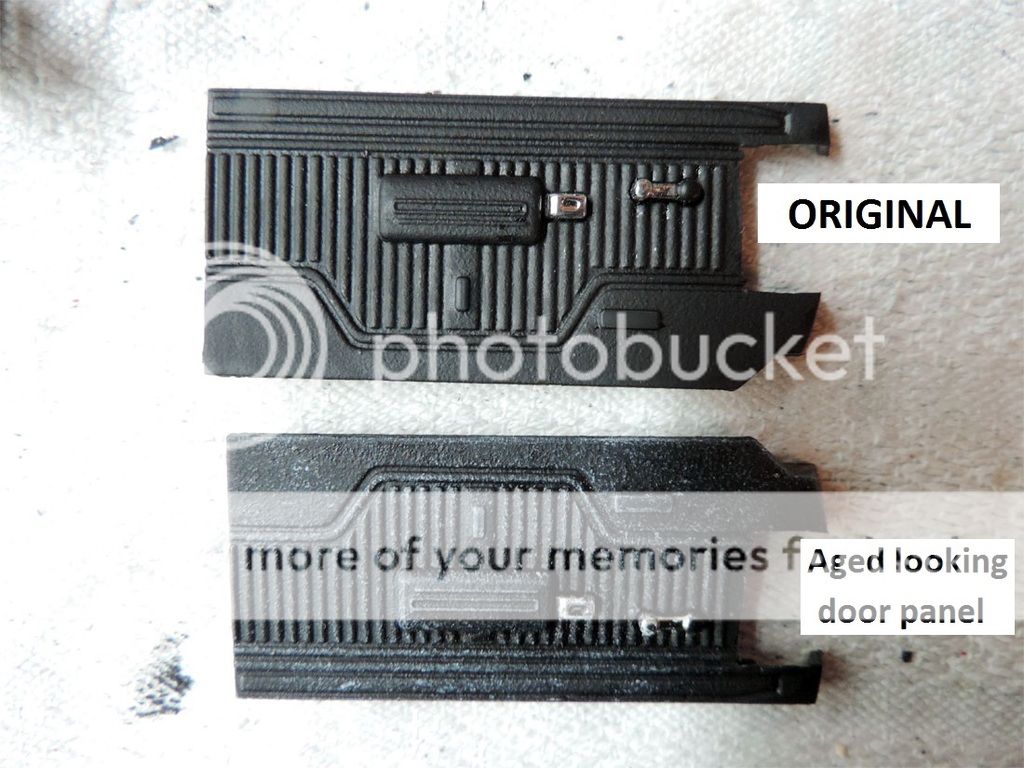
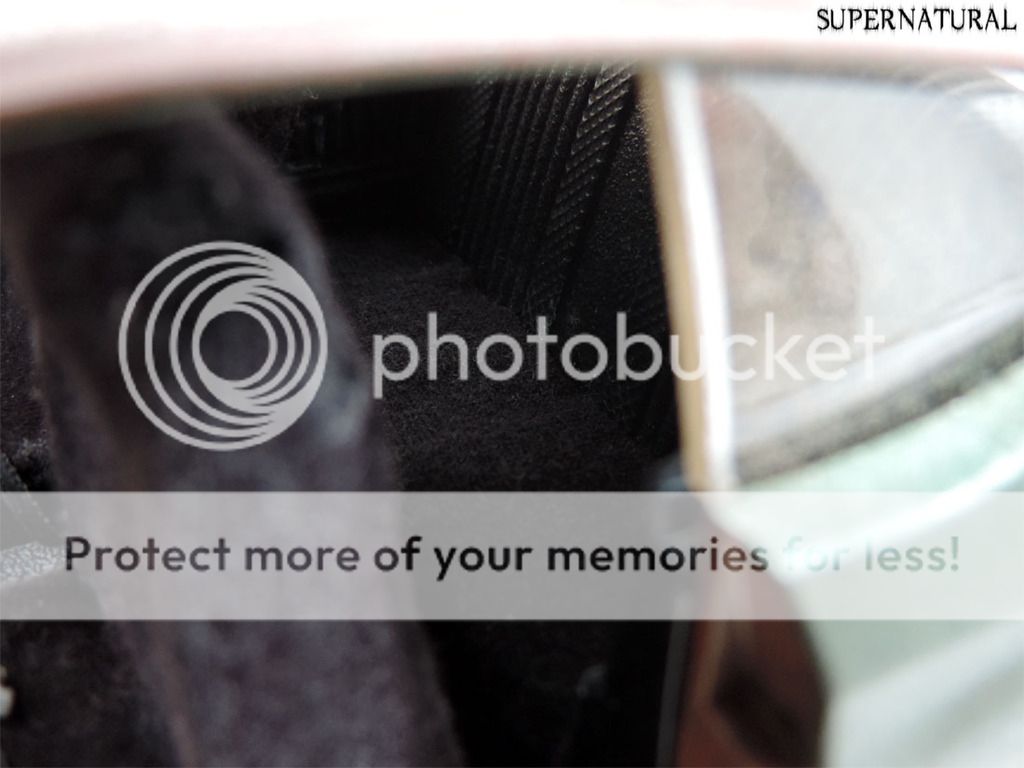
- I gave the whole interior an old dirty & dusty aged look ...
- erased the tag in the windshield's corner using nail polisher remover …
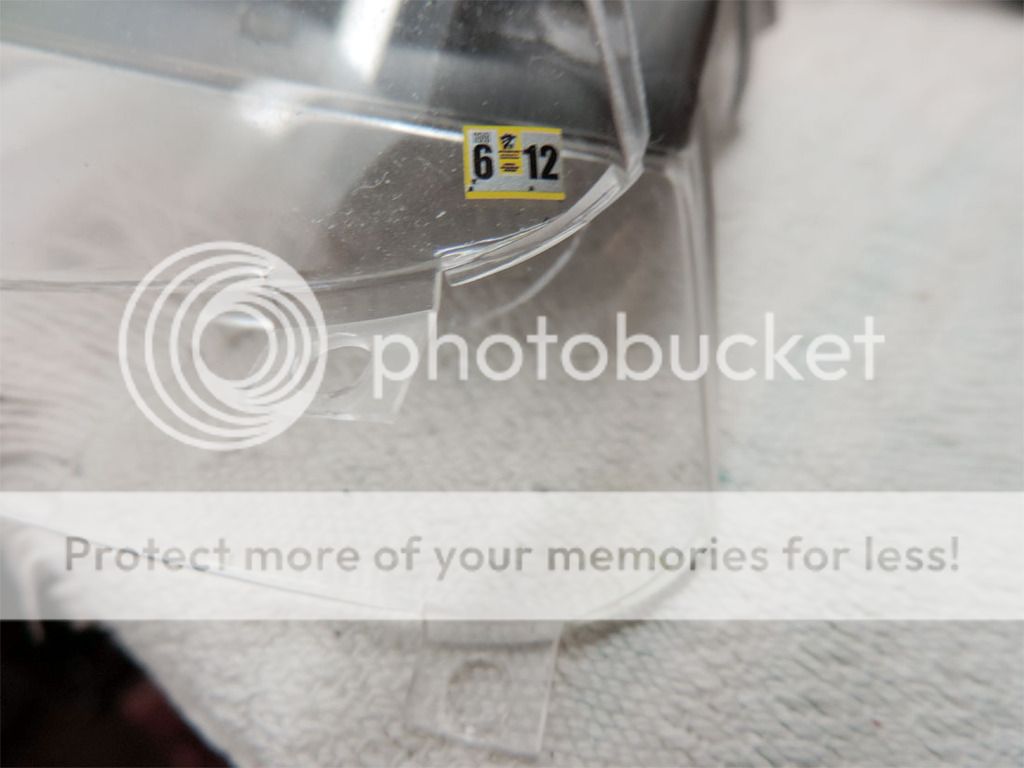
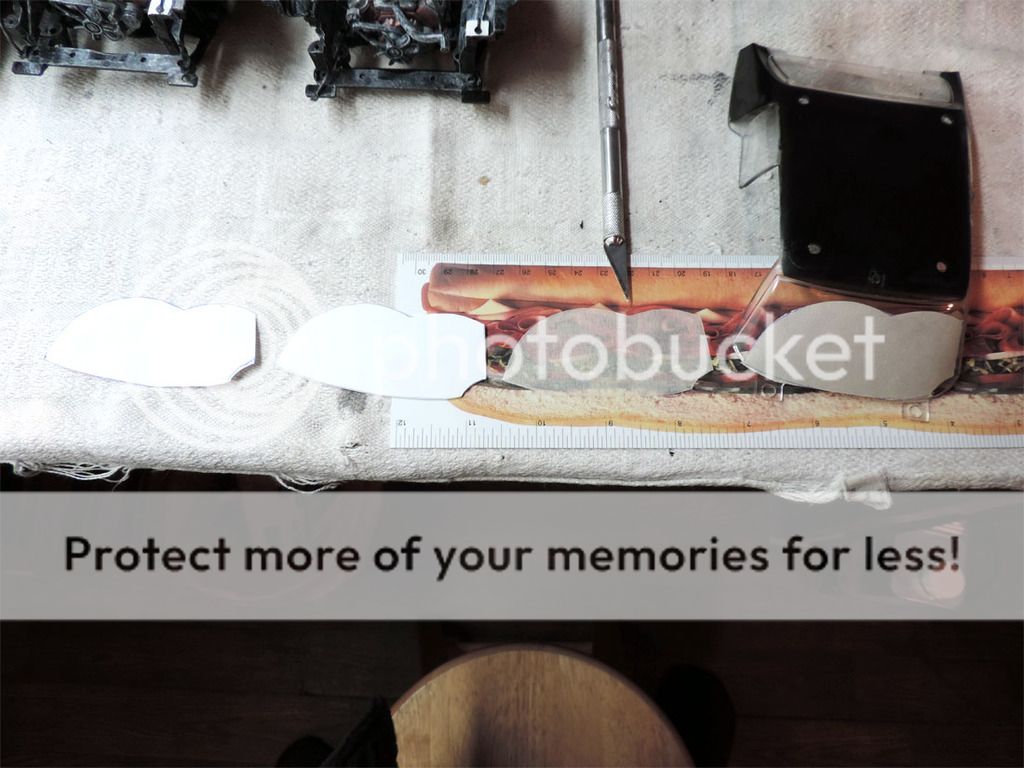
- designed the dirty window template on paper , then on hard plastic , replicate the part on masking tape , cut around and peel excess , applied cut tape to windshield …
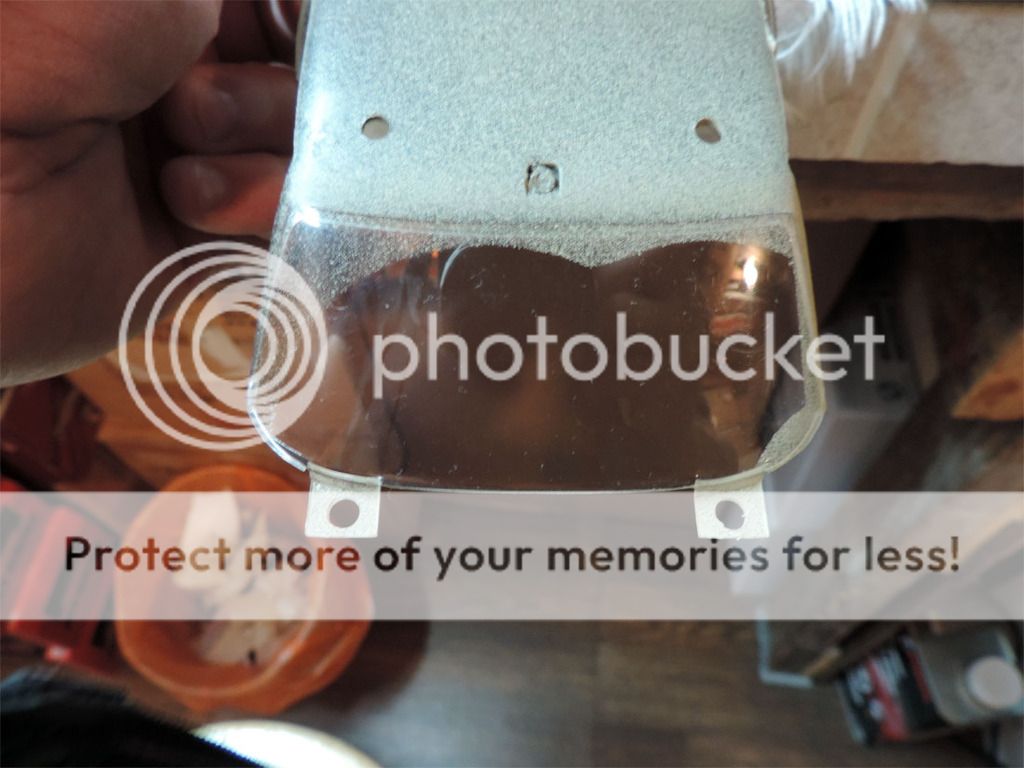
- using the buckskin paint can, I sprayed from far away, the fume on the windshield to replicate a very dusty glass ... sprayed paint made a light fume to side windows and rear glass as expected and as desired (less dust then front) ...

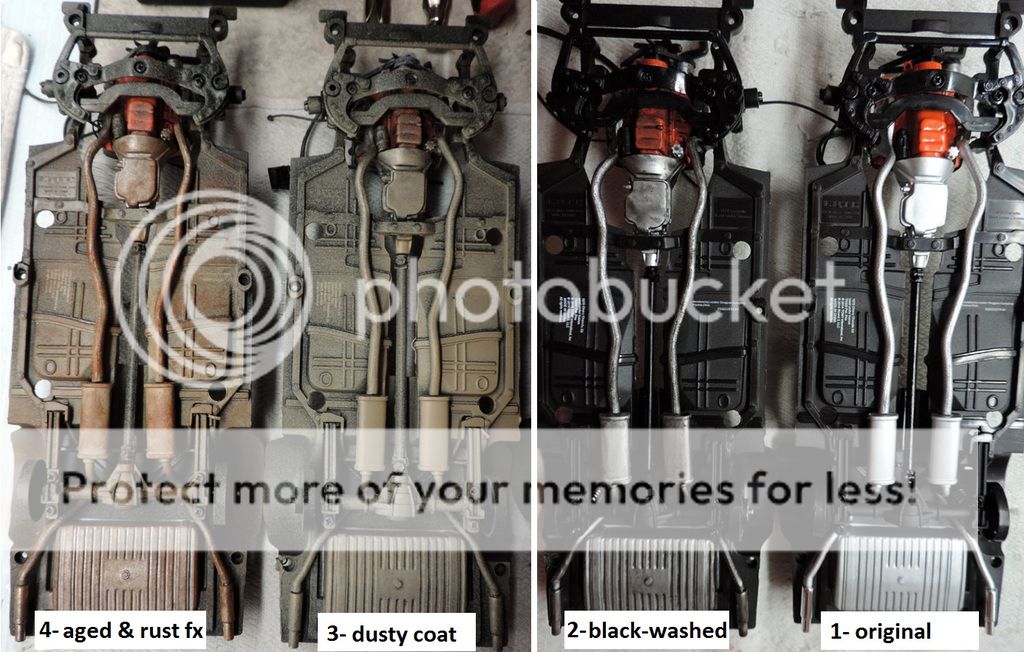
- Then it was time to replicate an old dirty undercarriage. So here are the steps :
1- original / untouched
2- blackwashed all undercarriages to replicate old metal parts
3- sprayed buckskin paint to replicate dust
4- added a very light brownish rust paint color coat with tip of fluffy paint brush all around to replicate rust all over
..... then finished by adding another little coat of sprayed buckskin paint from far away to add a dirty coat over rust effect
- painted the steering wheels to correct colors and add a little rust effect in the middle …
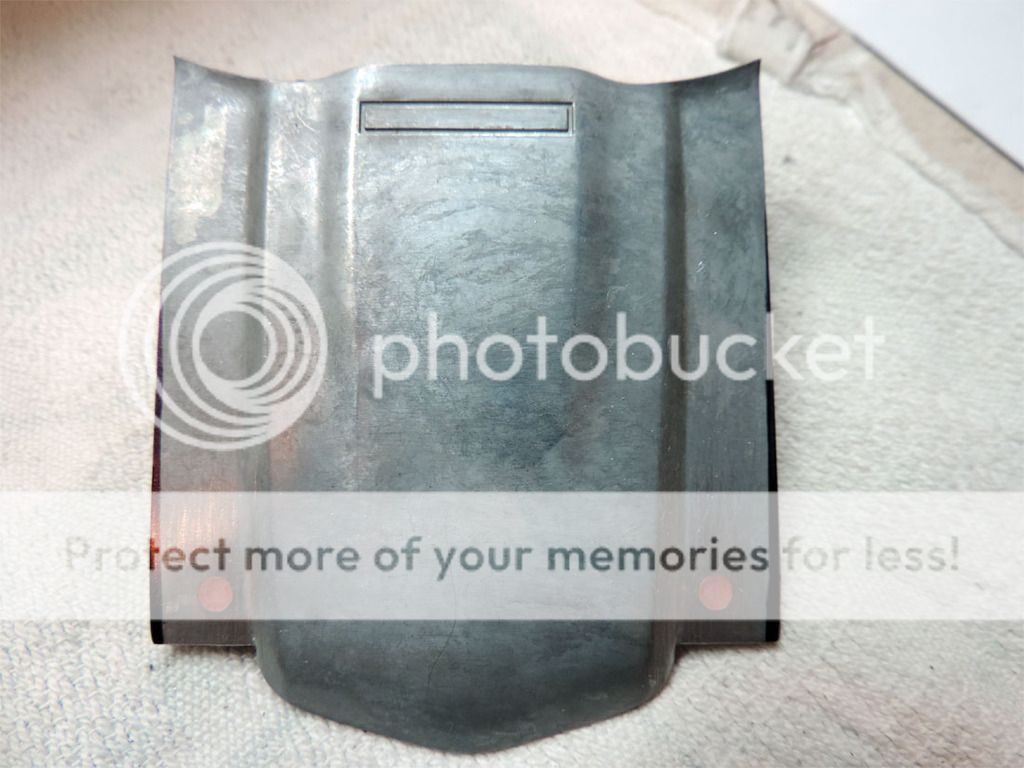
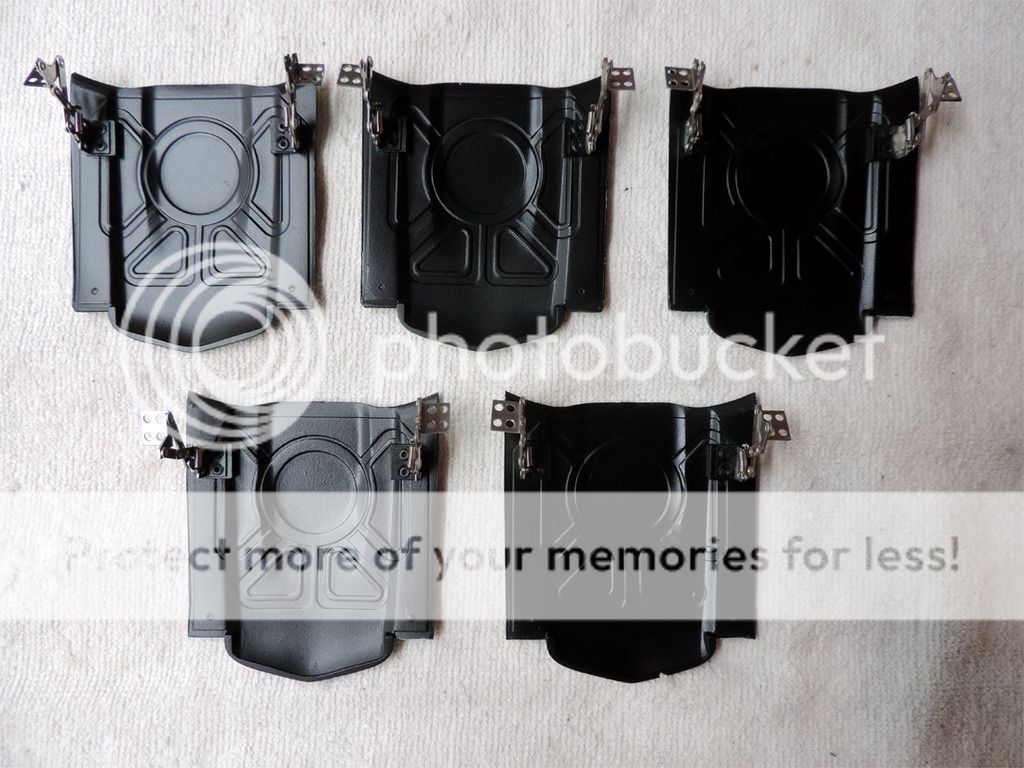
- created, painted and installed the trays behind the rear seat …

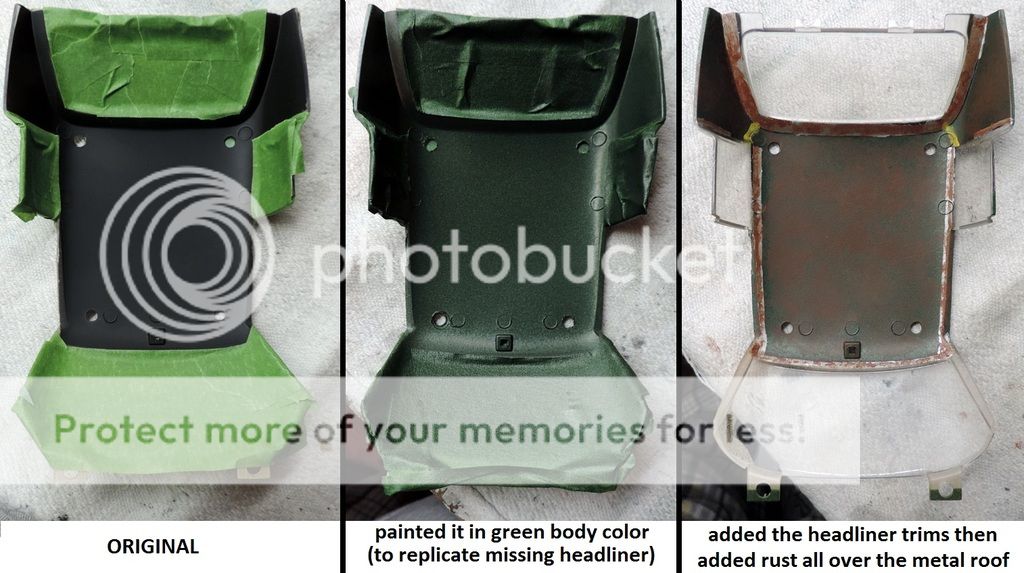
- now for the headliner, since there is no more on the real car, I had to replicate the roof being on bare metal with rust spots …
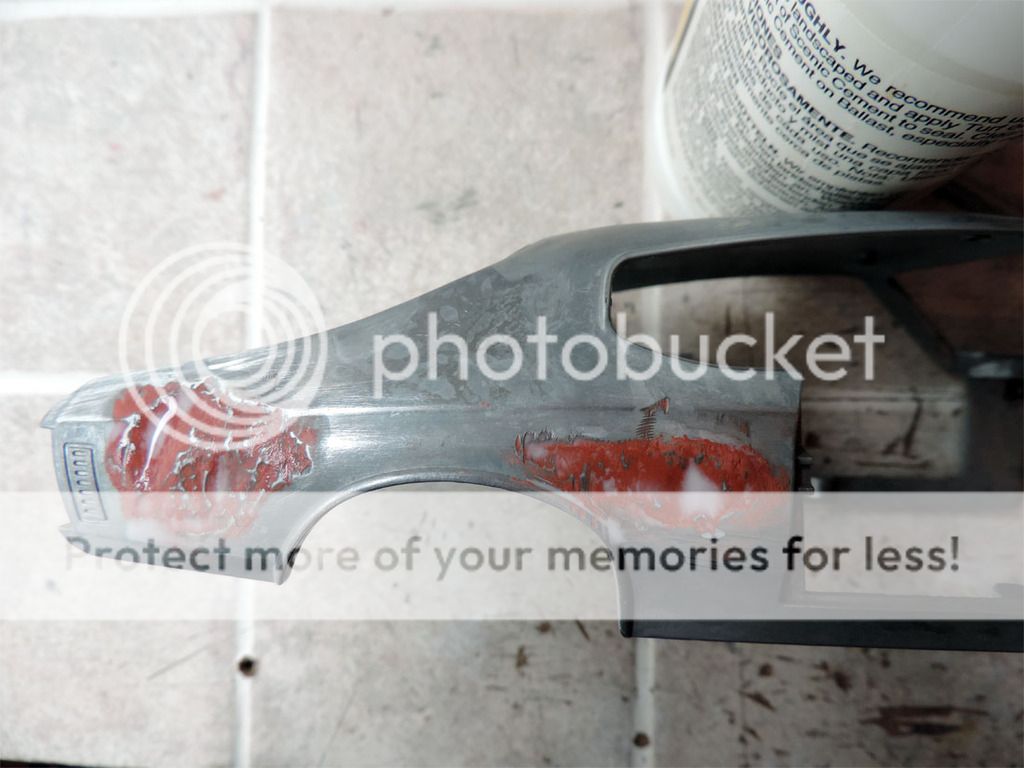
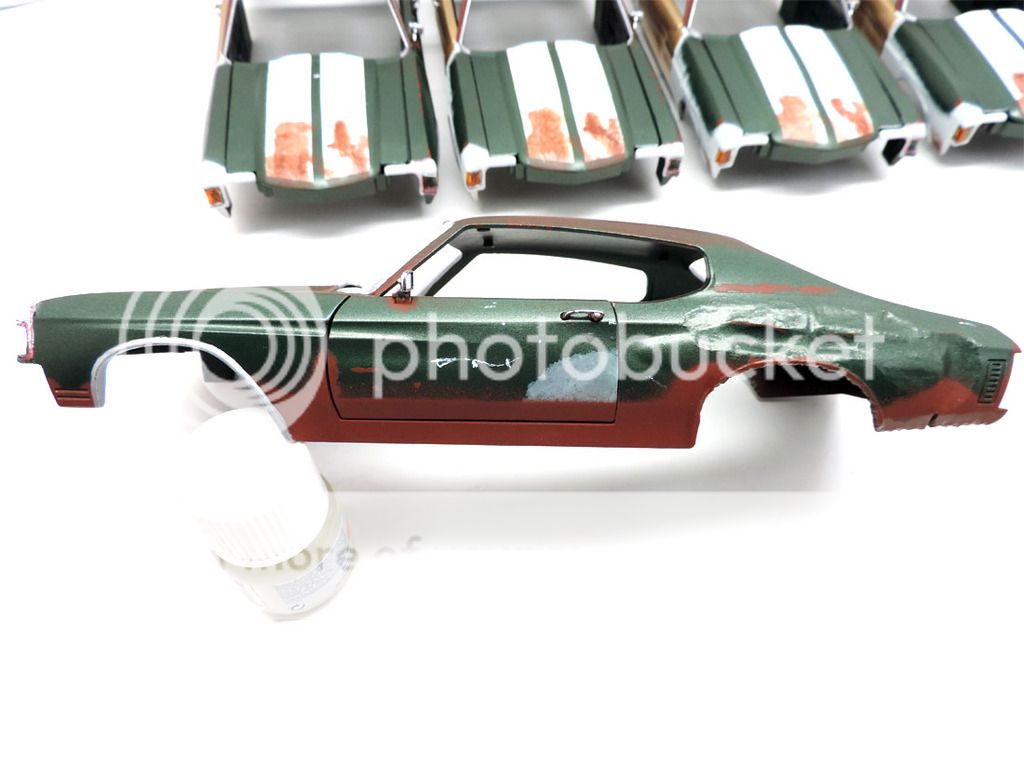
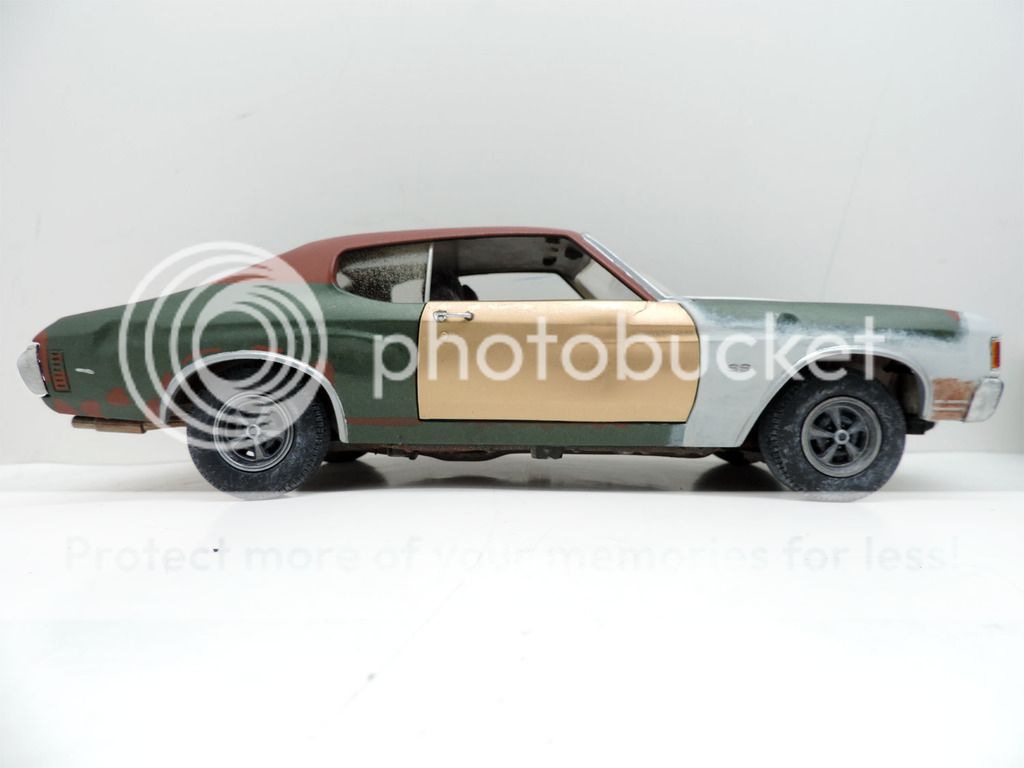
- sprayed body with red primer on driver's side, added white primer on driver's door ….. then a lot of body detailing :
a) rust spots
b) wheel well's chrome trims ... except for the rear driver side as it is on Bobby's car
c) windshield & rear glass chrome trims
d) rust around the inner door latches
e) white scratches on driver's door
f) red faded paint along fenders & trunk edges
g) big yellow spots on left side of rear glass (whatever those are??)
h) added rust spots over red primer areas (bottom of rear fender ... along junction of door & front fender ... around the rear wheel's arch)
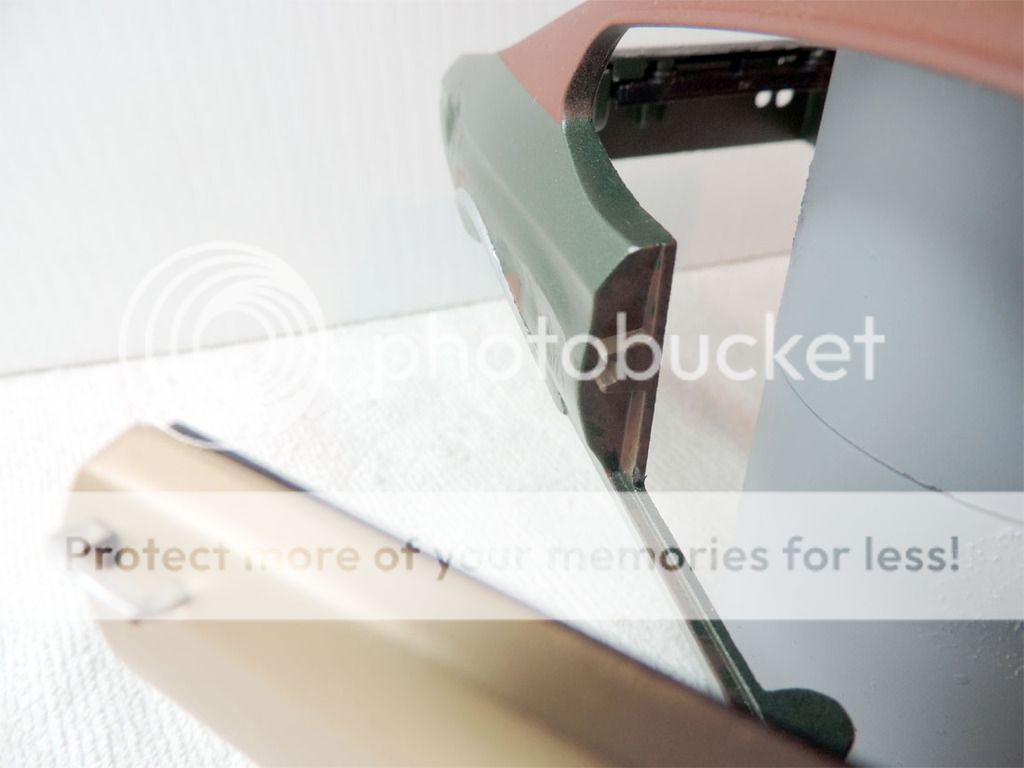
I) added rust at junction of rear fender and C-pillar
j) rust scratches on the driver's door
k) little red paint in the missing left front corner light location as on Bobby's car
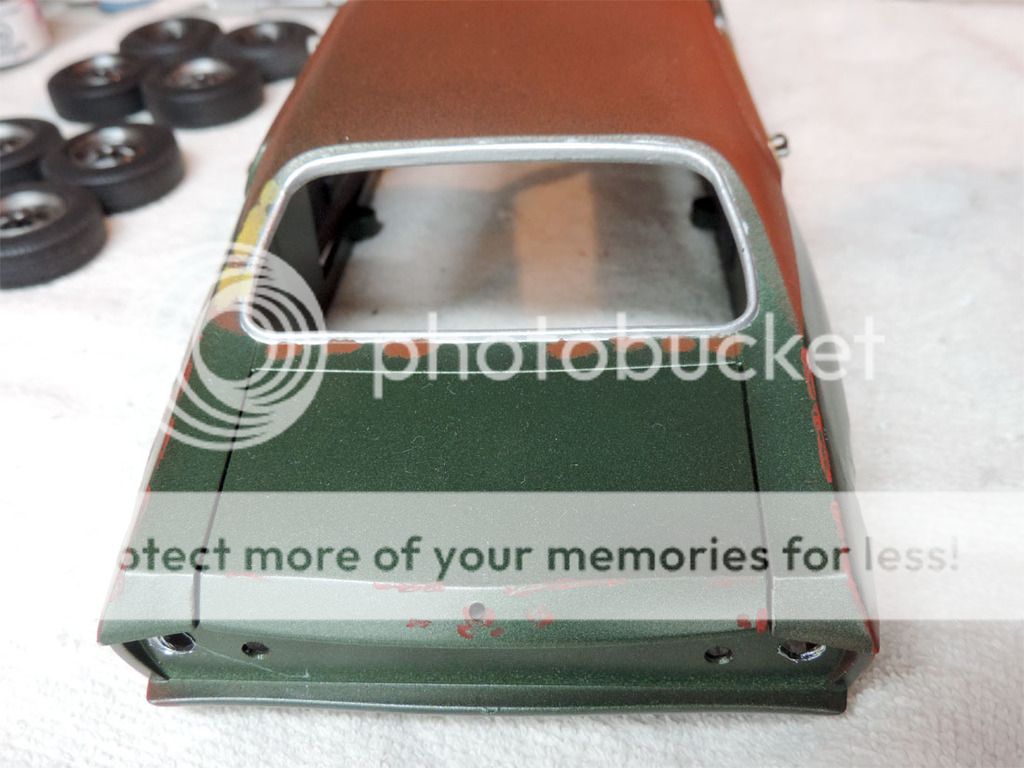
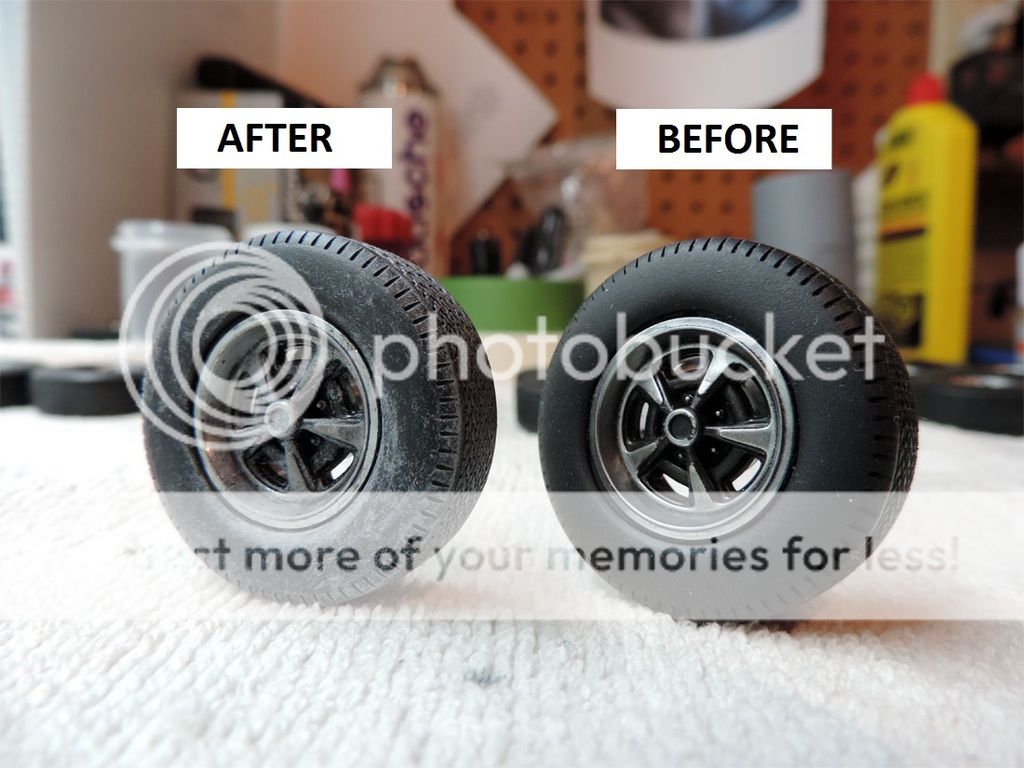
- made the 20 tires look old & dirty .... instead of black & shiny …
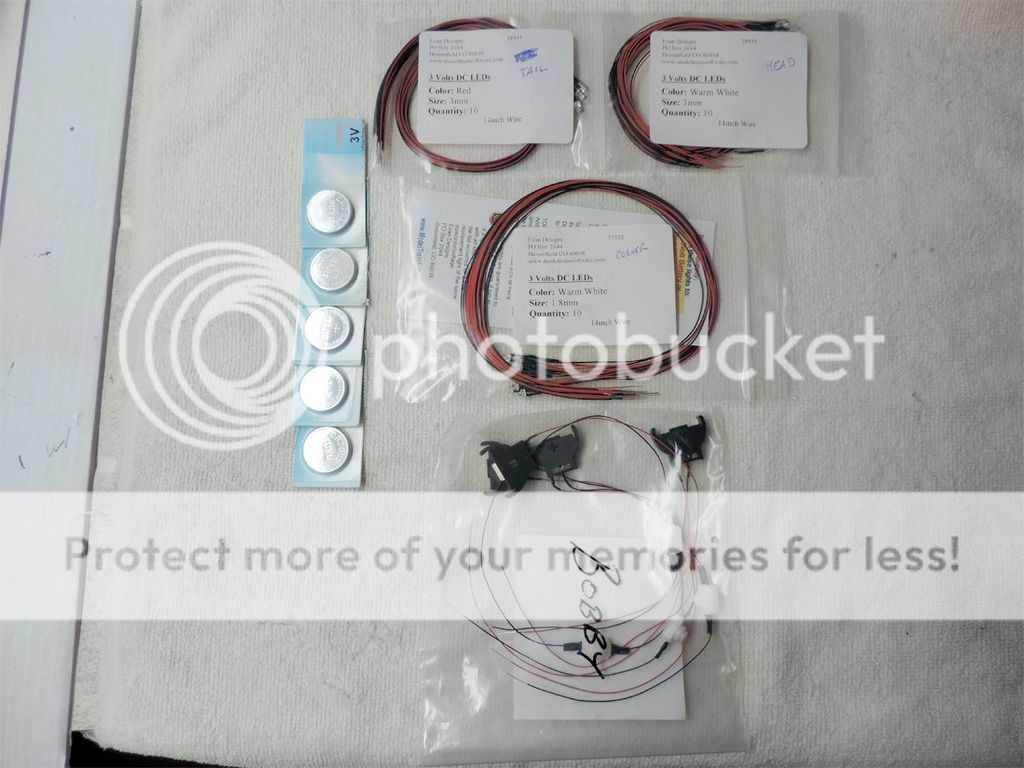
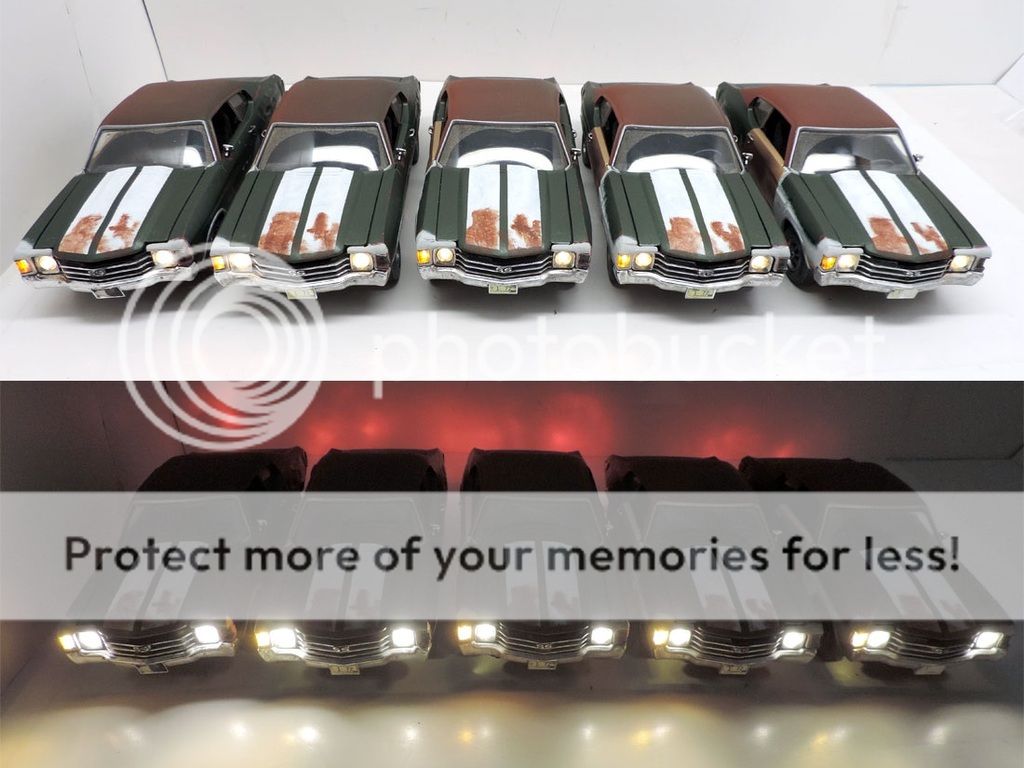
- prepared my LED lights wirings …
- drilled new holes in order to pass the wiring for rear LED lights …
- detailed the rear backup lights … and re-detailed front & rear bumper by white-washing them
- prep the rear panel for LED lighting : removed rear lights, drilled holes underneath them and LED test fitting ...
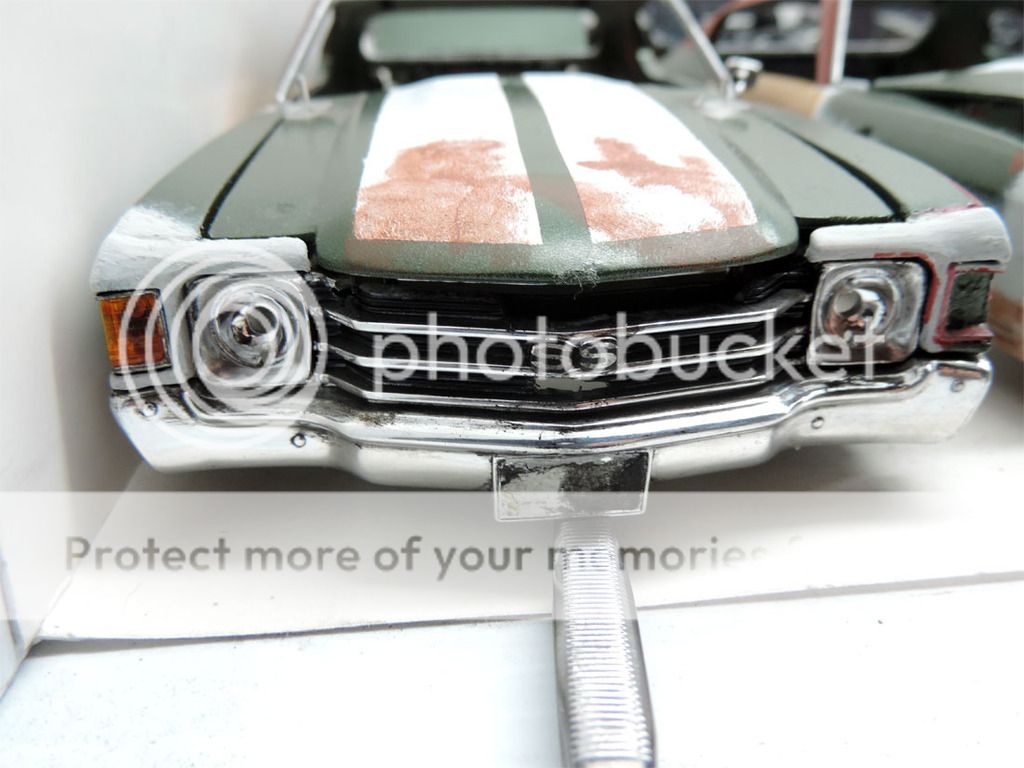
- prep the front facia for LED lighting : removed headlights, drilled holes underneath them and LED test fitting ...
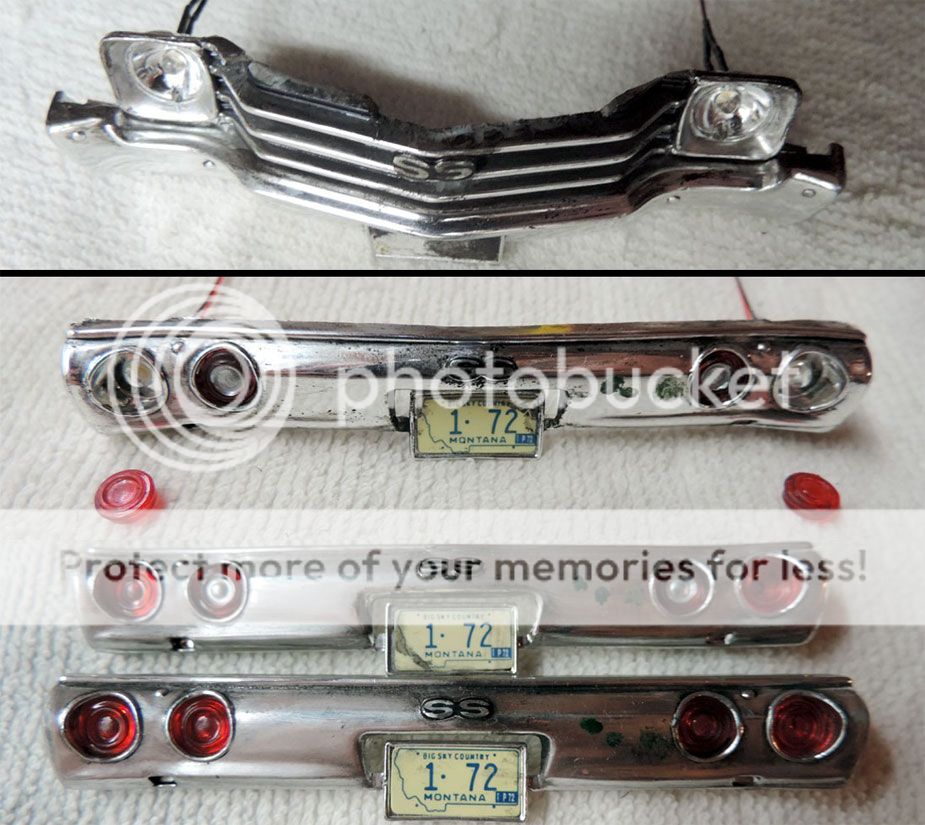
- installed the front right corner lights and prep them for LED … and final fitting test of 1972 front end on 1970 body
(Bobby's driver side corner light is broken/missing and no lightbulb in socket) …
- installed all the LED & battery wiring …
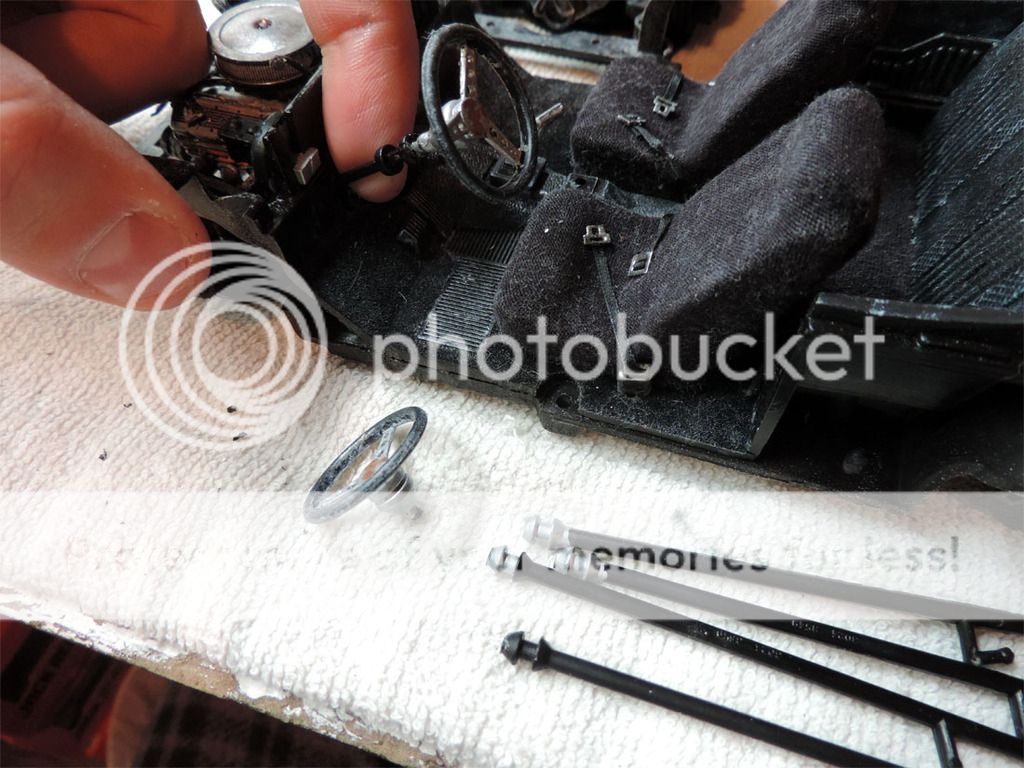
- cut steering columns of the old Bburago 57 Corvette and installed steering wheels on the Chevelle's columns …
- dab a coat of "matt gloss" , applied with tip of hard brush all over the car's body to replicate the damaged & faded paint …
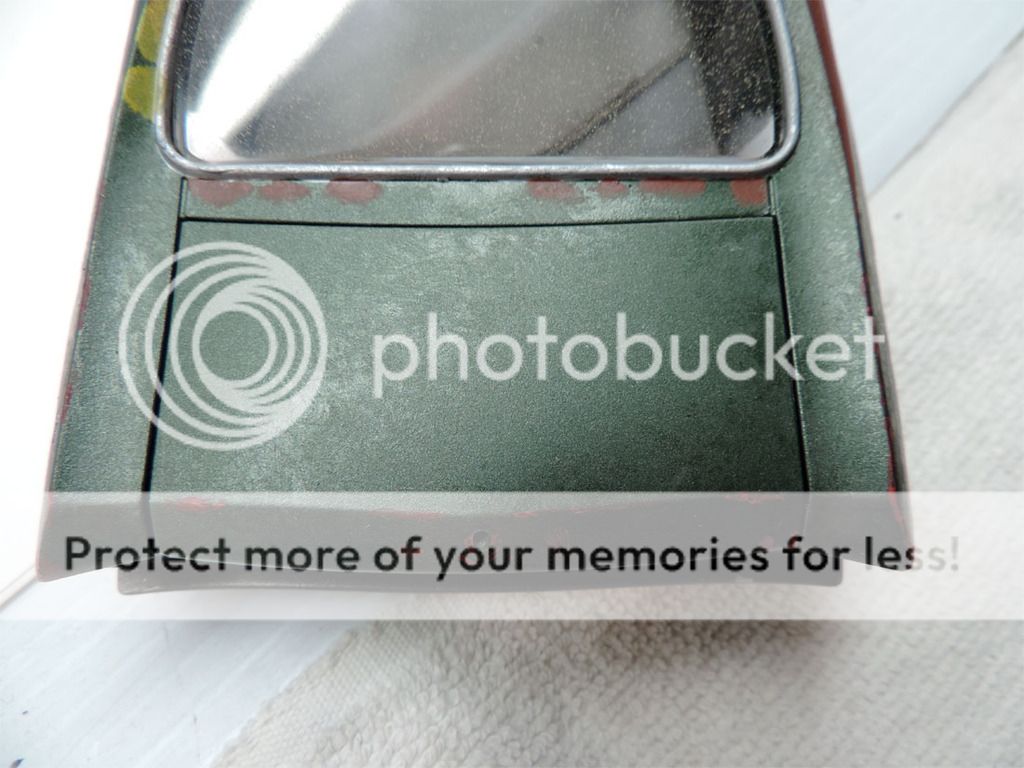
- painted the fuel cell …
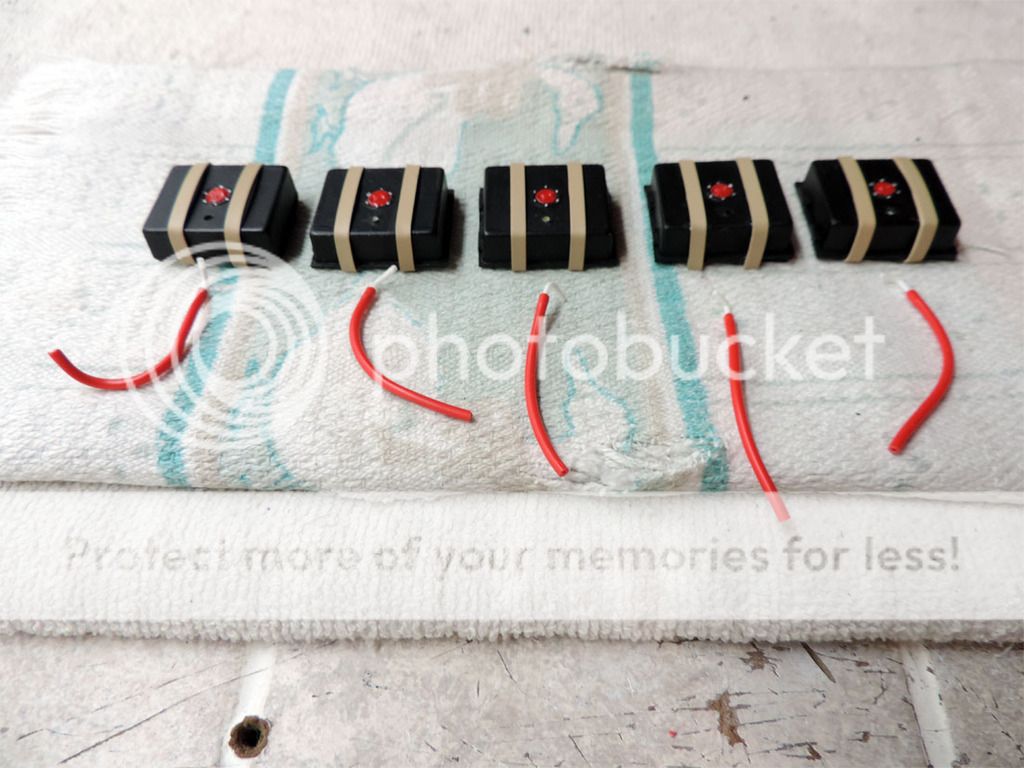
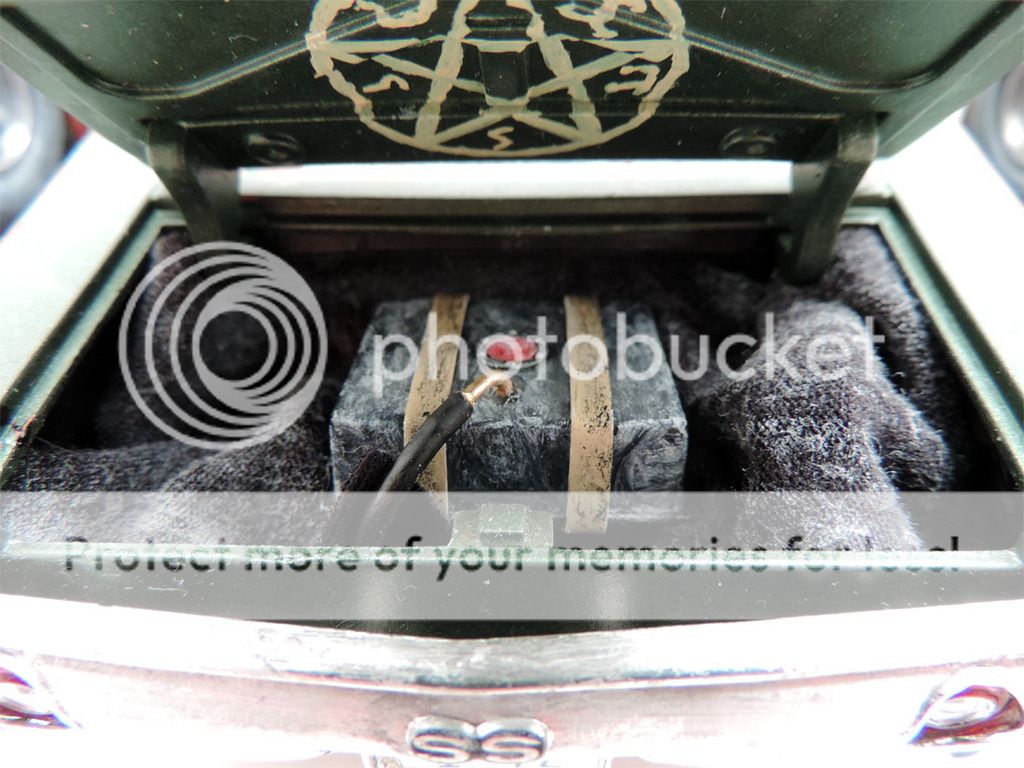
- made the retaining straps ... created and shaped the 90° brass connectors (using styrene) ... created the fuel hoses (using electrical wires) …
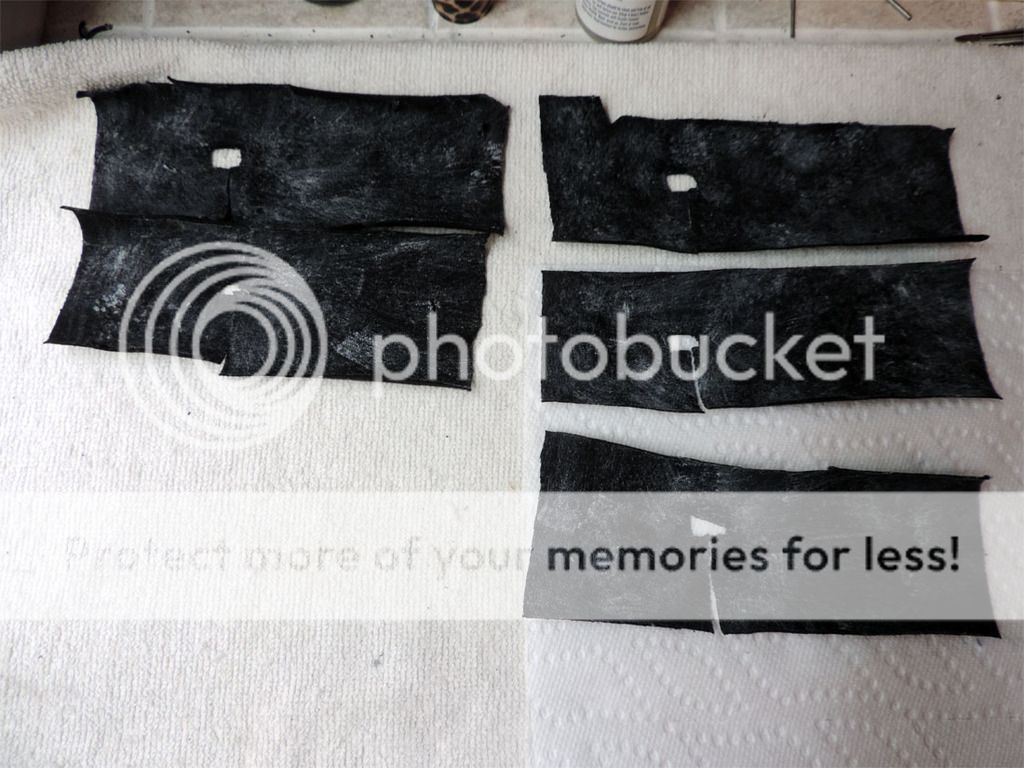
- used leftovers from seat covers fabric to replicate what ever fabric that is inside Bobby's trunk and gave it a dirty look
- painted the fuel hoses and connectors and gave them an old & dirty look
- installed fuel cells
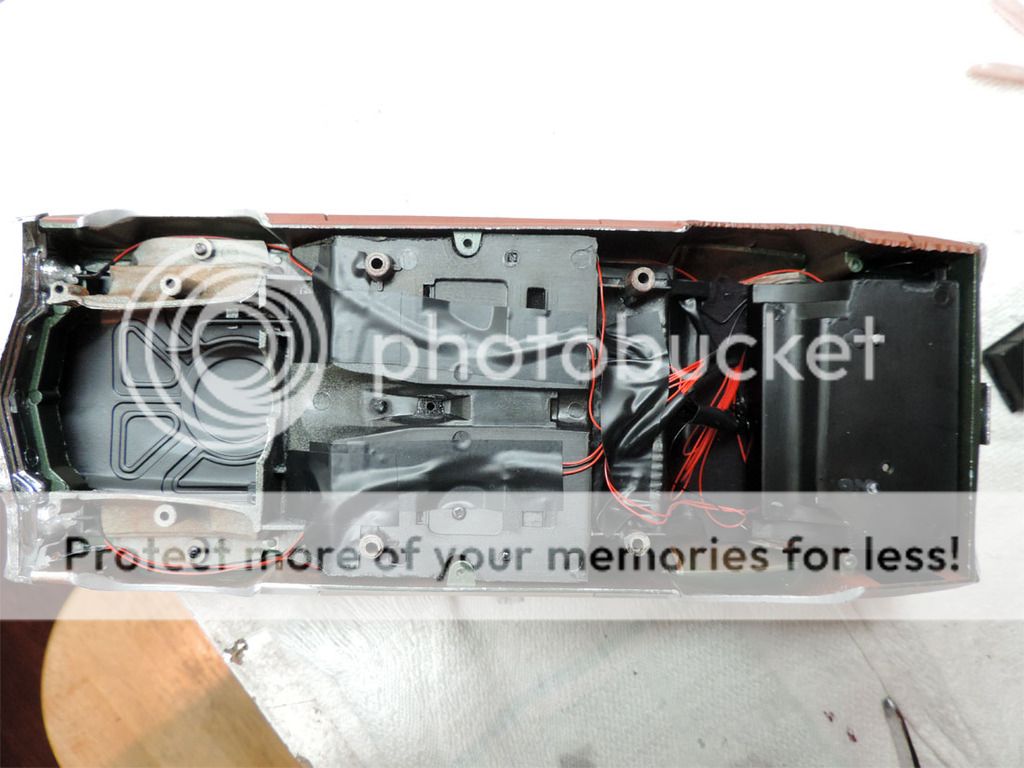
- installed off/on switches (left)
- cut a hole in trunk floors to make room for the battery connector (right) … BATTERY model #2032
- installed the trunk fabric ... so it covers the off/on switch and the battery

- assembled all undercarriages
- installed radiators and put the new batteries
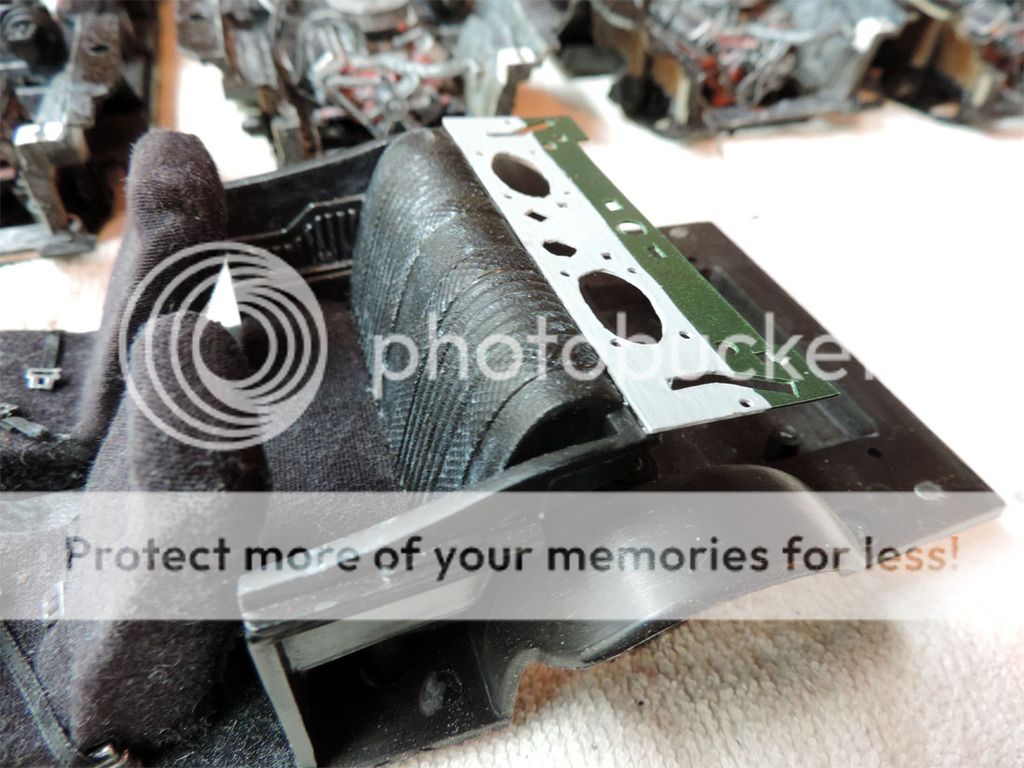
- reconnect the panels into the firewalls
- re-plugged battery cables , radiator hoses and master cylinder brake booster's hoses
- installed the 20 "new" wheels & tires … and put the "SS" logos on front fenders …
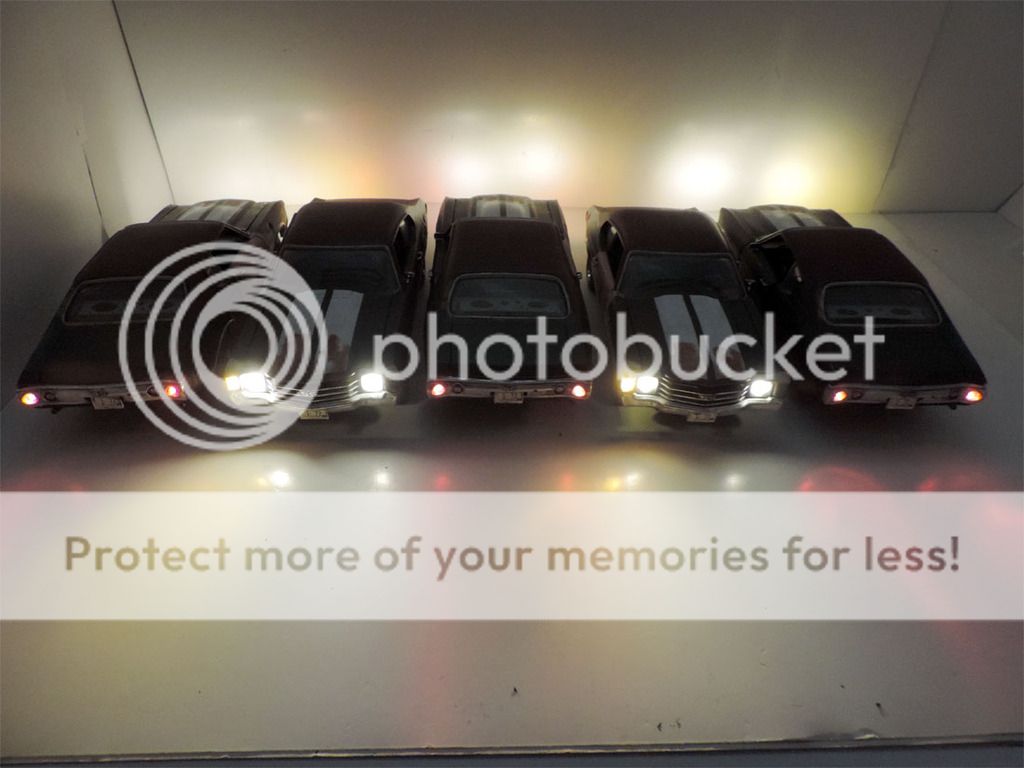
- final lighting testing

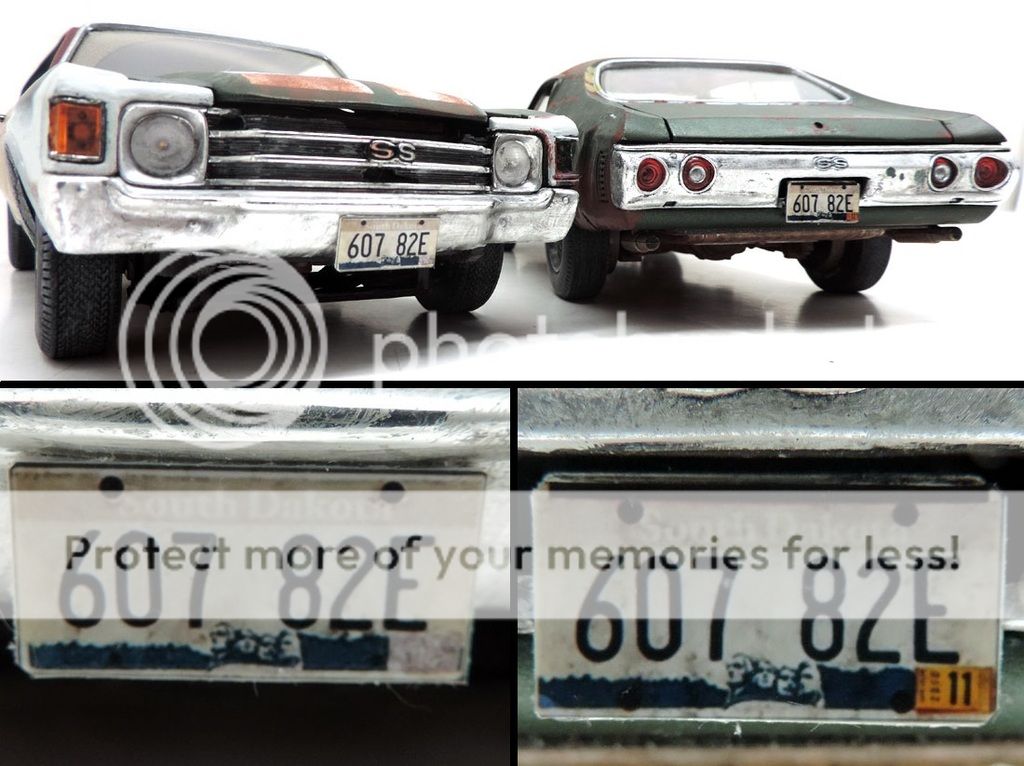
- put the licence plates on …
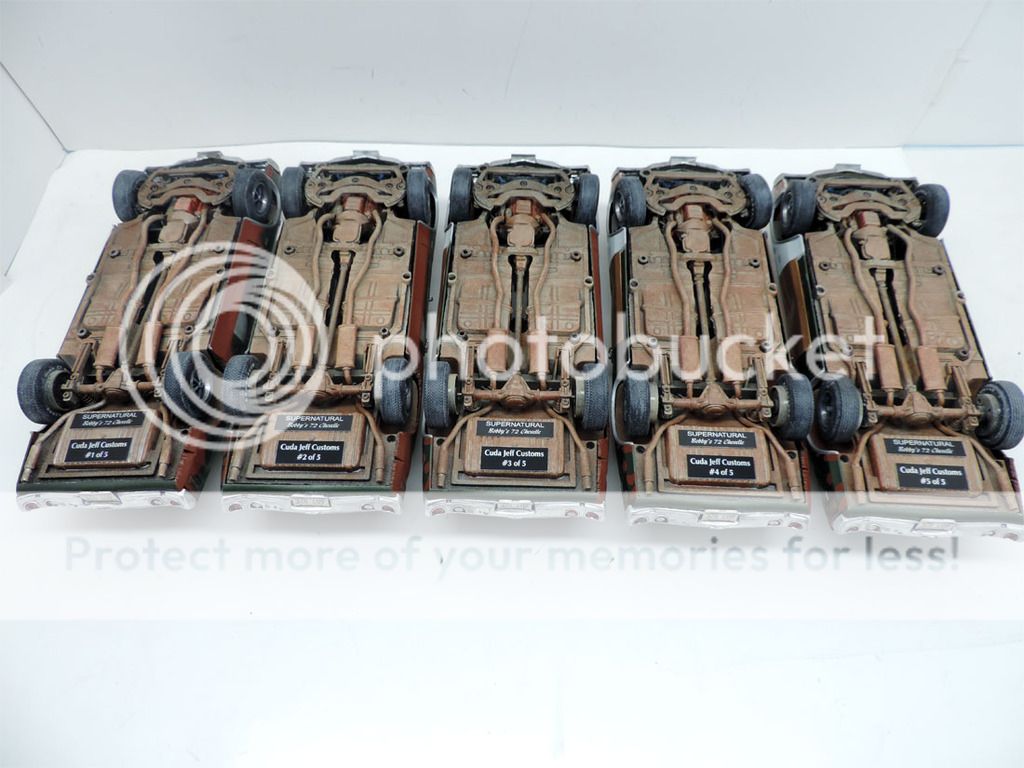
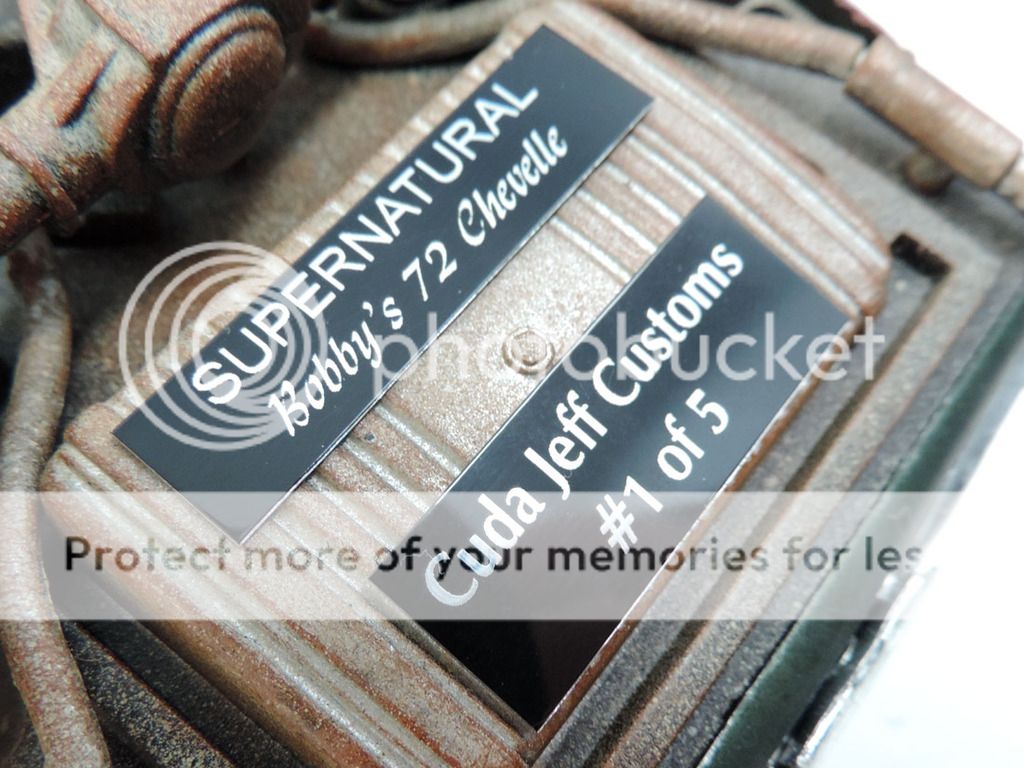
- put the final touch ... which certified that those Chevelle are truly "Limited Edition" of 5 made by Cuda Jeff Customs ... (me) …
... AND DONE!!!!
I hope you've enjoyed this "making of"
... and here's the final shooting :


... by Cuda Jeff's Customs
Year of model release : 2012
Year of customization : 2015
Based on item : 2015 Auto World #109
Hours to complete it : 160 (average of 32 hours per car ... yes I made 5 of those)

Distributor : Warner Brother / CW
Number of seasons : 10
Television premiere on : September 13, 2005
Last episode airing on : Show is still running ... renewed for season 11 & 12
Starring : Jensen Ackles, Jared Padalecki, Misha Collins, Mark A Sheppard, Jim Beaver
Synopsis : The show follows two brothers, Dean & Sam Winchester, as they hunt Demons, ghosts, monsters and all other supernatural beings in the world, behind the wheel of their 1967 Impala loaded with all kind of weapons.

Supernatural is one of my favorite TV Show since it's been on!
…. the story of how I got "trapped" into making these customs is quite interesting … here's all it all started …
Keep in mind that all of these littles stories are all connected to each other …

Greenlight already released the deceiving black 67 Impala last year … but has no intentions of releasing Bobby's 72 Chevelle … so I had this custom project sitting in one corner of my mind since the Impala has been out … but what was stopping me is the little fact that there is no 1972 Chevelle Hardtop made in 1/18 scale ... which is KIND OF a big problem!
Yes, some of you will say that Maisto did make the model … correct … well not so much … you see, Maisto did the convertible …. and they decide to make a crappy "hardtop" out of it, by simply removing the top booth cover and place a separate plastic piece consisting of the new windshield with top the body.
It was probably due to reducing production costs, instead of creating a new mold … but, it surely look odd with the huge gap that is all around at the junction of the top, trunk and rear fenders … it is so odd looking and since top is plastic, it would have given a very shitty look once completed , plus it doesn't really recreate the real roof line of the hardtop… and I'm too anal about details to just be okay with that!
Now …
Among my very good friends, there's a guy who lives in Kansas, his name is Rick Blevins ... he used to be on DX (Projectthx138) ... but hasn't logged in over a year ago.
To place him in this story, he's THE reference when it comes to cars, props, weapons, wardrobe, etc ... everything related to the Supernatural show. Why?
A - He's without a doubt, the biggest fan of the show
B - He's very close with the show production team and crew
In fact, my good friend also builds true replicas of the famous 67 black Impala and the last one he built for one of our "Supernatural Sister" (Stefany) , was used in season 9, episode 20, that was filmed in Chicago last year, the only episode that was filmed in USA ... that episode had to be filmed in the windy city because it was serving as a springboard to launch a new series , a spin-off, of which the story was setting in Chicago.
Rick's quality of work is so perfect, that the production team asked him if it was possible to use the car he built for our common friend, Stefany. Since the show is film in BC, Canada … having to transport the couple of Impalas they use on the show ... PLUS ... all the weaponry the Winchesters have in their weapon box, stashed in the trunk of their car … Customs would have been a real freaking nightmare!!!
And since my friend Rick has all the real replicas of all the weapons they did used on the show since the very first episode … the production just told him which weapons they would need for this one ... so they filled up the weapons in the Impala's trunk, got the car in a close trailer and him, Stefany and her boyfriend went to Chicago, all paid expenses for 4 days and got to be on the set and meet with the cast and crew AND NOW, she has a studio certification that proves that her car is now a screen-used Impala! THAT IS SO FREAKING COOL FOR HER!!!
So getting back to my little Chevelles project now ...... a few months later ...
Rick and I, we called each other once or twice each week. And during one of these calls, I put myself into trouble because, my huge cakehole and I, made the mistake of mentioning that I was THINKING about the POSSIBILITY of MAYBE EVENTUALLY , make Bobby's Chevelle ... now that wasn't a smart move from my part, especially telling that to someone who's an even bigger crazy fans then I am. LOL
Now guess what happened ...
The next phone call he gave me a few days later, he told me that he had told 3 of his friends about my, possible, next project … and those 3 friends of his were not any average Joe

- Jeff Budnick : (creator of the real 67 Impala that is on the show and he's the owner the real Chevelle that Bobby drives. Jeff is also the guy who's in charge of all the cars on the show from the beginning in 2005) …BTW, the reason why the replicas that Rick is building, are the most faithful replicas you can find, it is because they're' all built according to the original specs, measures and details of the real true car of the show, provided by Jeff Budnick himself ... which is also why the production did not hesitate to use the car he built for the episode in Chicago.
- Eric Kripke : (Supernatural's creator - also executive consultant , writer , executive producer & showrunner) ... (although I think it is going to him, but with my memory problems due to chemo treatments, I remember my friend telling me about him in this project but I'm not sure anymore if it's Kripke or someone else from the show)
- Jim Beaver : (actor who plays Bobby Singer in the series, the Chevelle is its character's car)
Those guys are all cars nuts like us, they have seen all the previous 21 movie/tv customs I've made ... because my buddy have share every one of my custom links with these guys …. And after seeing my Dumb & Dumber van, they convinced him, to convince me, to make one for them too!!
Gotta tell ya, at first I wasn't very happy about the situation, I felt trapped with the obligation to accept

And my friend is doing so much for me since January 2014 (things I cannot talk about yet), so I just couldn't say no to him .... and by doing so, I had to say yes to the 3 other guys ... but to know that 3 of those cars, would go to those 3 guys , made me quite nervous!!

As for the other 2 cars, of course I was building one for me and the other one was for my Supernatural Brother, Rick.
So, from then on, I've been officially commissioned to make 5 custom models of the same Star Car ... 5 models of a car that doesn't exist in 1/18 scale … I just had to get my mind wrapped about how to get out of this mess by finding solutions to make that possible! Can you imagine the difficulties I was facing regarding this project??
... and I knew I needed those models to be the best accuracy possible ... as, of course, all my customs are … but those needed to be the best work ever I could do ... because among those 5 cars, 3 are actually going to people that I surely didn't want to disappoint!
So you can understand the pressure I had on my shoulders to make those cars has perfect has they could be! ... my reputation as a customizer was on the line!!!
And as a MEGA FAN of the show, I SURELY don't want to disappoint them IN ANY WAY!
So that was it for the stories behind the built … hope you found the story interesting!

Now what I like about making a new custom is that I'm improving my skills on some work I've done on other models ... and trying something new on others. For instance, for these models :
- Create a year model that doesn't exist in 1/18 form yet, so I had to cut, replace and weld parts from one model onto another on … x5
- Creating new parts
- damage body parts by recreating dents … man that was something!!!
- make a multi-color car
- make decals
- create an aged-look on the entire car, inside & out
- make all the same steps x5 .... it was the very first time I was making more than one of the same custom model, and by doing so, making them for customers and getting paid for.
So as I usually do with all my customs, here's the "making of", of those very complicated creations …
I hope you'll find it interesting
Here's the pictures now ...
Please keep in mind that pictures NEVER does justice to what it really looks like for real ... also, lighting in my work place is very shitty for taking pictures
As for every custom I make, I had to find movie references and do many movie screengrabs ... for the very first time, I couldn't be more better serve for this project has the real owner of the car, that is used on the show, Jeff Budnick, sent me about 50 pictures of every freaking details I asked about … and those are details that NOBODY else has seen beside the show crew & cast. So I feel privileged to be able to have those pictures from THE GUY himself!

I started my project by deciding which Chevelle was going to use, to be my main car to transform into a 72 Chevelle.
So I chose to use the Auto World Jack Reacher 1970 Chevelle. Basically, 70 & 72 year model are sharing the same body, only the front is different … and of course, the rear bumper/light panel.
I did some testing with many other 70 Chevelle that were made in 1/18 scale, but there was always something that didn't fit to match the front end of the Maisto 71 model … I took the Jack Reacher version because it was the best match.
But as you can see, as in many TV show like Dukes of Hazzard, many Chevelles were destroyed during the process as I needed 5 different cars to make 1 Chevelle :
- Auto World 1970 Jack Reacher model that I was transforming into the 1972 Bobby Singer car
- Maisto 1971 Chevelle (vinyl top version) for front ends & corner lights which are different from the convertible
- ERTL 1970 Baldwin Motion for the T-Shifters
- Bburago 1957 Corvette for the steering wheels models (cars are not showing as I only got the steering shipped)
- Maisto 1970 Nova SS for the round chromed air cleaners
So the first step was to completely disassemble the 10 cars (5 Jack Reacher + 5 Maisto) ... plus gather the parts I needed from others donnors (Baldwin's shifters ... Nova's air cleaners ... Corvette's steering wheels ... GMP Pontiac wheels ... etc)

- then cutting 10 front ends off ... from the five 72 Maisto and the five 70 Jack Reacher …


- recreating "bad shape" Bobby's front grill of five 72 grills …

- denting five 72 passengers doors …

- removing trim from driver side, rear wheel arch and recreating "ate by rust" arches trimming …

- now one of the parts that scared me the most to do was to figure out how to dent a diecast. Because Bobby's car is a turd, a junkyard car … and it's in a VERY bad shape. Only I didn't know how to dent fenders because metal is very thick.
So I thought about grinding into the metal … so I did some testing on a dummy model … now the results weren't satisfying me because we clearly could see the grinding marks …

... so I thought of a solution and it worked! .... the first step remains the same : creating dents on five 70 Chevelle by grinding in the body panels …

- then simply smooth the grinding marks by sanding them with my dremel, until a smooth finish … that's it …

- now stripping the models from their paint , that meant 30 parts : bodies, hoods, trunks, both doors, front ends …


- then some putty body work and finish with use of liquid cement to correct badly damaged dents …

- fill up holes of hood pins … and trimming hood's edges on both side because in order to make the 1972 front end to fit on the 1970 body, I had to lightly bend the front fenders by pulling them in a little … it's invisible to the naked eye, but it resulted, of course, that the hood weren't closing properly anymore … so a little bit of trimming was needed

- drilling holes in trunks to replicate Bobby's missing trunk key lock … then primer stage …

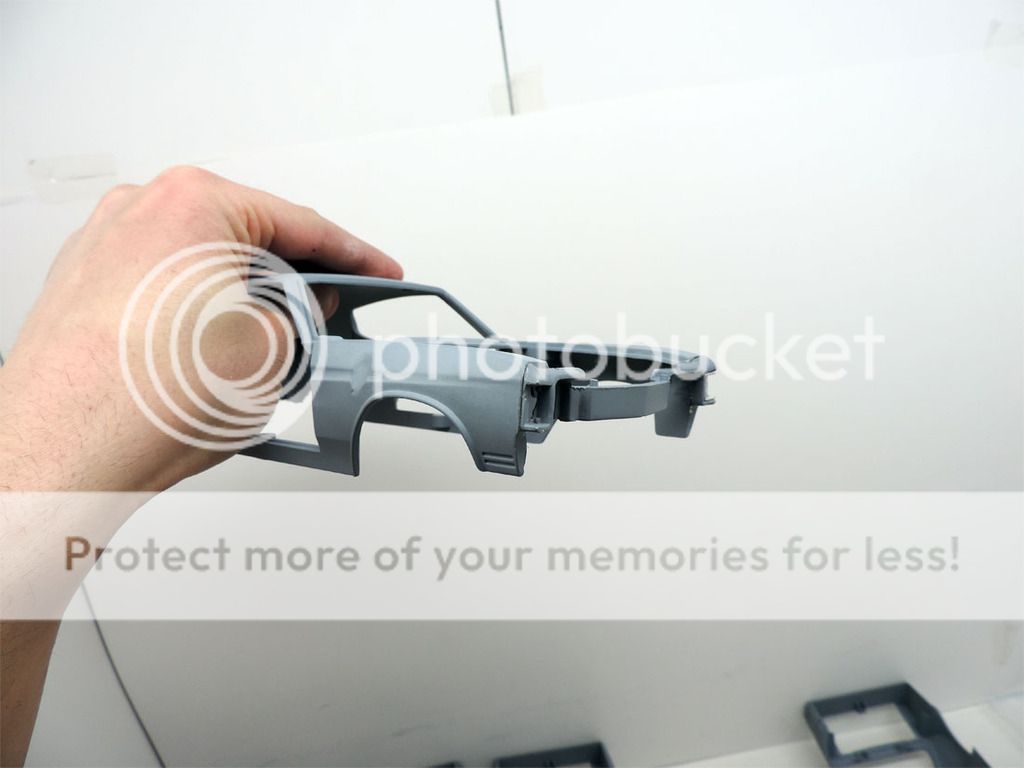
- installed the front '72 front ends on '70 bodies …

- painted the hood's underside in black …

- made guidelines to paint the dual stripes … now on Bobby's car, the stripes are badly painted, they seems to have been done with a paint roller … and the green paint underneath is still showing through on some places.
So I really wanted to recreate that look, so I used a small sponge paint roller to paint the stripes …

… so now it looks exactly like Bobby's hood …

- then I've painted all 30 parts to true original '72 Chevelle green factory paint ... except for the passenger doors which are gold …then I've painted the Demon's Traps on all trunk lids, in original Buckskin paint color, just like it is on the show car …

- transmission has been changed from automatic to manual T-Shifter …

- Bobby's front seats has covers on them … so is the rear bench … so I did them, make the whole interior look dirty & dusty … and replaced the seatbelts … all 5 cars has the seatbelts placed in 5 different position to make them unique to each other …


- tops has been primed to rust color primer, with a gradient of paint from passenger side fading on to driver side …


- now all parts are painted …

- all chrome parts has been black-washed to remove shine and make it look like old unrestored chrome … also black-washed the entire engine on the 5 cars to give them a "not taking care of" look ... which recreated oil leaks under the engine and transmission … also black-washed the entire exhaust line …


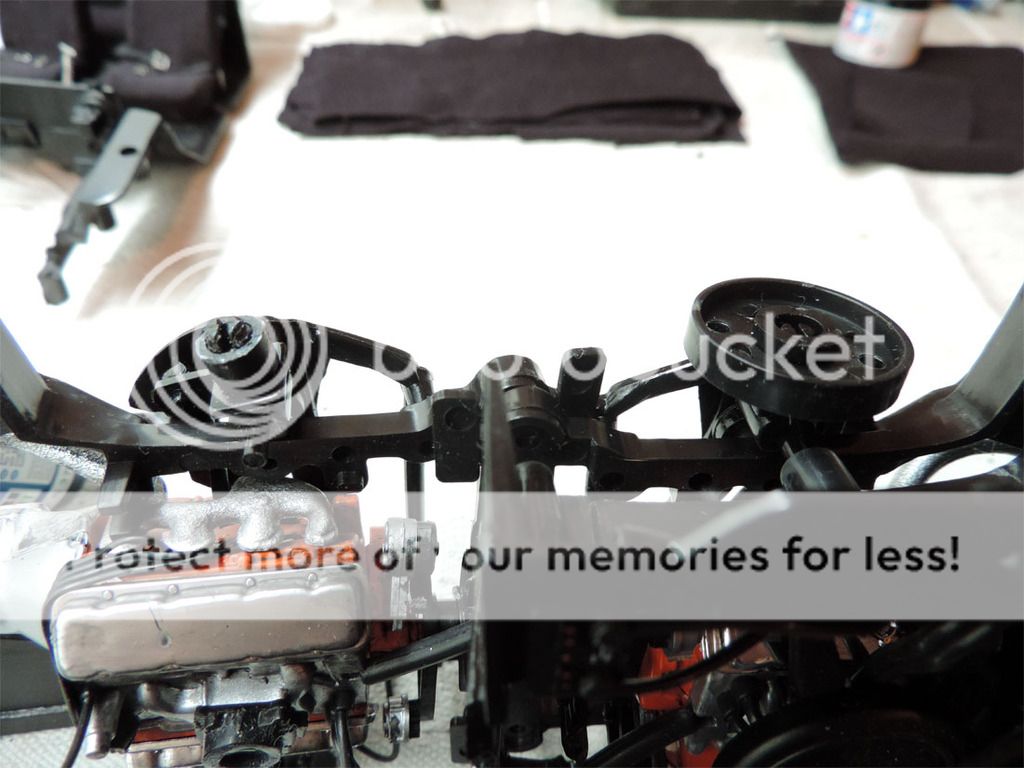
- figured a way to make the engine and engine bay looks like it's really dirty & dusty … just like the real car is …

- here you can see the original engine (Jack Reacher) … and the Supernatural one, once done …

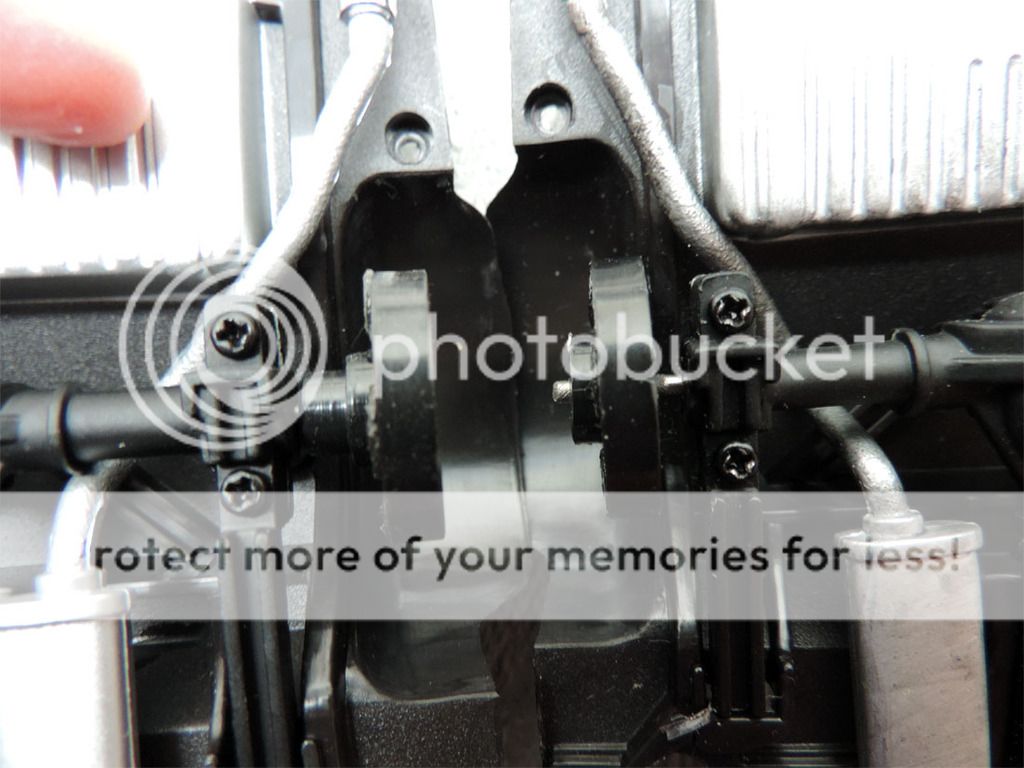
- figured out a way to attach the new Pontiac wheels to the model ... which was really problematic!!!
For the rear wheels, I just flip over the attachments …

… for the front wheels, I couldn't free the attachment disc from pins … so I had to gently cut through and remove the disc completely, only keeping the hub …

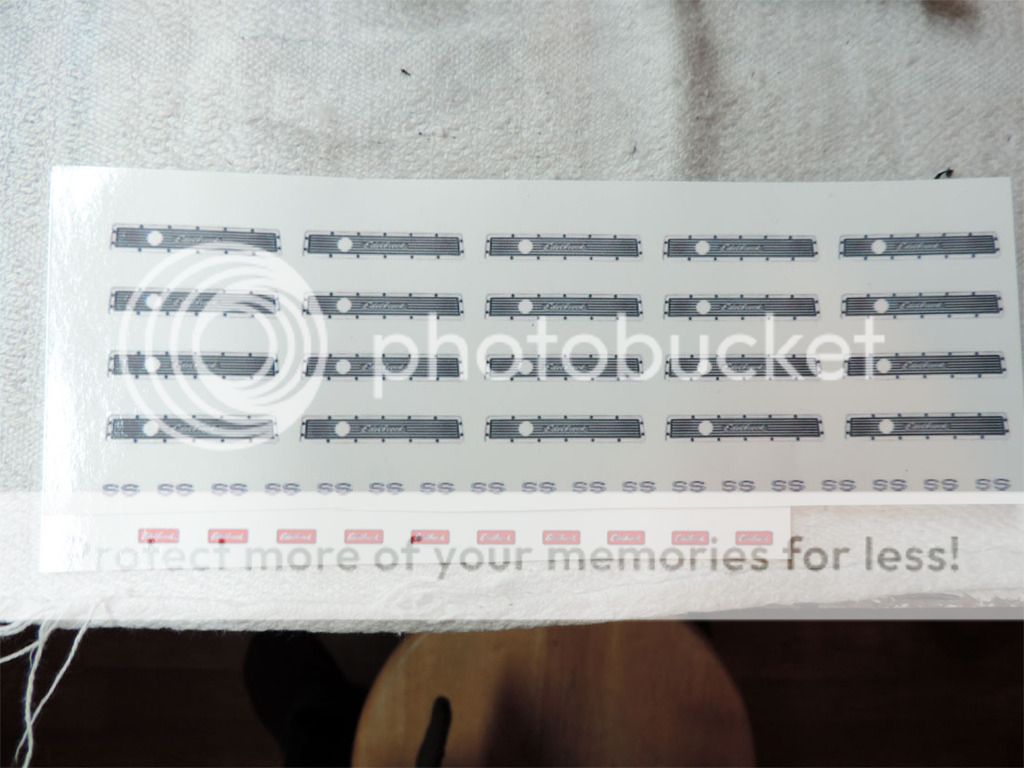
- then I found the images I needed to print to make my models … so I needed 3 decals which I had one of my contact to do since apparently, I'm too dumb to figure out how to do them myself
"SS" fender logos … "Edelbrock" red stickers for the radiators … "Edelbrock" Valve covers

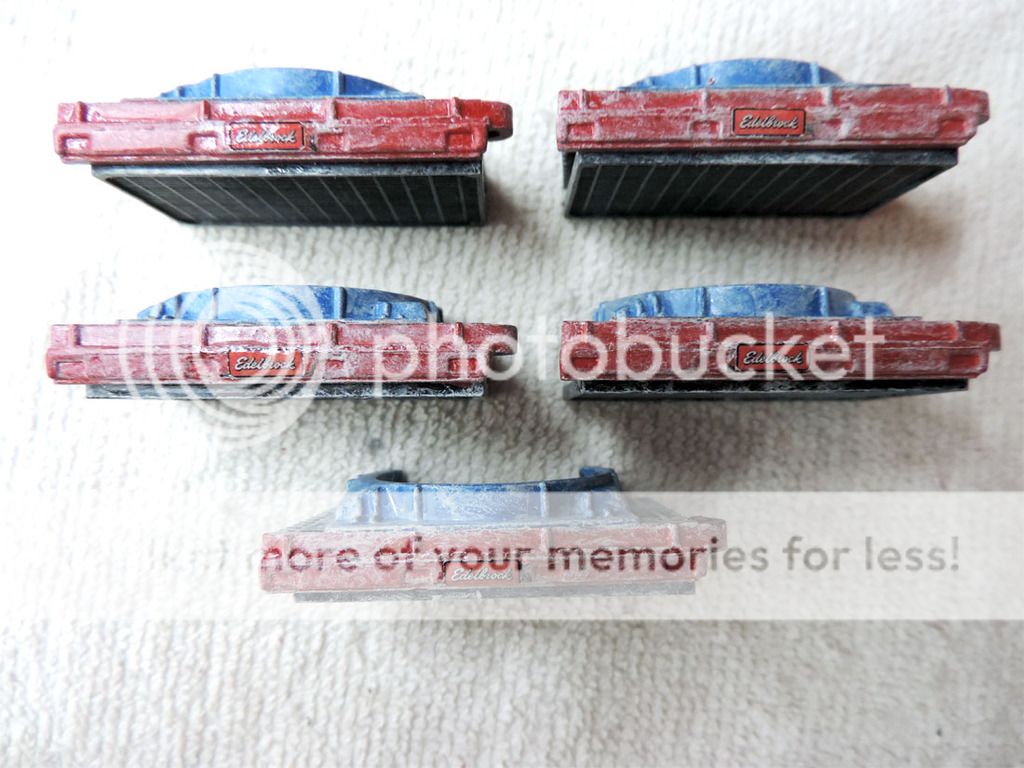
- radiators has been painted … then put the red "Edelbrock" stickers on the top of it … then gave it that dirty & dusty look to match the one in Bobby's car …

- put the "Edelbrock" valve cover decals to replicate the ones on Bobby's …


- I gave the whole interior an old dirty & dusty aged look ...


- erased the tag in the windshield's corner using nail polisher remover …

- designed the dirty window template on paper , then on hard plastic , replicate the part on masking tape , cut around and peel excess , applied cut tape to windshield …

- using the buckskin paint can, I sprayed from far away, the fume on the windshield to replicate a very dusty glass ... sprayed paint made a light fume to side windows and rear glass as expected and as desired (less dust then front) ...


- Then it was time to replicate an old dirty undercarriage. So here are the steps :
1- original / untouched
2- blackwashed all undercarriages to replicate old metal parts
3- sprayed buckskin paint to replicate dust
4- added a very light brownish rust paint color coat with tip of fluffy paint brush all around to replicate rust all over
..... then finished by adding another little coat of sprayed buckskin paint from far away to add a dirty coat over rust effect

- painted the steering wheels to correct colors and add a little rust effect in the middle …

- created, painted and installed the trays behind the rear seat …


- now for the headliner, since there is no more on the real car, I had to replicate the roof being on bare metal with rust spots …

- sprayed body with red primer on driver's side, added white primer on driver's door ….. then a lot of body detailing :
a) rust spots
b) wheel well's chrome trims ... except for the rear driver side as it is on Bobby's car
c) windshield & rear glass chrome trims
d) rust around the inner door latches
e) white scratches on driver's door
f) red faded paint along fenders & trunk edges
g) big yellow spots on left side of rear glass (whatever those are??)
h) added rust spots over red primer areas (bottom of rear fender ... along junction of door & front fender ... around the rear wheel's arch)
I) added rust at junction of rear fender and C-pillar
j) rust scratches on the driver's door
k) little red paint in the missing left front corner light location as on Bobby's car


- made the 20 tires look old & dirty .... instead of black & shiny …

- prepared my LED lights wirings …

- drilled new holes in order to pass the wiring for rear LED lights …

- detailed the rear backup lights … and re-detailed front & rear bumper by white-washing them
- prep the rear panel for LED lighting : removed rear lights, drilled holes underneath them and LED test fitting ...
- prep the front facia for LED lighting : removed headlights, drilled holes underneath them and LED test fitting ...

- installed the front right corner lights and prep them for LED … and final fitting test of 1972 front end on 1970 body
(Bobby's driver side corner light is broken/missing and no lightbulb in socket) …

- installed all the LED & battery wiring …

- cut steering columns of the old Bburago 57 Corvette and installed steering wheels on the Chevelle's columns …

- dab a coat of "matt gloss" , applied with tip of hard brush all over the car's body to replicate the damaged & faded paint …

- painted the fuel cell …

- made the retaining straps ... created and shaped the 90° brass connectors (using styrene) ... created the fuel hoses (using electrical wires) …

- used leftovers from seat covers fabric to replicate what ever fabric that is inside Bobby's trunk and gave it a dirty look

- painted the fuel hoses and connectors and gave them an old & dirty look
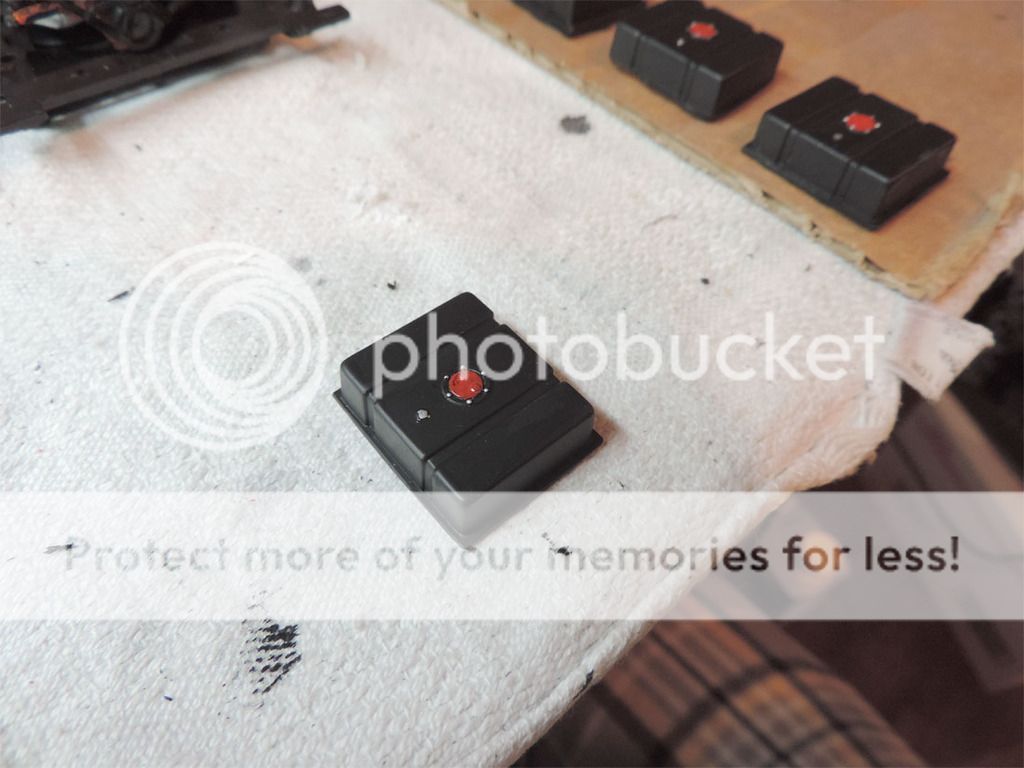
- installed fuel cells
- installed off/on switches (left)
- cut a hole in trunk floors to make room for the battery connector (right) … BATTERY model #2032
- installed the trunk fabric ... so it covers the off/on switch and the battery


- assembled all undercarriages
- installed radiators and put the new batteries
- reconnect the panels into the firewalls
- re-plugged battery cables , radiator hoses and master cylinder brake booster's hoses

- installed the 20 "new" wheels & tires … and put the "SS" logos on front fenders …

- final lighting testing


- put the licence plates on …

- put the final touch ... which certified that those Chevelle are truly "Limited Edition" of 5 made by Cuda Jeff Customs ... (me) …


... AND DONE!!!!
I hope you've enjoyed this "making of"
... and here's the final shooting :


